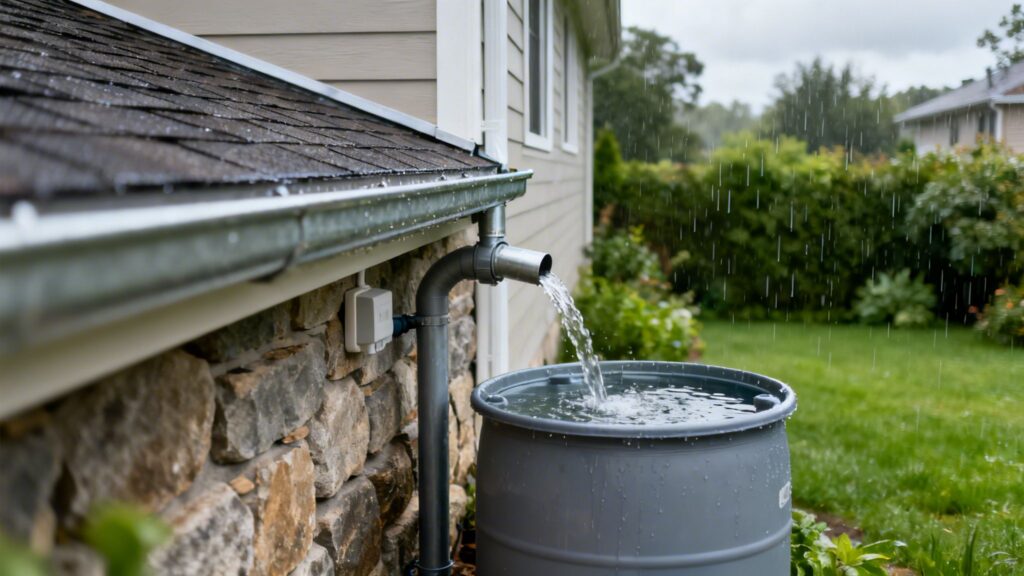
A basic rainwater collection system is simpler than you might think. It boils down to three parts: catchment (your roof), conveyance (gutters and pipes), and storage (barrels or tanks). The goal is to capture runoff, filter out the big stuff like leaves and twigs, and keep that water on hand for non-potable uses like gardening or emergency sanitation.
Why Rainwater Collection Is a Preparedness Essential
Picture this: a bad storm rolls through and knocks out the power grid for a week. No big deal at first, but then you realize the municipal pumps that deliver your tap water aren’t working. Suddenly, the only water you have is what’s in a few bottles in the pantry. This isn’t some far-fetched doomsday plot; it’s a real scenario that exposes a major vulnerability in our modern lives.
When the grid goes down, self-reliance isn’t just a nice idea—it’s what keeps your family safe and healthy. This is where knowing how to build a rainwater collection system goes from a weekend hobby to a core pillar of your emergency plan.
The Shift to Water Self-Sufficiency
For most of human history, people relied on the rain to survive. We’re just getting back to basics, and for good reason. It’s about more than just trimming your water bill; it’s about securing a vital resource when the systems we depend on fail.
A well-designed DIY system gives you a decentralized water source that you control. This harvested water is perfect for a ton of non-potable needs during a crisis:
- Sanitation: Flushing toilets when the city water is off is a huge morale booster.
- Hygiene: Having water for washing hands, clothes, and dishes.
- Gardening: Keeping your victory garden irrigated during a drought.
- Emergency Reserves: Water for pets, cleaning, or anything else you might need.
When I built my first system, it taught me a valuable lesson: this project is about more than just water. It’s about the peace of mind that comes from knowing you have a backup. It turns your home from a point of dependency into a resilient stronghold.
Understanding the Core Components
Every rainwater harvesting setup, from a single 55-gallon drum to a massive cistern, works on the same three principles.
First, you have the catchment area—usually your roof. Next is the conveyance system, which is just a fancy term for your gutters, downspouts, and pipes that move the water where you want it to go. Finally, you have the storage component, which is typically a food-grade barrel or a larger tank.
Many preppers take it a step further by integrating tools like a WaterBOB, an emergency bladder that turns a bathtub into a temporary 100-gallon reservoir for treated drinking water. While your rainwater system is mainly for non-potable uses, having tools like this creates a layered strategy for both drinking and sanitation. To dig deeper into this, check out our guide to building a 72-hour water plan.
This guide is here to reframe rainwater collection from ‘a neat eco-project’ to ‘an essential asset for self-sufficiency,’ giving you the actionable steps to secure your family’s water supply, no matter what happens.
Calculating Your Water Potential and Planning Your Site
Before you buy a single fitting or cut a piece of pipe, the most important work happens with a notebook and a calculator. A successful rainwater harvesting system isn’t just thrown together; it’s designed with purpose. This initial planning phase is what ensures your setup is perfectly sized for your needs and captures every possible drop.
First, let’s look at your primary collection surface: your roof. The material makes a huge difference. A smooth metal roof is incredibly efficient and can have a runoff coefficient of over 95%. In contrast, a standard asphalt shingle roof is closer to 80% because its texture holds onto more water.
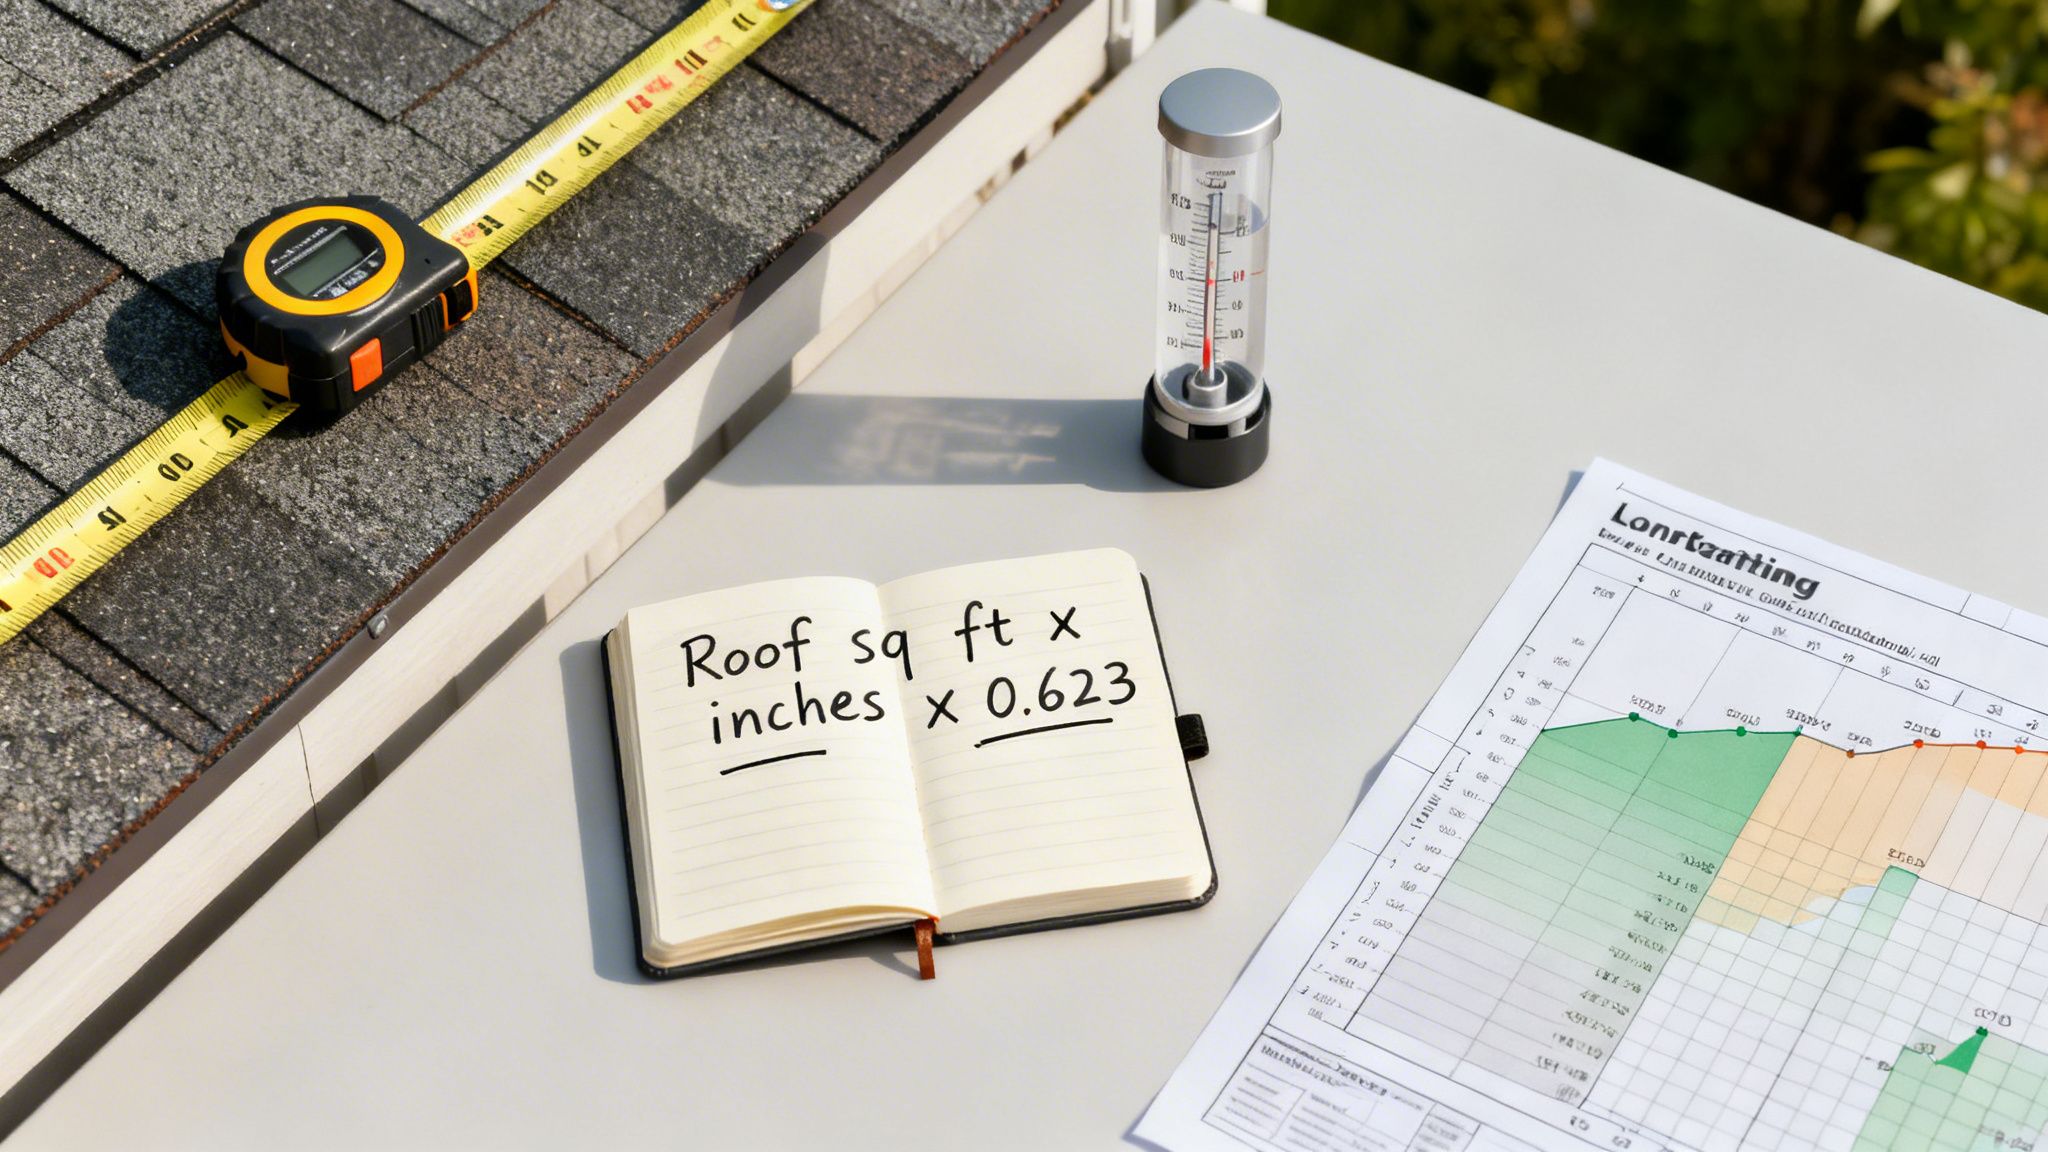
To figure out your roof’s collection area, you don’t need to climb up on a ladder. Just measure the length and width of your home’s footprint on the ground and multiply them. That’ll give you a solid approximation of the square footage that will feed your system.
The Simple Formula for Calculating Your Yield
So, how much water can you actually collect? There’s a straightforward formula that will become the foundation of your entire plan.
The math is simple:
(Roof Square Footage) x (Inches of Rainfall) x 0.623 = Gallons Collected
That magic number, 0.623, is the conversion factor. It represents the volume of water from one inch of rain falling over a single square foot. It’s the key that turns rainfall depth into storable, usable water.
Let’s run the numbers for a typical suburban home with a 1,500 square foot roof. Say a single storm drops just one inch of rain.
- 1,500 sq. ft. (Roof Area)
- 1 inch (Rainfall)
- 0.623 (Conversion Factor)
Plugging those into the formula gives us: 1,500 x 1 x 0.623 = 934.5 gallons.
Think about that. Over nine hundred gallons from a single inch of rain on an average-sized roof. Even if you only collect from half your roof (750 sq. ft.), you’re still looking at over 467 gallons. That’s enough to fill eight standard 55-gallon barrels from one moderate downpour. This shows the incredible potential of even a small-scale system.
Finding Local Rainfall Data
To make this practical for year-round planning, you need to know how much rain your area actually gets. You can find reliable local data from sources like the National Weather Service or local agricultural extension offices. Hunt down their monthly average rainfall charts. This will help you understand your area’s wet and dry seasons, which is critical for deciding on storage capacity.
For instance, if your area averages 3 inches of rain in April, that same 1,500 sq. ft. roof could potentially yield over 2,800 gallons in that month alone. Knowing this helps you decide if a few barrels will do the trick or if you need to think bigger, like a large cistern, to take advantage of the rainy season.
Strategically Siting Your Storage Tanks
Where you put your barrels or tanks is just as important as how big they are. Smart placement uses gravity and simple logistics to make your life easier.
Here’s what to consider when picking a spot:
- Proximity to Downspouts: Get your tanks as close to your chosen downspouts as possible. This means less piping, fewer potential leak points, and a simpler installation.
- Leveraging Gravity: Elevation is your best friend. Placing your tanks on sturdy cinder blocks or a small, purpose-built platform creates natural head pressure. Even just a foot or two of height makes a world of difference, allowing you to use a gravity-fed hose without a pump.
- A Solid Foundation: Water is heavy. A full 55-gallon barrel weighs over 450 pounds. Make sure your tanks sit on a level, stable surface that won’t shift or sink. A simple pad of compacted gravel is a cheap and effective foundation.
- Access and Discretion: You’ll need to get to the spigot and any filters easily. If operational security is a concern, pick a location that isn’t easily visible from the street. There are also many space-saving options out there, which you can see in our guide on collapsible water tanks.
Putting in the thought now saves a ton of time, money, and headaches down the road. By calculating your potential yield and carefully siting your system, you’re laying the groundwork for a reliable water source you can count on.
Gathering the Right Tools and Materials for Your Build
A successful build starts long before you make the first cut. It begins with having every single piece of the puzzle laid out and ready to go. Trust me, nothing kills a project’s momentum faster than a last-minute trip to the hardware store for one forgotten PVC fitting.
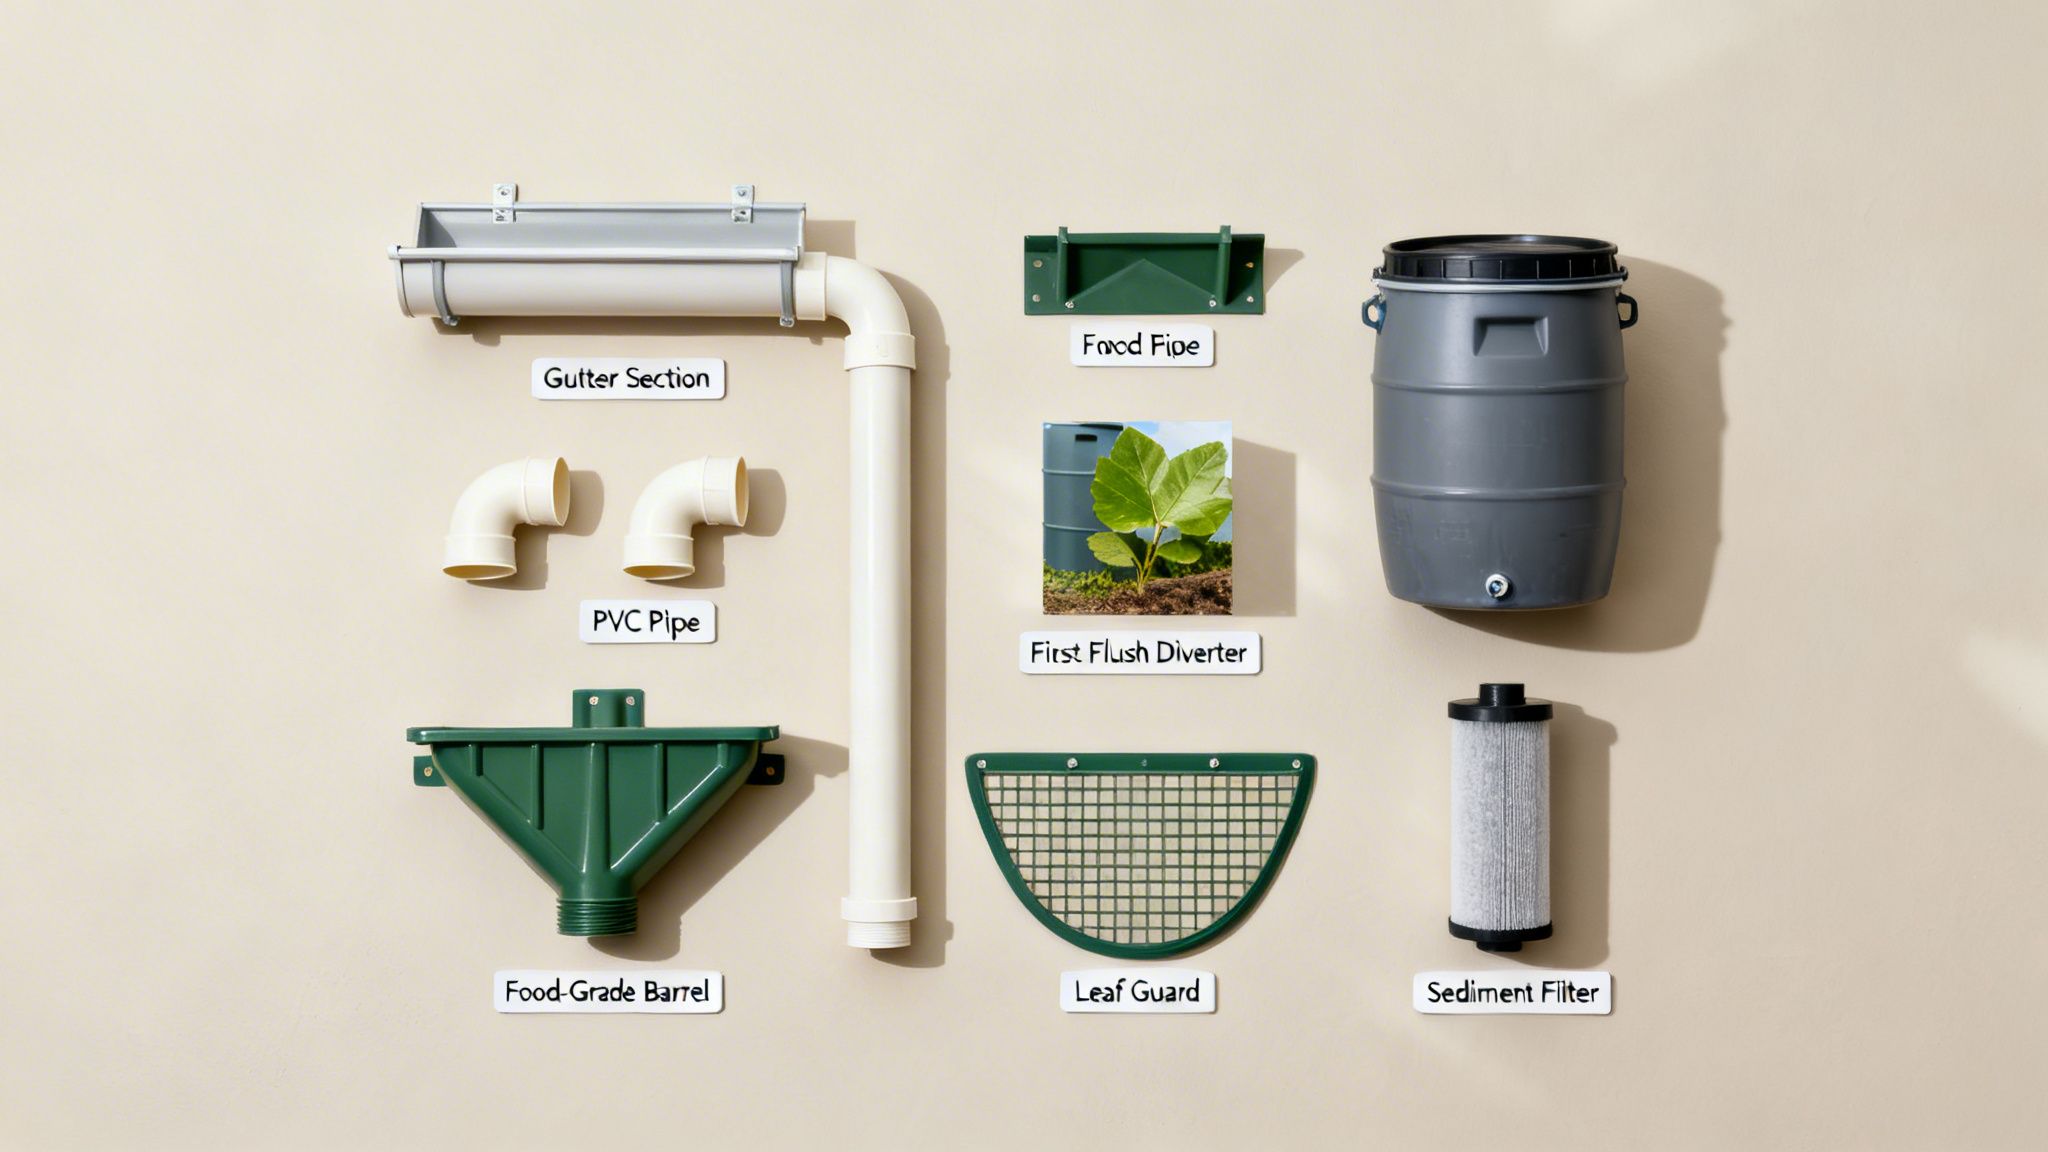
To keep things simple, I like to think of any rainwater system in four key stages: Catchment, Conveyance, Storage, and Filtration. Breaking it down this way helps clarify exactly what you need and why each part is so important for building an effective, long-lasting system.
Catchment and Conveyance Components
This is all about getting water from your roof and guiding it cleanly toward your storage tanks. Your existing gutters are doing the heavy lifting, but a few key additions will make a world of difference in your water quality.
- Leaf Guards & Gutter Screens: This is your first line of defense. Simple mesh guards over your gutters stop leaves, twigs, and other gunk from ever entering your system. This one simple step prevents future clogs and keeps your water cleaner from the start.
- Downspout Adapters & Fittings: You’ll need these to connect your standard rectangular downspouts to the round PVC pipes that will feed your barrels.
- PVC Pipes & Fittings: Schedule 40 PVC is the workhorse here. You’ll need a mix of pipes (usually 3-inch or 4-inch diameter), elbows, and connectors to route water from the downspout, through your diverter, and into the tank.
- First-Flush Diverter: This is non-negotiable if you want clean water. A first-flush diverter is a simple device that routes the first few gallons of rainfall—which washes all the dust, pollen, and bird droppings off your roof—away from your storage tank. Don’t skip this.
Getting the conveyance right means the water hitting your tank is already pretty clean, which makes the next steps much easier.
Storage and Filtration Essentials
Once the water is captured, you need a safe place to keep it. The type and quality of your storage container are critical for maintaining water quality over the long haul.
For most DIY setups, food-grade barrels are the go-to starting point. A standard 55-gallon, food-grade plastic drum is an excellent choice. It’s absolutely crucial that the barrel is opaque (not see-through) to block all sunlight, which is what prevents algae from growing inside. If you’re scaling up, investing in a purpose-built cistern from a trusted brand like Bushman or Norwesco is the way to go for durability and peace of mind.
A common mistake I see is people using any old barrel. Always, always source barrels that are certified food-grade and were used for something safe like juice concentrate or oils. Your water quality is on the line.
At this stage, basic filtration is about keeping out any remaining debris and critters.
- Tank Inlet Screen: A fine mesh screen where water enters the barrel is your final barrier against debris. More importantly, it keeps mosquitoes from getting in and turning your water supply into a nursery.
- Sediment Filter (optional but recommended): Adding a simple sediment filter to your spigot can catch fine particles, giving you much cleaner water for things like washing gear or tools.
Your Essential Toolkit and Parts List
Having the right tools on hand makes the difference between a frustrating afternoon and a job well done. Most of this is standard DIY stuff, but a few items are specific to working with PVC.
To make sure you’ve got everything covered, here’s a comprehensive checklist of what you’ll need. Planning your purchases with a list like this can help you budget and avoid those annoying extra trips to the store.
Rainwater System Component and Tool Checklist
| Component/Tool | Purpose | Estimated Cost Range (DIY) |
|---|---|---|
| 55-Gallon Food-Grade Barrel | Main water storage container. Must be opaque. | $20 – $75 |
| Gutter Leaf Guards | Prevents large debris from entering the system. | $1 – $3 per linear foot |
| Downspout Diverter Kit | Channels water from the downspout to the barrel. | $25 – $50 |
| First-Flush Diverter Kit | Diverts the initial, contaminated rainwater away. | $30 – $60 |
| Schedule 40 PVC Pipe (3″ or 4″) | Transports water from the downspout to the tank. | $15 – $25 per 10-ft section |
| PVC Fittings (Elbows, Couplers) | Connects PVC pipes to create the desired route. | $2 – $10 per fitting |
| PVC Primer & Cement | Creates a permanent, waterproof seal on PVC joints. | $15 – $25 for a set |
| Bulkhead Fittings & Spigot | Creates a leak-proof outlet on the barrel. | $15 – $30 for a set |
| Inlet Screen/Mesh | Final debris filter and mosquito barrier at the tank. | $5 – $15 |
| Power Drill & Hole Saw Kit | To cut clean holes for fittings in the barrel. | $30 – $70 (if you don’t own one) |
| PVC Cutter or Hacksaw | For making straight cuts on PVC pipe. | $15 – $30 |
| Level | Ensures the barrel base is stable and won’t tip. | $10 – $25 |
| Silicone Sealant | To seal any gaps around fittings for a watertight finish. | $8 – $15 |
Gathering every item on this list before you start is the single best thing you can do to ensure a smooth project. Good preparation is the foundation of a rainwater collection system that will serve you reliably for years to come.
Constructing Your Rainwater Harvesting System
Alright, you’ve done the planning and gathered the parts. Now comes the satisfying part: putting it all together. This is where your sketches and lists transform into a real, working rainwater harvesting system. We’ll walk through the build step-by-step to make sure every connection is solid and leak-free.
Think of this as building a long-term asset for your homestead or preparedness plan. A well-built system will handle storms and provide clean water when you need it most, so taking your time here pays off big time.
Gutter and Downspout Preparation
Before a single drop of rain enters your barrels, your gutters need to be ready. This is foundational work. If you skip this, you’re just channeling dirty water and future problems directly into your storage. A little prep here saves a lot of headaches later.
First things first, get up on a ladder and give those gutters a serious cleaning. You need to get all the leaves, shingle grit, sticks, and general gunk out of there. Once they’re clear, run a hose through them to flush out the small stuff and, more importantly, to spot any leaks. Seal up any leaky joints or pinholes with a good quality, outdoor-rated waterproof sealant. You want every drop making it to your downspout.
Next, install gutter guards or screens. This is a non-negotiable step in my book. These guards are your system’s first line of defense, blocking bigger debris from ever getting into your downspouts. This prevents clogs and dramatically improves the quality of the water you collect from day one.
Installing the First-Flush Diverter
Don’t skip this component. I learned this lesson the hard way. The first few minutes of any rainfall wash all the accumulated grime off your roof—dust, bird droppings, pollen, you name it. A first-flush diverter is a simple, ingenious device that automatically jettisons this initial “dirty” water before the cleaner rain is sent to your barrels.
Most kits are designed to splice right into your existing downspout. You’ll measure and cut out a section of the downspout, then fit the diverter assembly in its place. It works by filling up a small chamber with the first gallon or two of runoff. A floating ball inside then rises and seals off the chamber, redirecting all the subsequent, cleaner water to your storage tank.
I can’t stress this enough: a first-flush diverter is critical for water quality. Without it, all that roof gunk settles into a nasty sludge at the bottom of your barrels. It’s a small investment that makes a massive difference in the cleanliness and safety of your water.
Connecting Your Storage Tanks
Now we get to the heart of the system—the barrels or cisterns. The goal here is a sealed setup that keeps your water clean, keeps pests out, and safely handles any overflow.
You’ll start by drilling an inlet hole near the top of your barrel for the pipe coming from the diverter. A hole saw on your drill will give you a clean, perfectly sized cut for your bulkhead fitting. A watertight seal is absolutely essential here.
Once your inlet is set, you need to think about overflow. When that barrel fills up (and it will, faster than you think), the extra water needs somewhere to go. Install an overflow pipe near the very top, just below the inlet. Make sure this pipe directs water well away from your house’s foundation. Critically, cover the end of this pipe with a fine mesh screen to keep mosquitoes and other critters from turning your water supply into a breeding ground.
Setting Up Your Distribution System
Getting water in is only half the battle; you also need a reliable way to get it out.
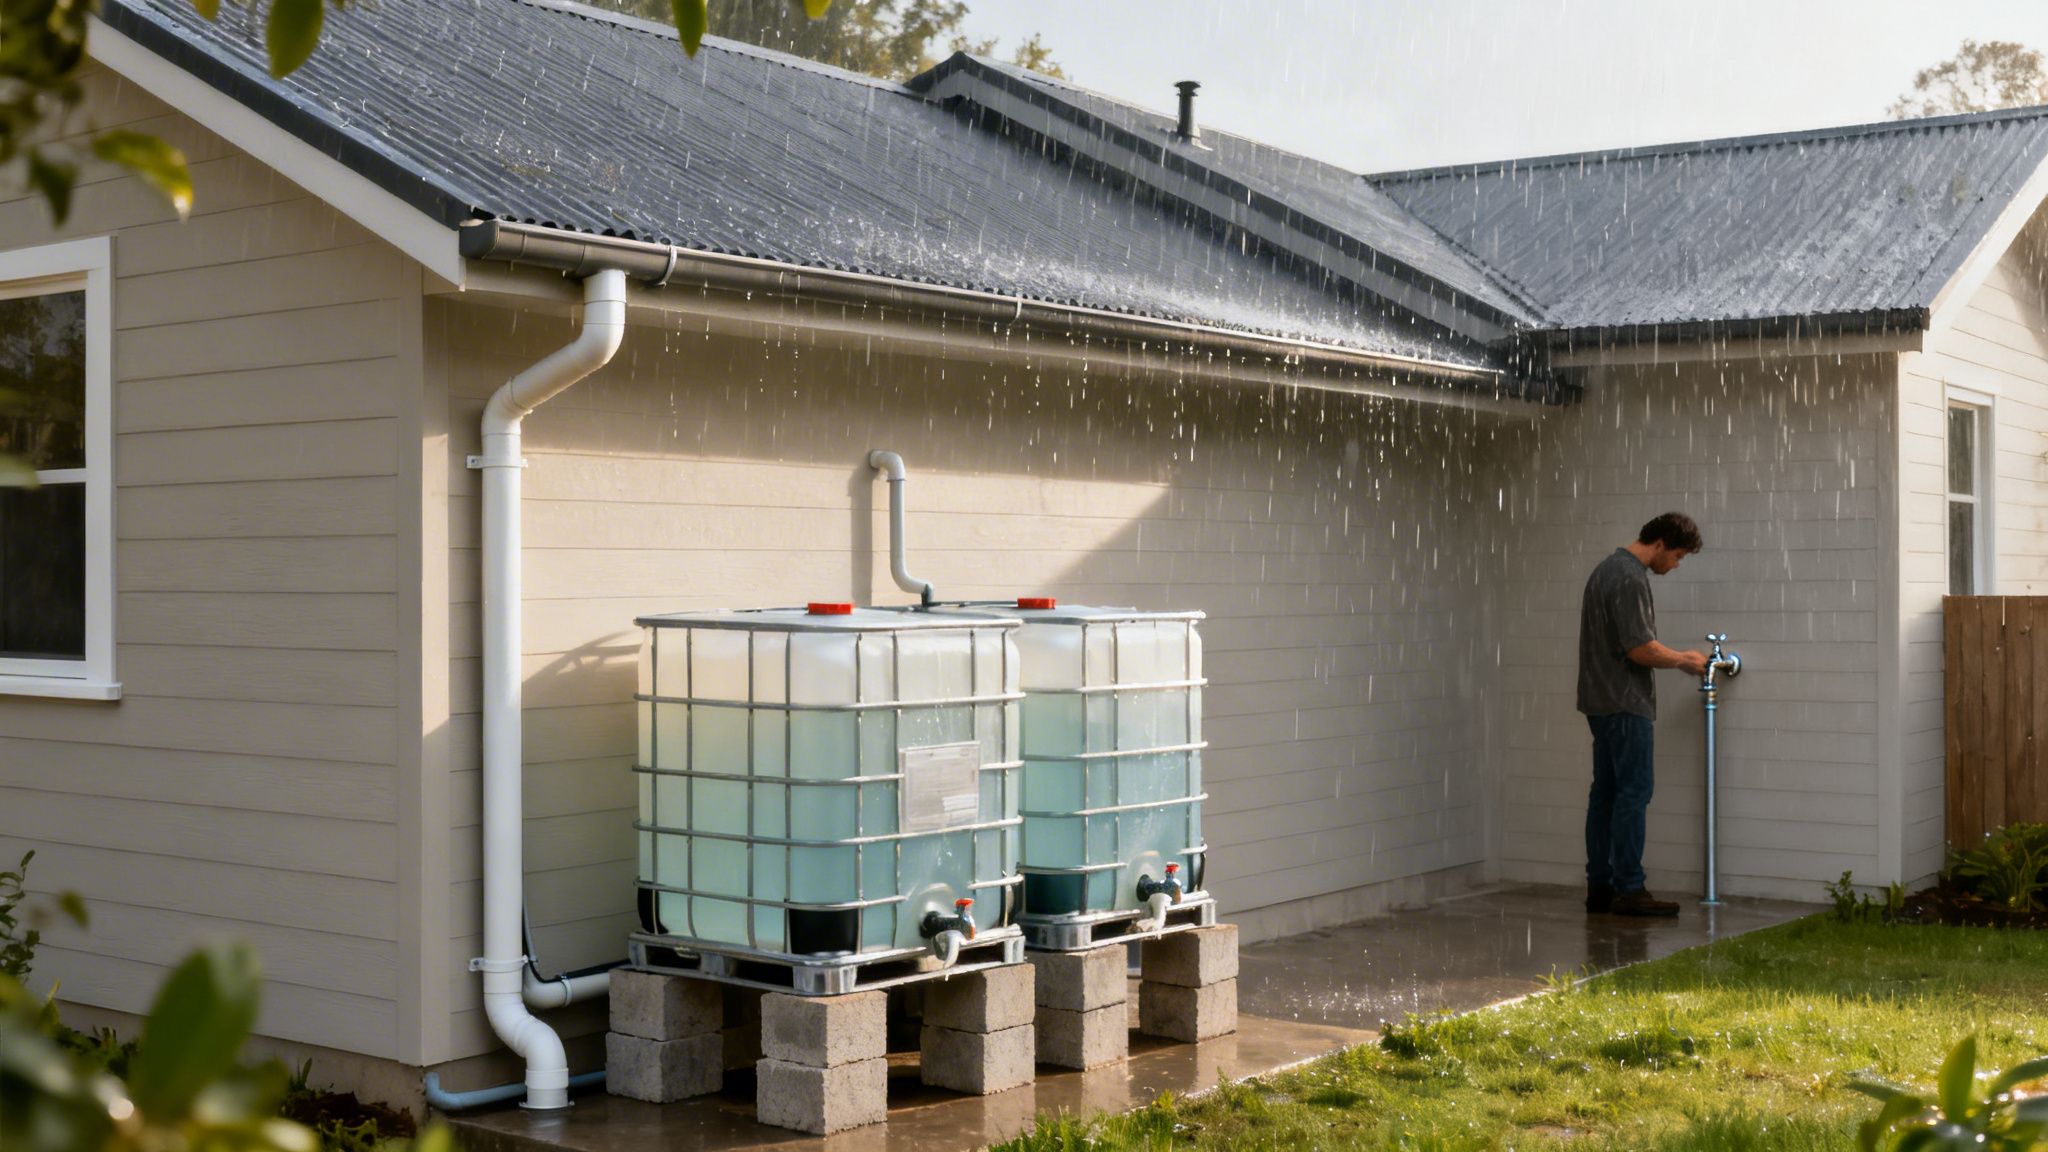
The simplest approach is a gravity-fed system. Just by placing your barrels on a sturdy stand or a few cinder blocks, you create natural water pressure. Elevating them even 1-2 feet provides enough pressure to easily fill a watering can or run a short garden hose. Install a spigot near the bottom of the barrel with another bulkhead fitting to create a leak-proof seal.
This setup is dead simple, requires zero electricity, and is perfect for non-potable uses like watering the garden or washing tools. It’s a core principle of self-sufficiency. If you’re going down that road, our guide on off-grid living for beginners has a lot of practical advice.
Need more oomph? For tasks like running a pressure nozzle or a longer hose, a small pump is a fantastic upgrade. A simple 12V diaphragm pump, like the ones made by SeaFlo, can give you the pressurized water you need. These are incredibly efficient and can run easily off a small solar panel and battery bank, making them a perfect fit for an off-grid or emergency setup.
Purifying Rainwater for Safe Drinking and Use
So, you’ve built your system and the rain barrel is filling up. That’s a huge step. But here’s the reality check: having water and having safe water are two totally different ballgames. This is where a good prepper mindset really kicks in, because you have to know how to make that water safe for whatever you need it for.
Rainwater isn’t pure. Think about it—it washes everything off your roof and out of the air on its journey into your tank. Bird droppings, dust, pollen, chemical residues… it’s all in there. Understanding the difference between basic filtration and true purification is what makes your system a reliable lifeline.
Simple Filtration for Non-Potable Water
Let’s start with the easy stuff. For tasks where you won’t be drinking the water—like flushing toilets, watering the garden, or washing your truck—you don’t need to go overboard. Your main goal is just getting the chunky bits out.
A basic screen over your barrel’s inlet and a simple hose filter on the spigot will do the trick. These will catch any leftover leaves, grit, and other particulates. The water will be clear and perfectly fine for any non-consumption use.
The Multi-Stage Approach to Potable Water
When it comes to drinking, cooking, or first aid, there are no shortcuts. You absolutely cannot take chances with your health. The only safe way to turn rainwater into potable water is with a multi-barrier approach. Each step in the process targets a different type of contaminant, creating layers of safety.
This method is about more than just making water look clean. It’s about ensuring it’s free from physical, biological, and chemical threats before it ever touches your lips.
Stage 1: Mechanical Filtration
First things first, you need to get rid of all the fine particles that slipped past your initial screens. We’re talking about silt, sediment, pollen, and other gunk that makes water cloudy. The go-to tool for this job is a 5-micron sediment filter. You install this filter cartridge in-line, right after your storage tank but before any other purification steps.
This pre-filter is non-negotiable. It doesn’t just clear up the water; it also protects the more expensive and sensitive purification gear downstream from getting clogged up. You’ll extend the life of your whole system by doing this right.
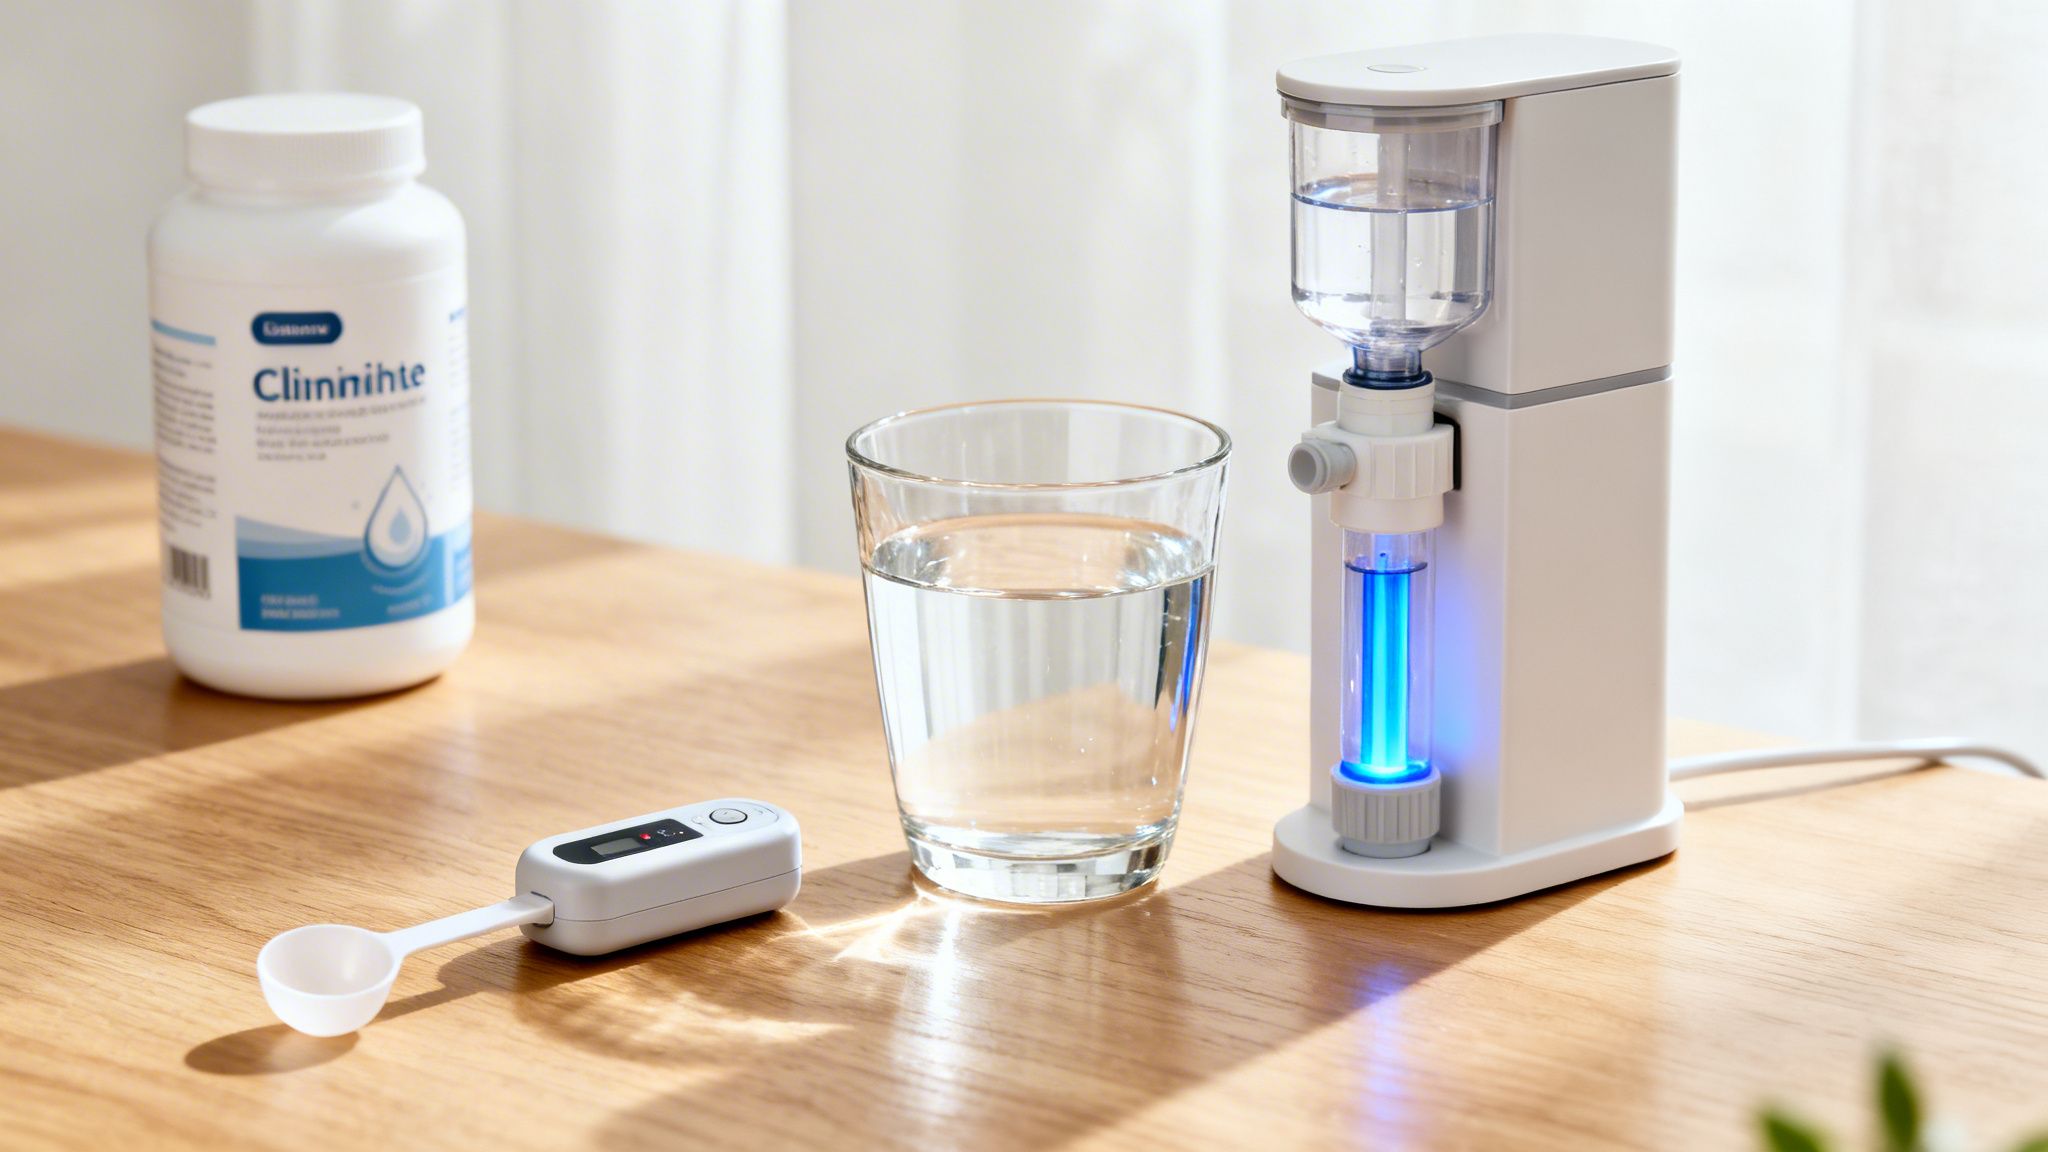
Stage 2: Purification for Pathogens
Next up are the invisible threats—the nasty stuff like bacteria, protozoa, and viruses that can make you seriously ill. This is where a high-quality purification system is an absolute must.
Gravity-fed filters are a favorite in the preparedness community for one simple reason: they work without electricity.
- Systems like the Berkey Water Filter are legendary for their ability to remove an incredibly high percentage of pathogenic bugs using their micro-porous filter elements.
- Another solid option you’ll see is the ProOne gravity-fed system.
The process is simple. You pour water into the top chamber, and gravity does the work, pulling it through the filters into a clean reservoir below.
Remember: Filtration removes sediment, but purification is what neutralizes dangerous microorganisms. Never assume filtered water is safe to drink without this critical second step. For a deeper dive into the specifics, our guide on how to filter rainwater for drinking provides more detail on various methods.
Stage 3: Disinfection and Long-Term Storage
For total peace of mind, especially if you plan on storing this water for a while, a final disinfection step is a smart move. This adds a residual layer of protection to stop anything from growing back in your stored water.
You’ve got two main options here:
- Chemical Disinfection: This is the old-school, time-tested method using unscented household bleach or calcium hypochlorite. The key is using the right amount. A good rule of thumb is 8 drops of 6% bleach per gallon of clear water. Add it, give it a good stir, and let it sit for at least 30 minutes before you use it.
- UV Sterilization: An ultraviolet (UV) sterilizer is a device that zaps microorganisms with UV light, destroying their DNA and making them harmless. It’s an excellent chemical-free method, but it does require power. It’s a perfect match for a system hooked up to a small solar panel and battery bank.
By layering these methods—mechanical filtration, purification, and final disinfection—you create a bulletproof process. Your harvested rainwater will be safe for any and all uses, ensuring your preparedness efforts truly protect your family’s health.
Common Questions About Building a Rainwater System
Even the best-laid plans run into snags. When you’re figuring out how to build a rainwater collection system for the first time, questions are guaranteed to come up. Thinking through these common issues now can save you a world of hurt—and money—down the road.
Let’s get ahead of the curve and tackle some of the most frequent questions I hear from people building their first setup.
Is It Legal to Collect Rainwater Where I Live?
This is, without a doubt, the very first question you need to answer. Water rights are a tangled web, and the rules can change dramatically from one state line to the next.
Some places, like Texas and Washington, are all-in on rainwater harvesting and might even offer financial incentives to get you started. On the flip side, other states have historically been much more restrictive. Colorado, for example, had a notoriously complex “prior appropriation” system for years, though recent laws have made it much easier for homeowners to install smaller systems.
The bottom line is simple: always check with your state’s environmental agency and your local city or county ordinances before you buy a single fitting. Don’t assume anything.
How Often Should I Maintain My Rainwater System?
A rainwater system isn’t a “set it and forget it” deal. If you want clean water and a system that lasts, you need to put in a little work. I find a simple twice-a-year schedule works perfectly.
- Spring and Fall: These are the best times to give your gutters a complete clean-out. Get all the leaves, twigs, and gunk out of there.
- During the Cleaning: While you’re up on the ladder, give your leaf guards, pre-filter screens, and first-flush diverter a good inspection. Clean them out and make sure everything is working as it should.
- Annually: At least once a year, grab a good flashlight and peek inside your storage tanks. You’re looking for any sludge or sediment that’s settled on the bottom. If you see a noticeable layer building up, it’s probably time to drain and clean the tank.
How Do I Stop Mosquitoes from Breeding in My Barrels?
Standing water is a five-star resort for mosquitoes, and your rain barrel can become a serious breeding ground if you’re not careful. The number one defense is a completely sealed system.
Every single entry point needs to be screened or sealed shut. This means the main inlet where water flows in from the downspout and—this is the one people forget—the overflow outlet. Use a fine, 1/16th-inch mesh screen to cover any opening. Your barrel lid also needs to be tight-fitting.
If your design has to be open for some reason, you can drop in a Summit Mosquito Dunk. It contains a natural bacterium that’s lethal to mosquito larvae but safe for birds and other wildlife. A few drops of vegetable oil on the water’s surface can also work in a pinch by creating a film that suffocates the larvae.
A single mosquito can lay hundreds of eggs in standing water. Securing your system isn’t just about clean water; it’s about preventing a potential health hazard right on your property.
What Is the Best Way to Winterize My System?
If you live anywhere that sees freezing temperatures, winterizing isn’t optional. It’s absolutely critical to prevent cracked pipes, damaged filters, and ruined tanks. Before that first hard freeze hits, you need to put your system to bed for the winter.
Start by draining all the water from your pipes, filters, and the first-flush diverter. Then, disconnect the downspout from your storage tank and reattach your original downspout elbow. You want to direct all that winter rain and snowmelt away from your foundation, not into your offline system.
For large cisterns, it’s wise to drain them down to about 90% capacity. This leaves enough room for a layer of ice to expand without damaging the tank. For smaller 55-gallon barrels, your safest bet is to drain them completely, flip them upside down, and store them for the season.
Finally, remember that water quality is an ongoing process. To be certain your stored water is safe for its intended use, regular testing is a must. You can learn about the different options in our guide on how to test water for contamination.

