Knowing how to get safe drinking water is more than just a skill—it’s a lifeline. At its core, purification means removing the nasty stuff like bacteria, viruses, and parasites that can make you seriously ill. The best methods are boiling, filtration, chemical treatments, and UV light, and knowing which one to use when is key. Master these, and you can turn almost any water source into something safe to drink.
Why Water Purification Is a Non-Negotiable Survival Skill
Beyond quenching thirst, clean water is the line between staying healthy and getting dangerously sick. Whether you’re dealing with a city-wide boil advisory, a natural disaster that’s knocked out the municipal supply, or you’re deep in the backcountry, the power to make your own safe drinking water is everything. It’s a foundational piece of self-reliance, right up there with the most essential survival skills you must master.
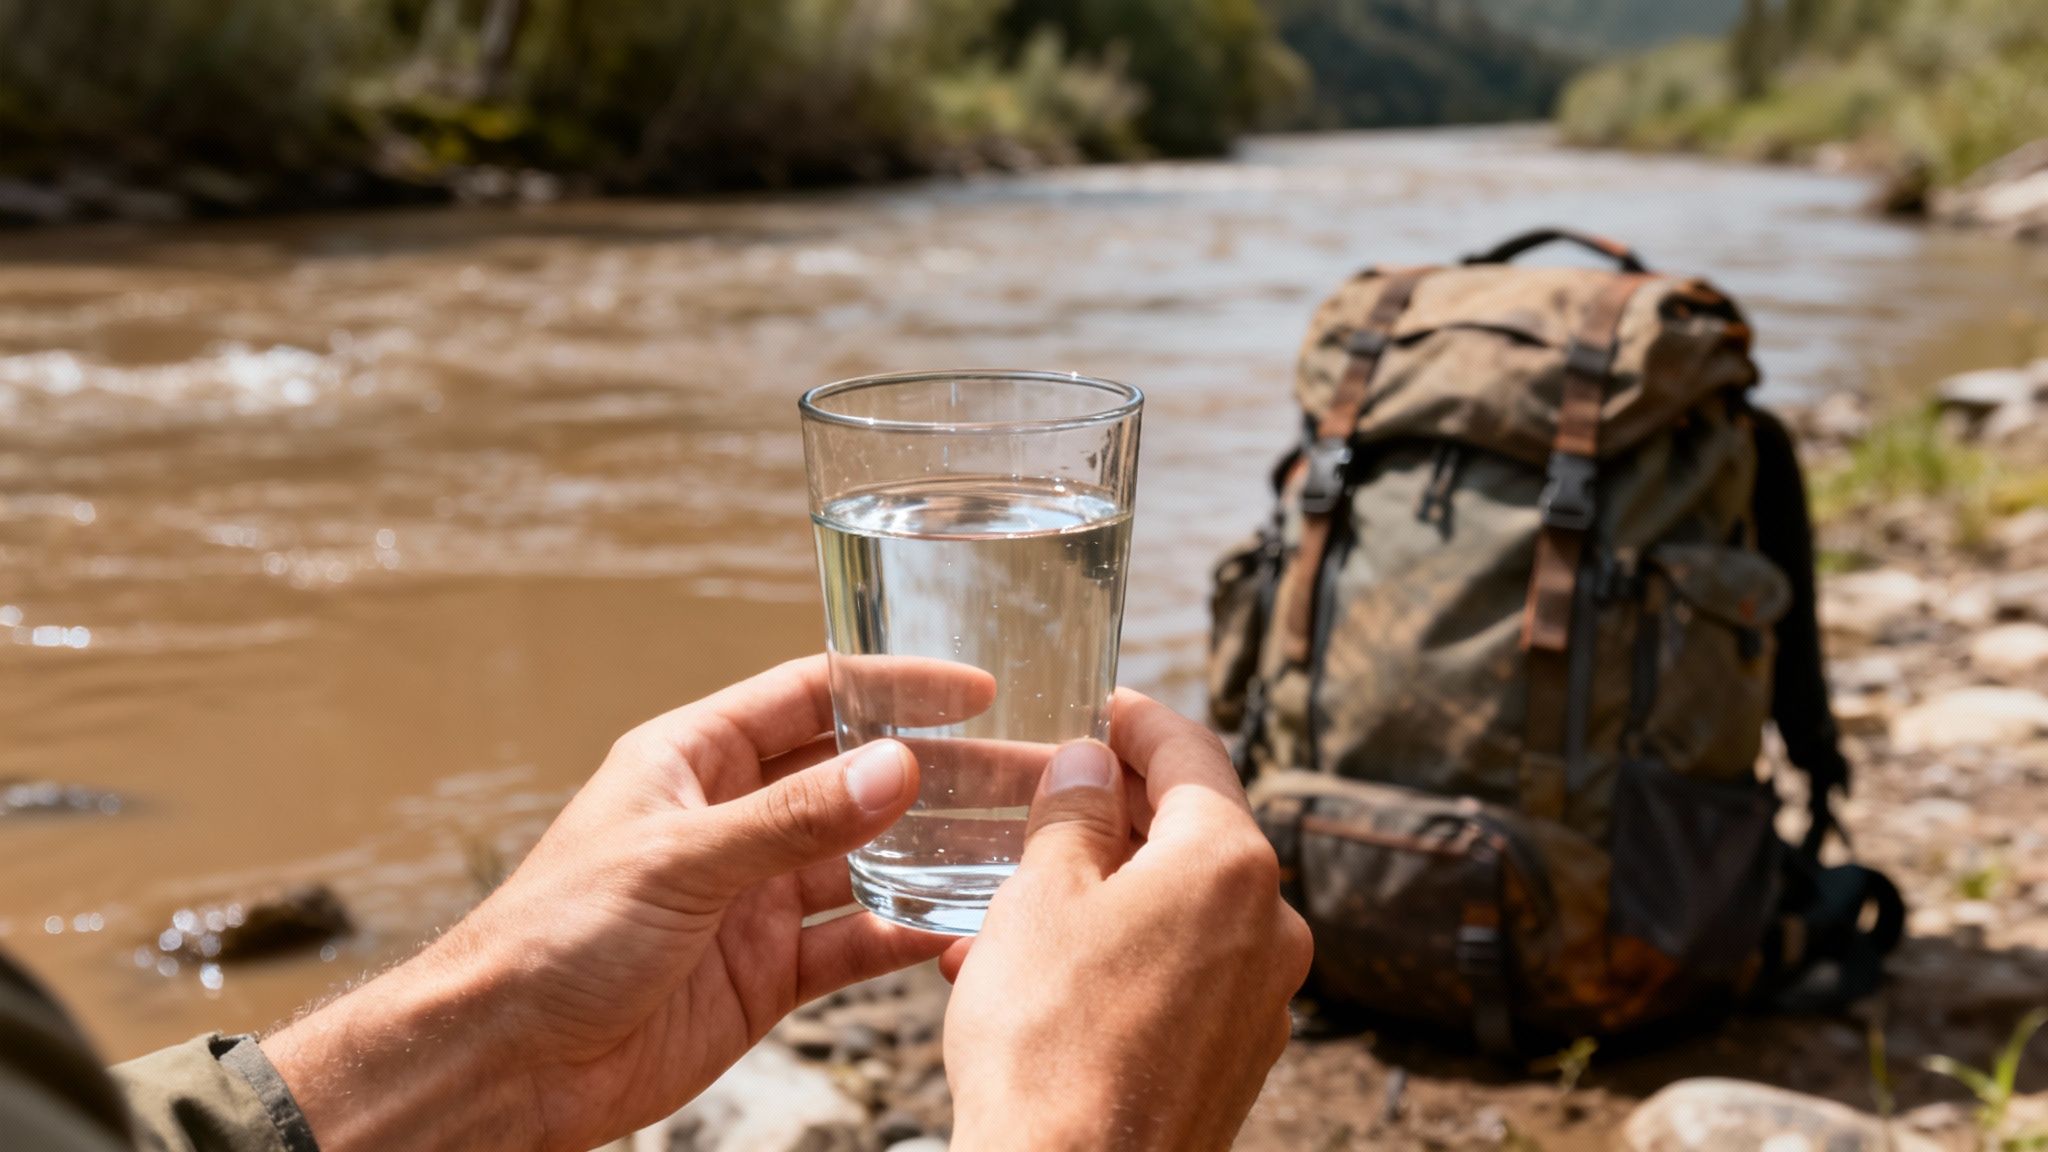
Don’t be fooled by appearances. That crystal-clear mountain stream might look pristine, but it can be loaded with microscopic pathogens. Invisible threats like Giardia, Cryptosporidium, and E. coli are notorious for causing debilitating gastrointestinal illnesses that lead to severe dehydration—a life-threatening combo in any emergency.
The Pillars of Water Safety
This guide is built around four proven methods for making water safe. Each has its place, and we’ll dig into the practical steps for all of them so you know exactly what to do.
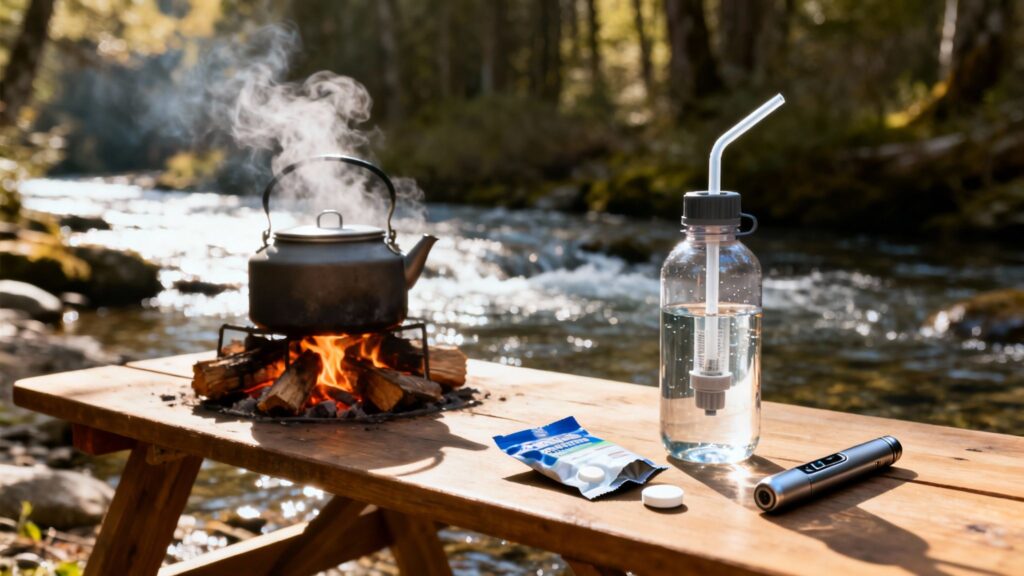
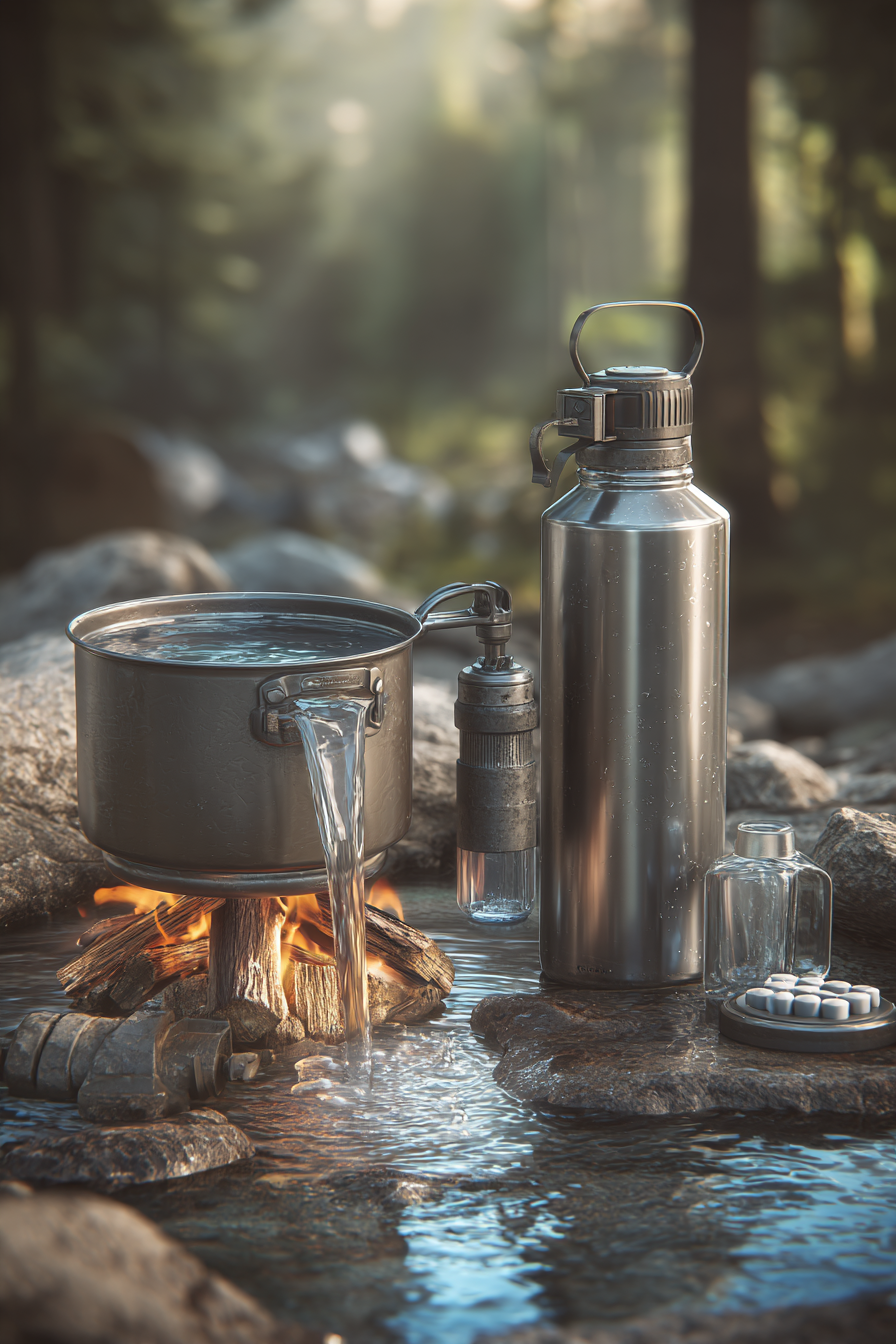
- Boiling: This is the gold standard, the most foolproof way to kill virtually every pathogen. If you have a heat source and a pot, you have a reliable purification system. It’s perfect for home emergencies or base camp.
- Filtration: A highly practical and portable option for backpackers and bug-out bags. Filters like the popular Sawyer Squeeze are brilliant at physically removing bacteria and protozoa from water on the move.
- Chemical Treatment: Think tablets or drops—lightweight, compact, and effective for neutralizing viruses and bacteria. Products like Potable Aqua tablets are a fantastic backup to have in any kit or a primary choice for ultralight trekking.
- UV Light: This is the modern, high-tech approach. A small UV wand, like a SteriPen, scrambles the DNA of microorganisms, making them harmless in about a minute.
The need for this knowledge is bigger than just personal preparedness. Globally, over 2 billion people don’t have access to safely managed drinking water. This crisis is driving a massive industry, with the global water purification market valued at USD 59.18 billion. It’s expected to more than double to USD 123.24 billion by 2037, as cities grow and the demand for clean water skyrockets.
Having multiple purification skills empowers you to adapt. If your filter clogs, you can boil. If you run out of fuel, you can use chemical tablets. This redundancy is the hallmark of true preparedness.
By learning these different techniques, you free yourself from depending on a single tool or system. You gain the flexibility to assess any water source and choose the right method for the job, keeping yourself and your family hydrated and healthy, no matter what happens.
Field-Tested Water Purification Methods That Work

When your gear is packed and you’re miles from civilization, or a disaster strikes at home, theory gives way to practical skill. Knowing how to purify water isn’t about memorizing facts; it’s about knowing which tool to pull from your mental toolkit for the situation at hand.
We’ll cover four reliable methods: boiling, filtration, chemical treatment, and ultraviolet (UV) light. Each has its own place, and each is effective against different types of nasty pathogens—bacteria, protozoa, and the notoriously tiny viruses.
Boiling: The Gold Standard of Purification
Boiling is the most dependable water purification method, hands down. It’s a simple, powerful technique that kills virtually all pathogens, including bacteria, protozoa like Giardia, and even the smallest viruses that can slip through many filters.
The process is straightforward. Just bring your water to a full, rolling boil, where big bubbles are breaking the surface nonstop. Keep it boiling for at least one minute. If you find yourself at high altitude (above 6,500 feet or 2,000 meters), you need to extend that time to three minutes because water boils at a lower temperature up there.
Once it’s done, let the water cool down on its own. To get rid of the flat taste boiled water sometimes has, just pour it back and forth between two clean containers. This re-aerates it and makes it much more palatable. The only real downsides are the time it takes and the fuel you’ll burn through.
Filtration: Your First Line of Defense in the Field
Water filters are a backpacker’s best friend for a reason. They give you clean water on demand without the waiting game of boiling or chemicals. Most modern filters work by forcing water through a membrane with microscopic pores, physically blocking contaminants before they reach your bottle.
Squeeze-style filters like the Sawyer Squeeze or straw-style filters like the Lifestraw are popular and trusted choices. These gadgets are incredibly effective at removing larger pathogens like bacteria (E. coli, Salmonella) and protozoa (Giardia, Cryptosporidium). They are a core component of any well-thought-out survival gear list.
But it’s critical to know their limitations. Most backcountry filters simply can’t catch viruses, which are too small for their pores. That’s why filtration is best suited for wilderness water sources far from human contamination, where viruses are much less of a concern.
Chemical Treatments: The Lightweight Powerhouse
When every ounce in your pack matters, chemical treatments are invaluable. These lightweight tablets or drops use ingredients like iodine or chlorine dioxide to neutralize pathogens. They’re an excellent primary method for ultralight hikers and an absolutely crucial backup for any preparedness kit.
Using them couldn’t be simpler: add the correct number of tablets or drops to your water, seal the container, and wait. The wait time is the biggest variable and depends entirely on the product and water conditions.
- Iodine Tablets: A classic choice, iodine is effective against bacteria and viruses. It usually requires a wait time of around 35 minutes. The main drawback is its ineffectiveness against the parasite Cryptosporidium, and many people dislike the taste it leaves behind.
- Chlorine Dioxide: This is a more modern option that kills bacteria, viruses, AND Cryptosporidium. The trade-off is a longer wait time, which can stretch up to four hours for very cold or murky water to ensure a complete kill.
Always follow the manufacturer’s instructions to the letter. Guessing the dosage or cutting the wait time short can leave you with partially treated water that’s still unsafe to drink.
Chemical treatments work best in clearer water, as dirt and sediment can reduce their effectiveness. If your water source is murky, do a quick pre-filter through a bandana or t-shirt before adding the purifier.
Ultraviolet (UV) Light: The Modern Approach
UV purification is a fast, chemical-free method that uses the power of light to make water safe. A small, wand-like device, such as a SteriPen, emits high-energy ultraviolet light that scrambles the DNA of microorganisms. This renders them unable to reproduce and make you sick.
This method is incredibly effective against all three pathogen types: bacteria, protozoa, and viruses. To use it, you submerge the lamp in your water bottle and stir for the recommended time—usually 60 to 90 seconds for one liter.
The one absolute requirement for UV is that the water must be clear. Any sediment, silt, or even glacial flour can block the UV rays, creating tiny shadows where pathogens can hide. If your water is cloudy, you have to pre-filter it first. And remember, UV purifiers are battery-dependent, so always carry a spare set or have a way to recharge them.
Water Purification Methods At a Glance
Sometimes you need to make a quick decision in the field. This table breaks down the key pros and cons of each method to help you choose the right tool for the job.
| Method | Effective Against | Pros | Cons |
|---|---|---|---|
| Boiling | Bacteria, Protozoa, Viruses | Highly effective, simple, no special gear needed | Requires fuel, takes time, flat taste |
| Filtration | Bacteria, Protozoa | Fast, on-demand, improves taste, lightweight | Does not remove most viruses, can clog |
| Chemical | Bacteria, Viruses (Chlorine Dioxide also kills Protozoa) | Very lightweight, compact, easy to use | Requires wait time, can affect taste, less effective in murky water |
| UV Light | Bacteria, Protozoa, Viruses | Very fast, no chemicals, does not alter taste | Requires clear water, dependent on batteries |
Choosing the right way to purify water comes down to your situation—your environment, your gear, and the quality of your source. The most prepared individuals know how to use multiple methods, creating a redundant system that ensures they will always have access to safe, life-sustaining water.
Matching the Method to Your Mission
The best way to purify water isn’t about finding one perfect, do-it-all gadget. It’s about picking the right tool for the job. Your situation is what drives the strategy. A system that’s brilliant for a home emergency could be a complete liability on a multi-day hike where every ounce counts.
Thinking in terms of scenarios is what separates smart preppers from gear hoarders. It’s about building the skill to look at a situation, assess the threat, and deploy the right solution. Let’s walk through a few common scenarios to see how this plays out in the real world.
Home Emergency During a Power Outage
The storm hits, the power’s out, and the city issues a boil water advisory. Your mission now is about volume and reliability. You need to provide clean water for drinking, cooking, and sanitation for your entire family, and you have no idea if it’ll be for a day or a week.
This is where high-capacity, gravity-fed systems are king.
A countertop filter like a Berkey is perfect for this. You can pour gallons of questionable tap water—or even collected rainwater—into the top chamber, and let gravity do all the work. No power needed.
- Primary System: A high-capacity gravity filter. It’s dead simple, runs without electricity, and can easily meet the daily water needs of several people.
- Backup System: Boiling. It’s the ultimate fallback. If your gravity filter ever fails or the elements get damaged, you can always boil water on your gas stove, outdoor grill, or camp stove.
This layered approach gives you a convenient primary system and a bulletproof backup, keeping you covered for any bug-in situation.
Multi-Day Backpacking Trip
Out on the trail, the game changes completely. Now, weight and speed are everything. You need something small, light, and capable of giving you safe water right now, without waiting around.
This is the perfect job for a portable squeeze filter. You can scoop water from a stream, screw on the filter, and drink immediately. But what if it clogs? What if you drop it and it cracks? Gear fails. That’s why you always, always carry a backup.
A tiny bottle of chlorine dioxide drops or a small blister pack of purification tablets weighs next to nothing but can be a lifesaver if your main filter stops working. This redundancy is a core principle of being prepared in the backcountry.
For a deeper look at packing smart, our guide on bug out bag essentials digs into why layered systems for critical needs like water are so important.
International Travel to Developing Regions
When you’re traveling in places with sketchy water infrastructure, you face a new kind of threat: viruses. Most of the filters popular with hikers and backpackers are great for bacteria and protozoa, but they won’t stop viruses, which are common in water sources contaminated by human waste.
For this mission, you absolutely need a dedicated purifier—a device specifically engineered to eliminate all three pathogen types. A purifier bottle like the Grayl GeoPress is a fantastic all-in-one solution. You just fill it, press the filter mechanism, and you have perfectly safe water in seconds.
- Primary System: A water purifier bottle designed to remove viruses. It’s fast, self-contained, and protects you from the full spectrum of waterborne nasties.
- Backup System: A UV Light Purifier. Something like a SteriPen is a great, lightweight backup that also neutralizes viruses. Just make sure you pack extra batteries.
Long-Term Off-Grid Living
If you’re setting up a homestead or an off-grid cabin, you’re playing the long game. Your water system has to be tough, sustainable, and able to handle large volumes from potentially rough sources like a pond, a well, or a rainwater catchment system.
A large, multi-stage filtration system is usually the best bet. This might mean a bigger gravity-fed unit for drinking water, maybe paired with a whole-house sediment filter to pre-filter water coming from your source. You’re aiming for something you can rely on day in and day out without much fuss.
As for a backup, keep it simple. Storing a gallon of plain, unscented household bleach gives you a chemical treatment that can purify hundreds of gallons of water. It’s a low-tech, reliable way to ensure you’re never without a way to make your water safe.
Improvised and Advanced Purification Techniques
True readiness isn’t just about having the right gear; it’s about knowing what to do when that gear is gone. What happens if your filter breaks, your fuel runs out, or you’re caught completely unprepared? This is where resourceful, low-tech methods for creating safe drinking water become your lifeline.
These improvised techniques are the ultimate safety net. The ability to build a purification system from scratch moves you beyond relying on manufactured tools and into the realm of pure knowledge and ingenuity.
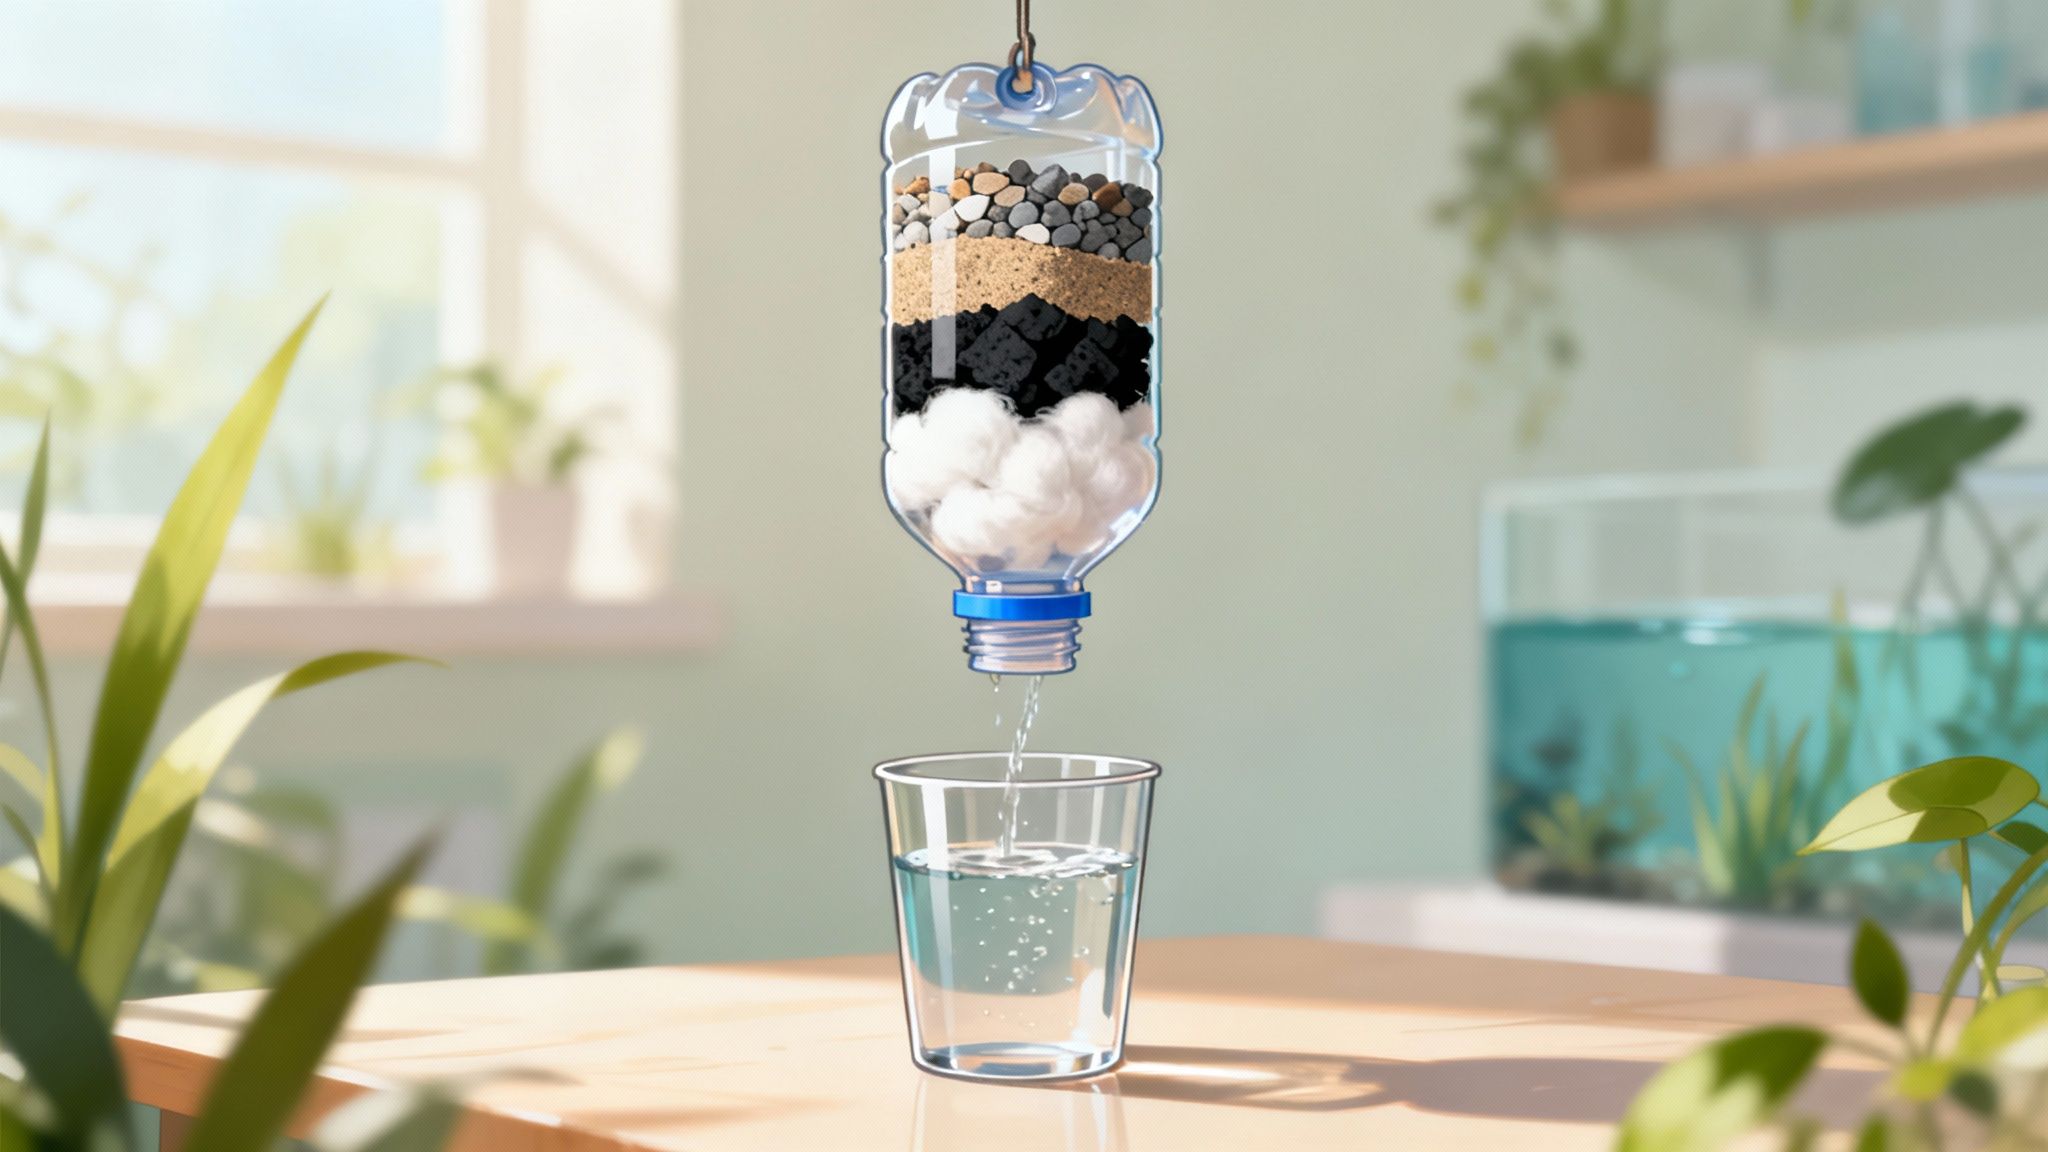
Building a DIY Bio-Filter
When modern equipment isn’t an option, you can mimic the function of a commercial filter using materials found right in your environment. A DIY bio-filter, often made from an empty bottle or even a hollowed-out piece of bamboo, uses layers of natural media to strain out the gunk and improve water clarity.
Now, let’s be crystal clear: this method does not remove pathogens. The water must still be boiled or chemically treated afterward. But for clearing murky, debris-filled water, it’s a critical first step.
Here’s a breakdown of the layers and how they work together:
- Top Layer (Fine Cloth): A scrap from a t-shirt or bandana acts as the initial screen, catching the big stuff like leaves, twigs, and insects.
- Second Layer (Fine Sand): This is your next line of defense, trapping the smaller suspended particles that make water cloudy.
- Third Layer (Crushed Charcoal): This is the magic ingredient. Charcoal from a completely extinguished campfire, crushed into small bits, helps absorb some impurities and drastically improves the water’s taste and smell.
- Fourth Layer (Coarse Sand): This layer simply keeps the fine sand from washing down into the gravel below.
- Bottom Layer (Gravel/Pebbles): This final layer provides support for everything above it while letting the filtered water drip through freely.
A pro tip: run the first few batches of water through the filter and toss them. They’ll likely be full of loose charcoal dust and sediment. Your goal is to get the water as clear as you possibly can before moving on to the final, pathogen-killing purification step.
The Power of Activated Carbon
The charcoal in your DIY filter works through a process called adsorption, where certain chemical impurities literally stick to the carbon’s surface. This is the exact same principle used in high-end water filters that feature advanced activated carbon elements.
Carbon-based purification has become the go-to for tackling invisible threats like micropollutants. In fact, the global activated carbon filters market is expected to hit USD 2.6 billion by 2032, a testament to its incredible efficiency. Activated carbon has a mind-bogglingly massive surface area—up to 3,000 square meters per gram—which allows it to trap contaminants like pesticides and industrial chemicals. You can explore more about these water treatment trends and their impact.
A homemade charcoal filter is great for improving water’s taste, smell, and clarity. But it is not a standalone solution. Always, always follow it up with a method like boiling to neutralize all microbiological threats.
Solar Water Disinfection (SODIS)
Believe it or not, one of the simplest and most effective purification methods requires nothing more than sunlight and a clear plastic bottle. It’s called Solar Water Disinfection, or SODIS, and it uses the sun’s ultraviolet (UV) radiation to destroy pathogens. This technique is so effective it’s recognized by the World Health Organization for use around the globe.
Getting it done is straightforward:
- Grab some clear plastic bottles. PET (Polyethylene terephthalate) plastic is ideal because it lets UV-A rays pass through.
- Fill the bottles with water that’s as clear as possible. If it’s cloudy, pre-filter it first with your DIY bio-filter or even just a cloth.
- Seal the bottles tightly and lay them on a reflective surface—think aluminum foil or even a light-colored roof—to maximize sun exposure.
- Leave the bottles in direct, strong sunlight for at least six hours. If it’s an overcast day, you’ll need to leave them out for two full days to be safe.
The combination of UV radiation and the sun’s heat works together to kill off bacteria, viruses, and protozoa. SODIS is a perfect example of how to purify water with minimal resources, turning basic physics into a reliable survival tool.
How to Store Water Safely and Avoid Recontamination
You’ve done the hard work of purifying your water—don’t let it go to waste. The final step is just as critical: storing it properly. All it takes is one dirty dipper or an unsealed jug to undo everything and reintroduce a host of nasty pathogens.
Safe storage is all about creating a closed, sterile environment. It’s the final link in the chain that ensures the water you drink is as safe as the moment you finished treating it.
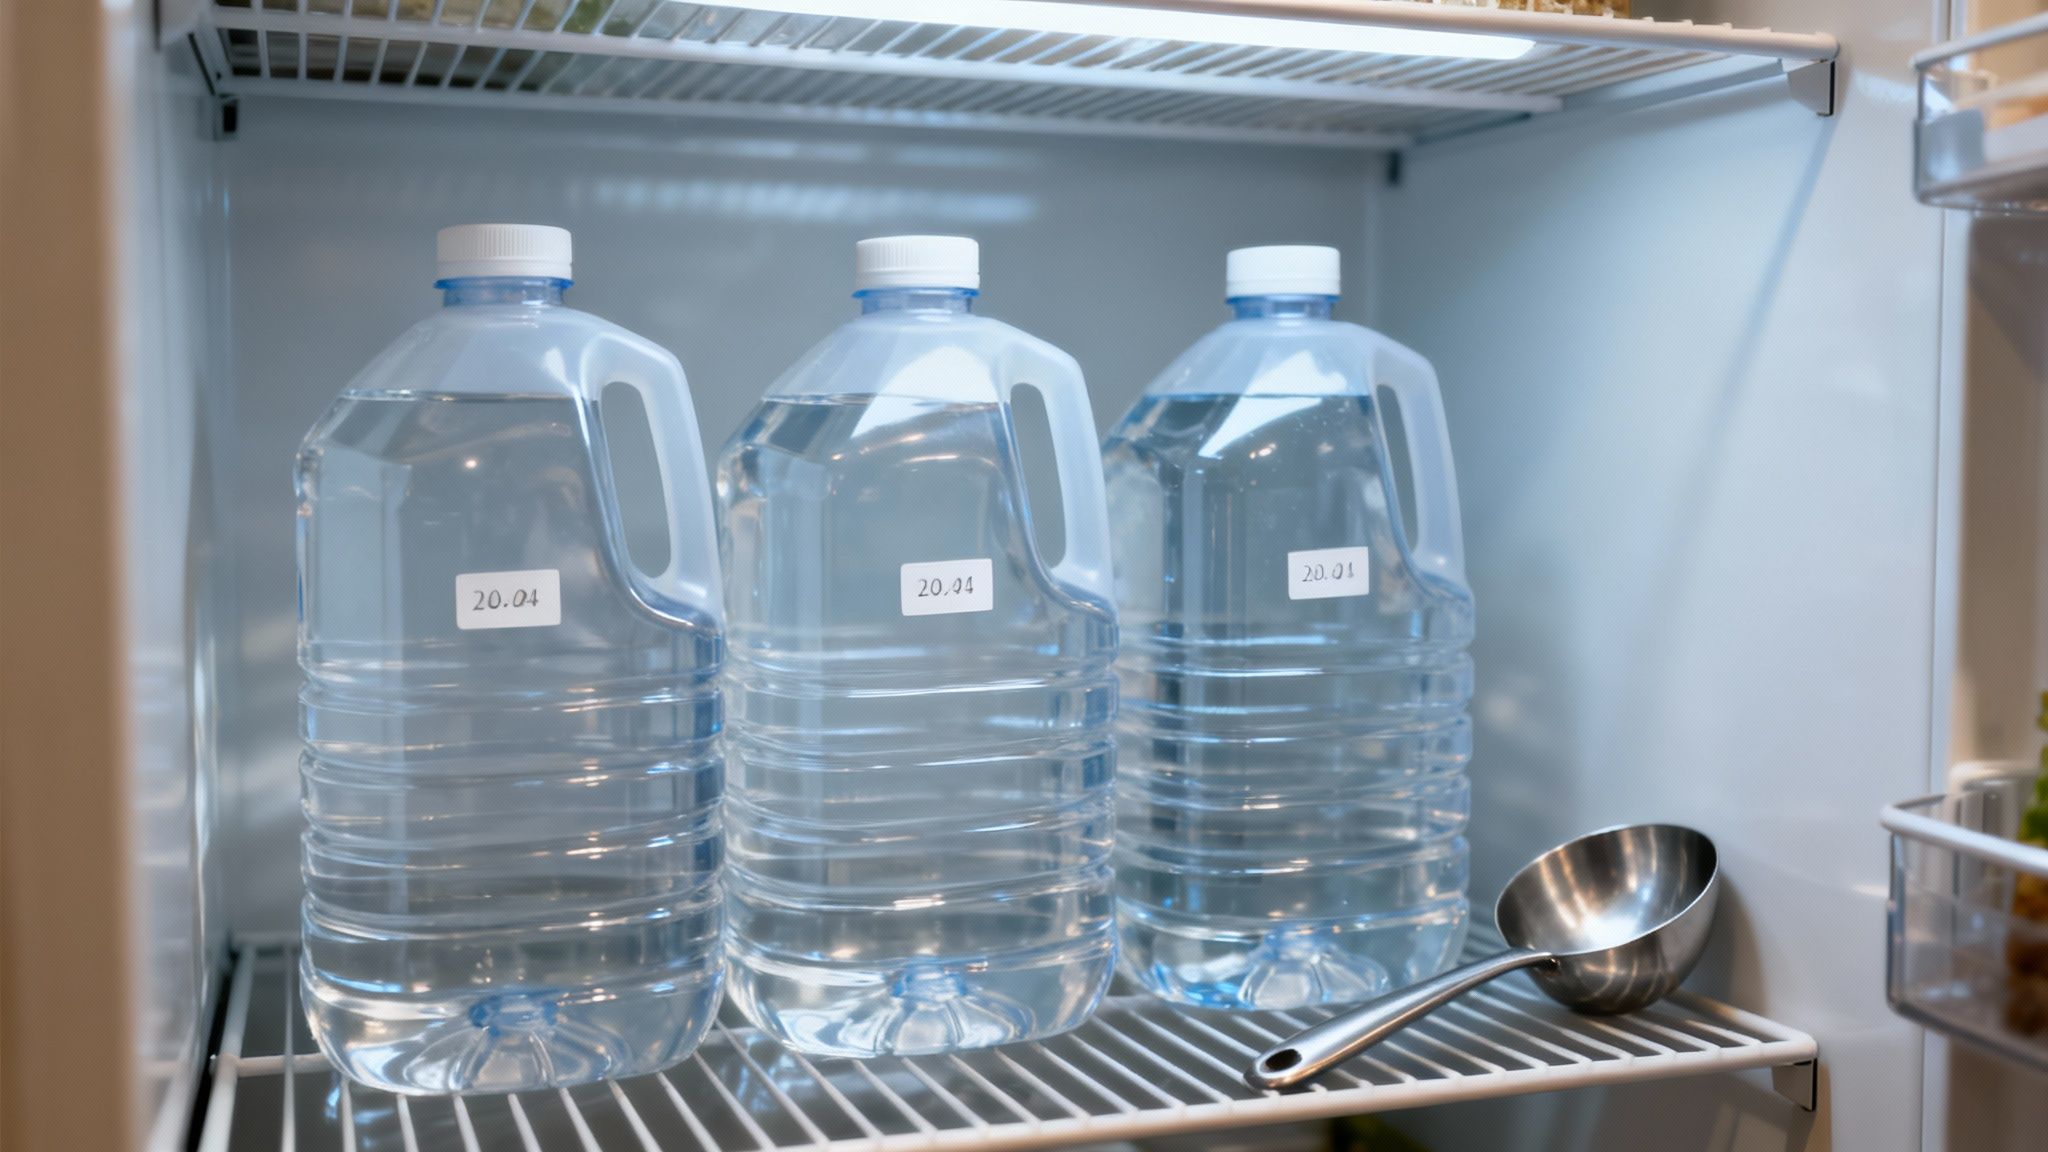
Choosing the Right Containers
Your container is the first and most important line of defense. Not all jugs are created equal, and grabbing the wrong one can leach chemicals into your water or fail to protect it. Stick with what’s proven to work.
- Food-Grade Plastic: Look for HDPE (high-density polyethylene) containers, which are usually marked with a #2 recycling symbol. Those big blue Reliance Aqua-Tainer jugs are popular in the prepper community for a reason. They’re tough, block out light, and won’t make your water taste like plastic.
- Glass Jars: Glass is fantastic because it’s completely inert and easy to sterilize. Canning jars or big glass carboys are perfect. The obvious downside is that they’re heavy and breakable, making them a much better choice for your at-home stockpile than a bug-out bag.
A word of warning: never use old milk or juice jugs. Even after a good washing, trace amounts of sugar and protein can linger, creating a perfect breeding ground for bacteria. Only use containers that have only ever held water.
Before you fill anything, you have to sanitize it. First, wash the container thoroughly with soap and water and rinse it out. Then, create a sanitizing solution by mixing one teaspoon of unscented household bleach per quart of water. Swirl this solution around inside, making sure it coats all surfaces. Let it sit for two minutes, then pour it out and let the container air dry completely.
Best Practices for Long-Term Storage
With your water purified and your containers prepped, a few simple rules will keep that supply drinkable for the long haul. Storing it the right way prevents algae and bacteria from growing and keeps it tasting fresh.
From a safety standpoint, properly treated and stored water can last indefinitely. For the best taste, though, it’s smart to rotate your supply every six to twelve months. This is a core part of building any reliable emergency stockpile, something we cover in detail in our 72-hour water plan.
Follow these essential tips:
- Seal It Tight: Every container needs a secure, airtight lid. This is your barrier against airborne dust, germs, and even insects.
- Keep It Cool and Dark: Find a spot with a stable, cool temperature that’s out of direct sunlight. A basement, pantry, or closet is perfect. Sunlight is the number one enemy here—it encourages algae to grow, even in treated water.
- Label Everything: Grab a permanent marker and write the date you purified the water on each container. This makes it easy to rotate your stock, ensuring you always use the oldest water first.
- Hands-Off Dispensing: When you need a drink, don’t dip a cup or your hands into the main container. That’s just asking for contamination. Use a clean ladle, or better yet, a container with a built-in spigot.
Common Questions About Water Purification
Even after you’ve got the main purification methods down, some questions always seem to pop up. These are the practical, real-world “what ifs” that can make or break your confidence when you’re actually out there.
Let’s clear the air and tackle some of the most common questions we hear.
Do I Need to Boil Water if I Use a Filter?
This is a great question, and the real answer is: it depends entirely on your water source and the filter you’re using.
Most backcountry filters you see are fantastic at pulling out bigger threats like bacteria and protozoa. But they can’t always catch the tiny stuff, specifically viruses.
If you’re pulling water from a remote mountain stream, miles from any people, the virus risk is almost zero. A good filter is likely all you need. The story changes if you’re anywhere near farms, busy campsites, or populated areas. In those spots, the risk of viral contamination from human waste shoots way up.
When in doubt, use a two-step process for bombproof safety: filter the water first to get rid of sediment and larger bugs, then boil it or hit it with chemicals or a UV pen to kill any viruses. Or, you could just carry a dedicated purifier like a Grayl GeoPress, which is built to remove bacteria, protozoa, and viruses all in one go.
How Can You Tell if Water Is Unsafe Without a Test Kit?
Here’s the single most important rule to internalize: treat all untreated water as if it’s unsafe. The most dangerous pathogens are completely invisible to the naked eye. You can’t see, smell, or taste Giardia or E. coli.
That said, your senses can still spot some obvious red flags that should make you extra careful. You should absolutely steer clear of water that shows any of these signs:
- High Turbidity: Is the water cloudy, murky, or full of floating gunk?
- Strange Smell: Does it have a chemical odor or a rotten-egg smell? That’s a classic sign of sulfur bacteria.
- Discoloration: Is the water an odd color—brown, green, or with an oily sheen on top?
- Proximity to Contamination: Is it downstream from a farm, factory, town, or even a popular hiking trail?
While clear, cold, fast-moving water is always a better bet than a stagnant pond, it’s still no guarantee. Use your eyes and nose for a quick field assessment, but never, ever let them replace proper purification.
Remember this: clarity does not equal purity. Some of the most pristine-looking water sources can be teeming with microscopic threats that will put you out of commission for days.
Can I Use a Brita Pitcher in an Emergency?
This is a common and incredibly dangerous misconception. The answer is a hard no. Never, ever rely on household pitcher filters like Brita or PUR to make untreated water safe in an emergency.
Those filters are designed to improve the taste and smell of water that’s already been treated by a municipal system. They’re great at reducing chlorine and some minerals. They are not designed to remove microbiological threats like bacteria, protozoa, or viruses.
Using one on contaminated water gives you a false sense of security and won’t protect you from getting sick. Proper water purification and knowing about emergency sanitation supplies are two sides of the same coin for staying healthy in a crisis.
How Long Do Water Purification Tablets Last?
Chemical treatments are a fantastic, lightweight backup, but they absolutely have a shelf life. Most iodine or chlorine dioxide tablets are good for about four years from their manufacturing date.
But that lifespan depends heavily on how you store them. To keep them potent, you have to store them in a cool, dark, and dry place. Heat, moisture, and direct sunlight will break down the chemicals and make them useless.
Always check the expiration date before you bet your health on them. If you find tablets that are discolored, crumbly, or look like they’ve gotten wet, just toss them. It’s not worth the risk.
At AATF Survival Guide, we believe knowledge is the most important survival tool you can have. By understanding these nuances, you’re better equipped to make smart, safe decisions for yourself and your family, no matter the situation.