Underground food storage is a time-tested strategy that harnesses the earth’s naturally stable temperature to keep food fresh for months, sometimes even years. It’s a resilient approach that safeguards your supplies from power outages, pests, and extreme weather, offering a degree of security a kitchen pantry just can’t touch. This isn’t just some old-fashioned trick; it’s a profoundly practical solution for modern self-reliance.
Why Go Underground for Food Security

When you pack your pantry or basement with supplies, you’re in a constant fight against temperature swings, humidity, and pests. Every summer heatwave threatens your canned goods, and every winter freeze is a risk. Storing food underground completely flips the script, letting the earth itself become your refrigerator and your fortress.
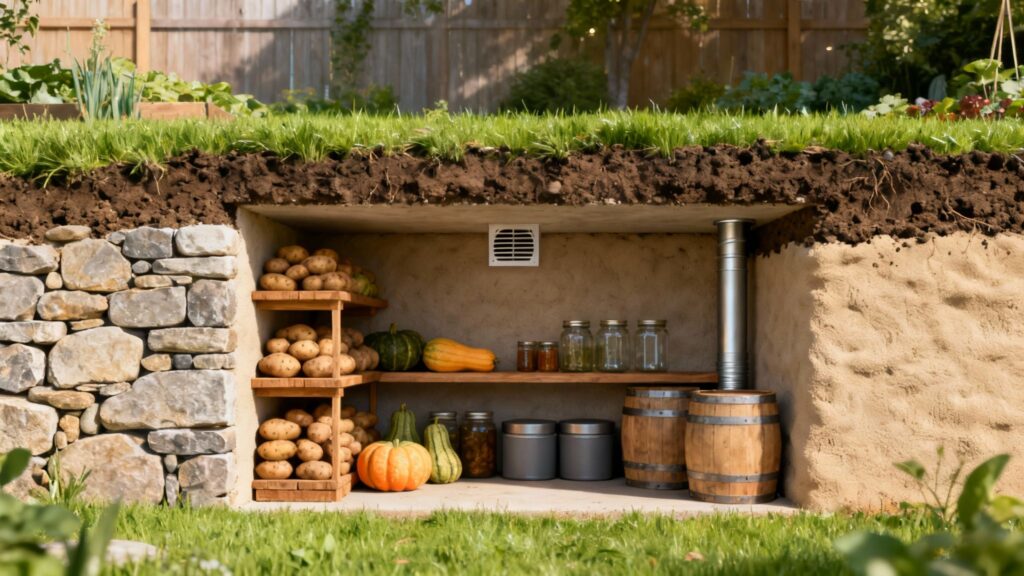
Just a few feet beneath the surface, the ground holds a remarkably steady temperature all year long, typically hovering between 50-55°F (10-13°C). This natural geothermal cooling creates the perfect conditions for preserving a huge variety of foods—all without needing a single watt of electricity.
The Core Benefits of Earth-Sheltered Storage
The advantages here are about so much more than just keeping things cool. You’re creating an entire system that protects your investment in your family’s future.
- Natural Climate Control: That stable, cool environment dramatically slows down spoilage. Root vegetables stay firm, apples keep their snap, and canned goods are shielded from the temperature fluctuations that ruin their quality and shorten their lifespan.
- Ultimate Discretion and Security: Let’s be honest, a buried cache or a well-disguised root cellar is far less obvious than a shed packed with supplies. It keeps your emergency food reserves out of sight and safe from looters or desperate neighbors in a crisis.
- Pest and Rodent Protection: A properly built underground unit is a sealed vault. It creates a solid physical barrier that mice, insects, and other vermin simply can’t chew through, unlike the walls of a typical pantry or basement.
Below is a quick breakdown of why this method is so effective, especially for modern preppers.
Key Advantages of Storing Food Underground
| Benefit | Description | Modern Application |
|---|---|---|
| Energy Independence | Operates 24/7 without electricity, making it immune to power grid failures. | Ensures food safety during blackouts, storms, or EMP events. |
| Stable Environment | Maintains a consistent 50-55°F temperature and high humidity naturally. | Extends the shelf life of produce and canned goods far beyond a pantry. |
| Enhanced Security | Conceals food stores from pests, rodents, and potential thieves. | Protects your long-term food investment from common threats. |
| Space Efficiency | Utilizes unused underground space, freeing up valuable room inside the home. | Ideal for suburban lots where indoor storage space is limited. |
This table just scratches the surface. The real value is the peace of mind knowing your food is safe no matter what’s happening in the world.
For anyone serious about preparedness, an underground food storage system moves beyond simple stockpiling and into true, long-term resilience. It’s an asset that works for you 24/7, with or without a functioning power grid.
And this strategy isn’t just for homesteaders with acres of land. Modern techniques and materials make it achievable even on smaller, suburban properties. Knowing your food is cool, safe, and protected is invaluable when facing supply chain chaos or other unpredictable events.
To dive deeper into the fundamentals of building a robust supply, you can explore our comprehensive guide on long-term food storage for more strategies.
Finding the Perfect Spot for Your Root Cellar or Cache
Before a single shovel hits the dirt, the success or failure of your entire project hangs on where you decide to build. The right spot isn’t just about convenience; it’s about working with nature, not fighting against it every step of the way.
Picking the wrong location can lead to a flooded cellar, unstable walls, or terrible temperature control. These are costly, soul-crushing mistakes that are a whole lot harder to fix once the hole is dug.
A prime site uses the earth’s natural tendencies to create the perfect preservation environment. That means you need to get a handle on three critical factors: soil type, water drainage, and the local water table.
Understanding Your Soil Composition
The ground under your feet is your primary building material. You’re looking for soil that’s stable, drains well but not too well, and is reasonably easy to work with.
- Sandy Soil: Drains like a dream, which is great for keeping water from pooling around your structure. The downside is that it’s loose and crumbly, meaning the walls of your dig can collapse easily. You’ll need to invest time and materials in shoring it up during construction.
- Clay Soil: When it’s dry, clay is rock-solid and holds its shape perfectly, making for a clean excavation. But clay holds water like a sponge. That creates immense hydrostatic pressure against your cellar walls, which can lead to leaks or even structural failure.
- Loam: This is the sweet spot. Loam is a balanced mix of sand, silt, and clay, offering both good stability and decent drainage. If you have loamy soil, you’ve got the best-case scenario for a DIY build.
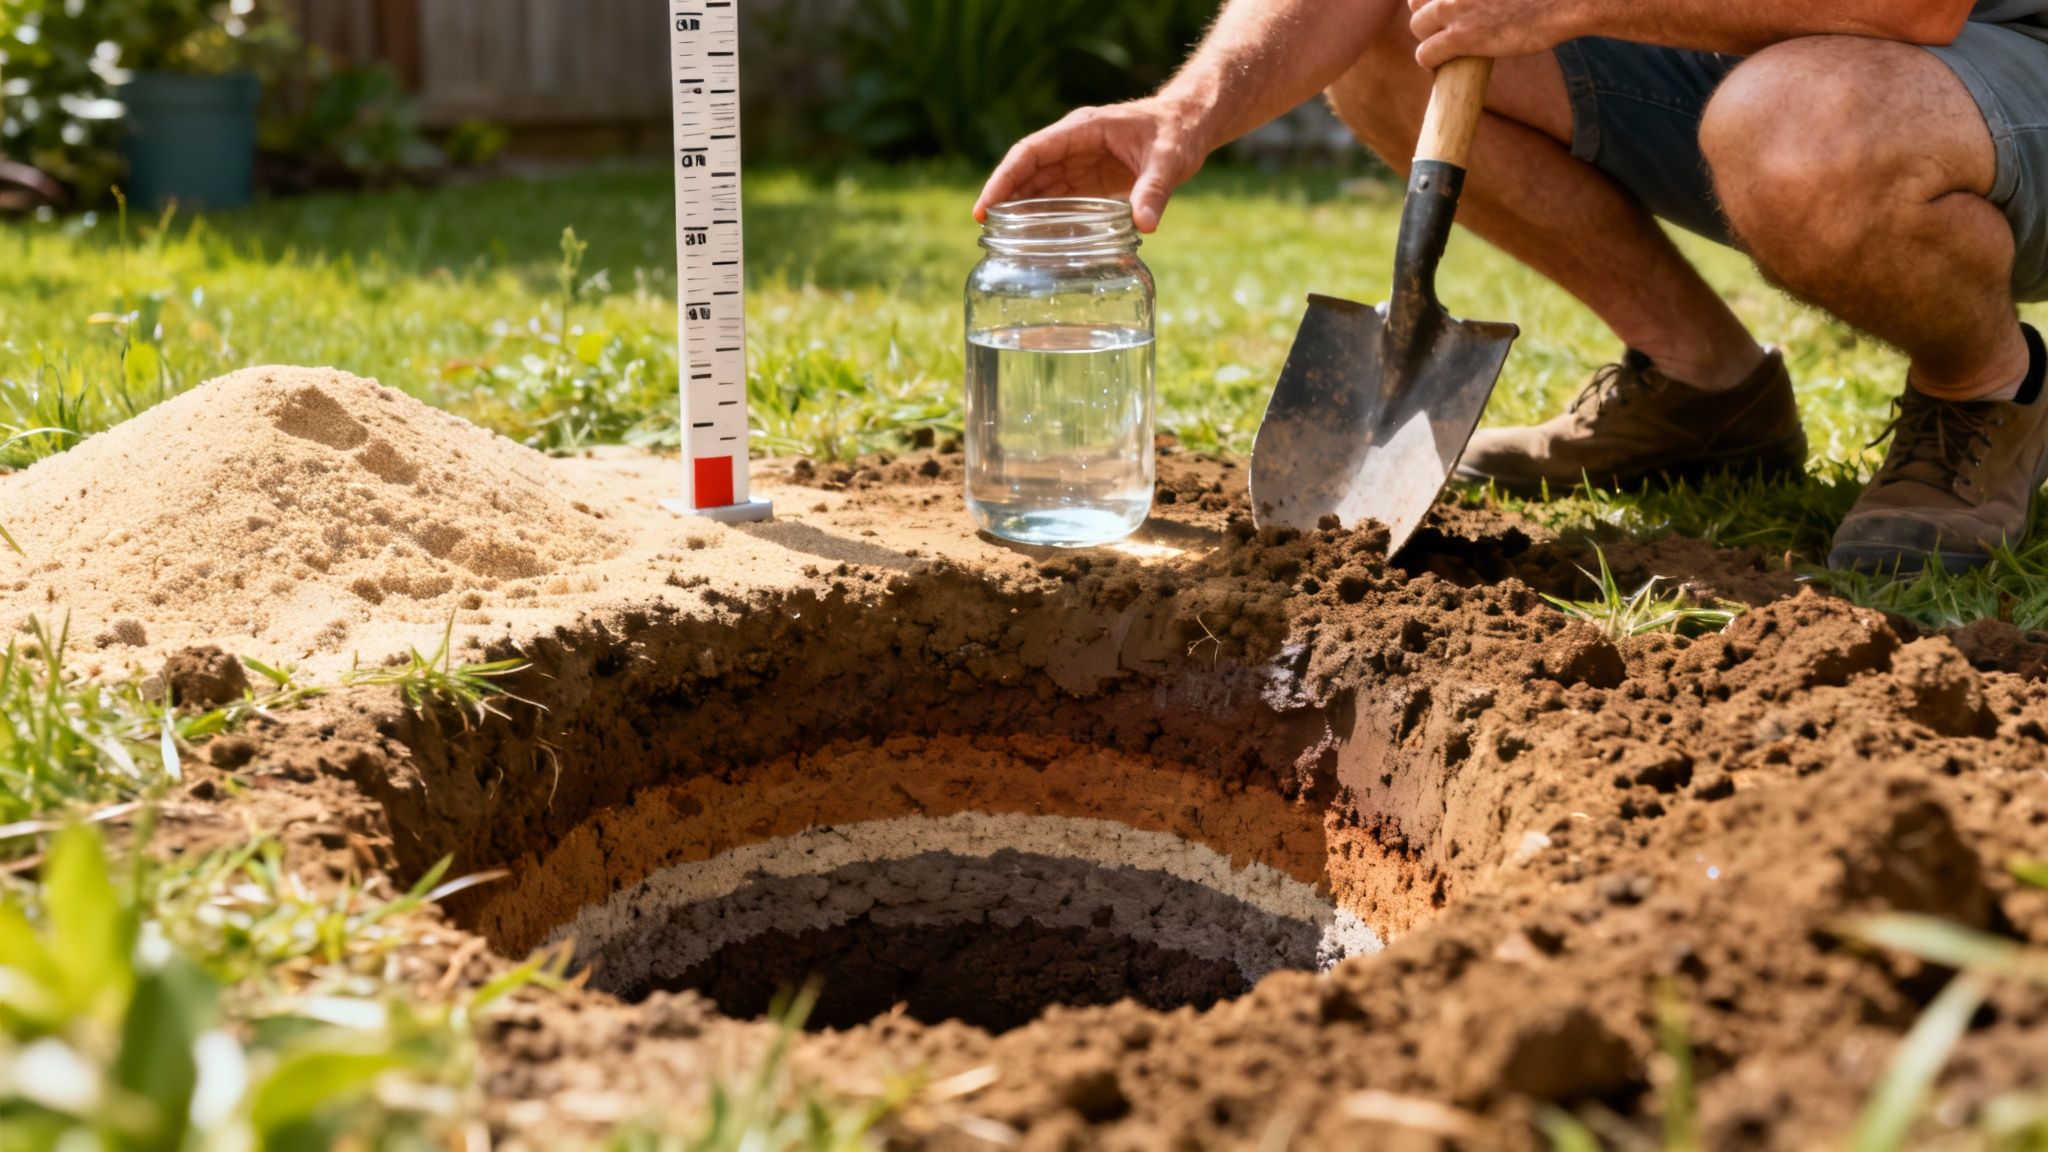
You can get a surprisingly good read on your soil with a simple “jar test.” Fill a Ball mason jar about a third of the way with soil from your dig site, top it off with water, shake it like crazy, and let it sit for a day. The layers that form—sand on the bottom, silt in the middle, clay on top—will tell you exactly what you’re working with.
How to Assess Water Drainage
Even with perfect soil, you need to understand how water moves across your property. Your goal is to build where water naturally flows away from, not towards. Never, ever build in a low-lying spot or a natural basin where rain and snowmelt will inevitably collect.
Your greatest enemy in underground storage is uncontrolled water. A simple DIY percolation test can save you from the nightmare of a perpetually damp or flooded cellar.
To run a “perc test,” dig a hole about a foot deep and a foot wide. Fill it with water and let it drain completely; this first step saturates the surrounding soil. Immediately fill it again and measure how fast the water level drops. A rate of about one inch per hour is a great sign of well-draining soil that’s suitable for an underground build.
If the water vanishes in just a few minutes, you’ve got very sandy soil and might need a liner to help hold onto some beneficial humidity. If the water level barely budges after several hours, you’re dealing with heavy clay. That site will almost certainly require an engineered solution like French drains to protect your investment.
Sizing Your Storage: Walk-In Cellar vs. Buried Cache
Once you have a viable location scouted, it’s time to decide on the scale of your project. This comes down to your primary goal: are you storing a winter’s harvest or a multi-year emergency supply?
A walk-in root cellar gives you tons of space and easy access, making it perfect for homesteaders with bushels of potatoes, apples, and shelves full of canned goods. A common mistake is building too small. A good rule of thumb is to plan for one cubic foot of space per 50 pounds of produce. For dry goods, a standard Gamma 5-gallon bucket holds around 30-35 pounds of rice or beans and takes up about 1.25 cubic feet. A family of four planning for a six-month supply could easily need 100-150 cubic feet of storage.
On the other hand, a buried cache—using something like a repurposed chest freezer or 55-gallon food-grade barrels—is all about discretion and simplicity. While smaller, caches are fantastic for securing high-value, long-term supplies like freeze-dried meals, grains, or even ammunition. Their smaller footprint also makes them easier to site on properties with limited space or tough soil conditions. These are just a few of the many options for off-grid food storage that you can tailor to your specific needs.
Building Your Underground Storage: From DIY to Pre-Built

With your site picked out, it’s time to turn those plans into a tangible asset. This is where your vision for food security becomes a reality, and thankfully, there are several proven paths you can take. The right choice will come down to your budget, skillset, and how much you plan to store.
Whether you’re aiming for a spacious walk-in root cellar or a discreet survival cache, the core principles are the same: structural integrity and environmental control. Let’s dig into three popular and effective construction methods, each offering a different balance of labor, cost, and capacity.
The Classic Cinder Block Root Cellar
If you’re looking for a permanent, high-capacity solution, the cinder block root cellar is a time-tested workhorse. This method creates an incredibly durable, walk-in structure that can last for generations, giving you plenty of room for shelves and bulk storage.
It all starts with a solid foundation. After you’ve excavated to the right depth, a thick base of compacted gravel is crucial for drainage. On top of that, you’ll pour a reinforced concrete slab. This floor gives you a stable, level surface and is your first line of defense against groundwater.
The walls go up course by course, laying cinder blocks reinforced with rebar. You’ll want to fill the cores with concrete for extra strength to withstand the immense pressure of the surrounding soil. Waterproofing isn’t just an option—it’s non-negotiable. The exterior walls must be coated with a high-quality foundation sealant like Drylok or a rubberized membrane before backfilling.
Proper waterproofing is the single most critical step in a cinder block build. Even a tiny leak can ruin the cellar’s environment, leading to mold and spoiled food. Don’t rush this part. Apply multiple coats and think about adding a dimple mat for an extra layer of protection.
The Cost-Effective Earthbag Dome
On a tighter budget or just prefer working with natural materials? Earthbag construction is a fantastic alternative. This technique involves filling polypropylene bags with a mix of your excavated soil and a stabilizer like clay or a little cement. You stack these bags in overlapping courses, like giant bricks, and tamp them down to create dense, rock-solid walls.
The dome shape is particularly clever. It distributes the weight of the overhead earth evenly, which means it requires less internal support than a square structure. It’s a labor-intensive method, no doubt, but the financial investment is minimal if you can use soil from your own site.
A huge advantage of earthbag building is its incredible thermal mass. The thick, earthen walls are brilliant at absorbing and slowly releasing heat, which helps maintain a very stable internal temperature. And just like any underground build, a good gravel foundation and an exterior waterproof barrier are essential.
Using the earth itself for preservation is an ancient concept. Back in 16th-century Burjassot, Spain, farmers dug deep, bottle-shaped silos to protect their grain. These vaults shielded the harvest from weather and pests by keeping temperatures steady, slashing post-harvest losses from over 30% down to under 5%. This old-school tech still has a lot to teach us.
The Simple and Discreet Buried Cache
For anyone who prioritizes speed, simplicity, and staying off the radar, the buried cache is an excellent starting point. This approach is perfect for securing a smaller, high-value stash of long-term foods like Mountain House freeze-dried meals or grains. Best of all, it doesn’t require the major excavation or masonry skills of a full root cellar.
Two popular options for this method are repurposing a chest freezer or using 55-gallon food-grade barrels.
- Repurposed Chest Freezer: An old, non-working chest freezer is a prepper’s dream. It’s already insulated, waterproof, and rodent-proof. Just dig a hole, place the freezer on a bed of gravel for drainage, and secure the lid. Some folks add extra weight on top or even a locking mechanism for good measure.
- Food-Grade Barrels: Those blue or white plastic barrels are another great choice. Dig a hole deep enough to bury the barrel, leaving just the top accessible. Like the freezer method, setting it on a gravel base is key. This approach also lets you create multiple, dispersed caches around your property for added security.
The containers you use inside the cache are just as important as the cache itself. For a detailed breakdown of what to use for different foods, check out our guide on the best food storage containers for long-term preparedness. No matter which method you pick, properly packaging your supplies is what will guarantee their longevity.
Creating the Perfect Climate for Long-Term Preservation
A well-built underground structure is a fantastic start, but it’s only half the battle. The real magic of long-term preservation happens when you master the climate inside. Your goal here is to create a stable, controlled environment that dramatically slows down natural decay—all without plugging anything in.
This comes down to a delicate balance of temperature, humidity, and airflow. Get these three things right, and your food storage transforms from a simple hole in the ground into a highly effective, passive refrigerator.
Mastering Passive Ventilation
The secret to a healthy root cellar is constant, gentle air exchange. Stagnant, damp air is a breeding ground for mold and mildew, which can wipe out your entire food supply in a hurry. A good passive ventilation system uses simple physics to keep the air fresh.
It only takes two key components:
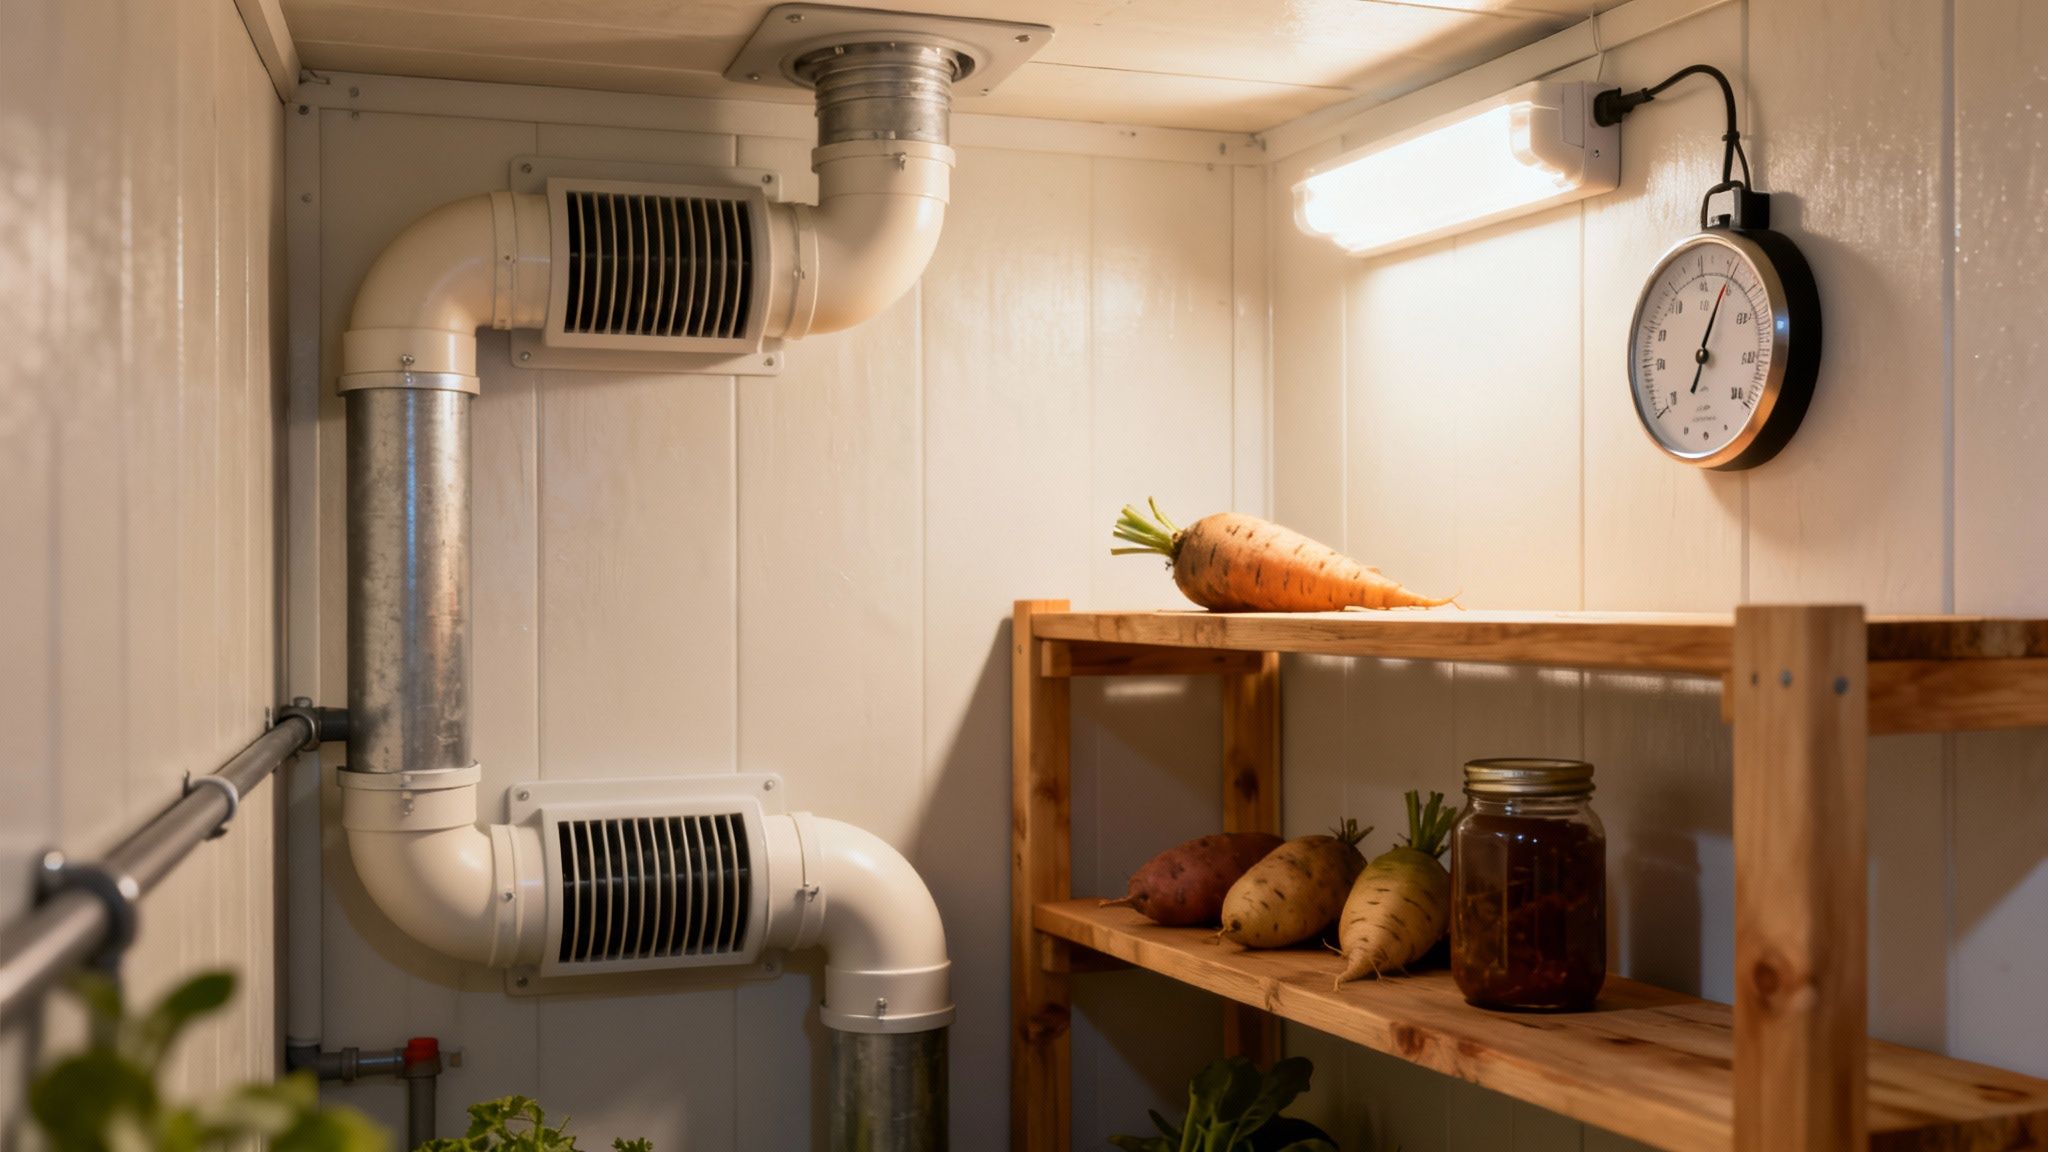
- A low intake vent: This pipe should run from the lowest point inside your cellar, up and out of the ground a little ways from the structure itself. It pulls in cool, dense, fresh air from outside.
- A high exhaust vent: Placed at the highest point inside the cellar, this pipe lets warmer, moister, and lighter air rise and escape naturally.
This continuous cycle draws fresh air through your space, preventing ethylene gas—a natural byproduct of ripening produce like apples—from building up and spoiling other foods prematurely. It’s a simple, set-and-forget system that lets your cellar breathe.
Proper ventilation is non-negotiable. It’s the single most important factor in preventing mold and ensuring your stored food remains safe and palatable for months on end.
Temperature and Humidity: The Two Pillars of Preservation
Not all foods are created equal, and their storage needs are just as diverse. Your main challenge will be creating different zones within your cellar to accommodate these needs. The ideal underground temperature is a consistent 50-55°F (10-13°C), but humidity is the real variable you need to manage.
For example, root vegetables like carrots and potatoes absolutely thrive in high humidity (around 90-95%), which keeps them from shriveling up. On the flip side, dry goods like grains, beans, and canned foods need a much drier environment to prevent rust and spoilage.
To manage these competing needs, you can create microclimates. Storing root vegetables in open bins on a damp gravel or dirt floor helps maintain high local humidity. For your dry goods, place them on high shelves where the air is naturally a bit warmer and drier. You can even add a desiccant like DampRid inside sealed containers for extra protection against moisture. A quality hygrometer, like those from AcuRite, is an invaluable tool for keeping an eye on these levels.
Optimal Underground Storage Conditions for Common Foods
Here’s a quick reference table to help you organize your supplies for the longest possible shelf life. Understanding these ideal conditions is a key part of extending your survival food shelf life, as poor storage can ruin even the best-prepared supplies.
| Food Type | Ideal Temperature Range (°F) | Ideal Humidity Range (%) | Storage Tips |
|---|---|---|---|
| Root Vegetables | 32-40°F | 90-95% | Store in bins of damp sand or sawdust to maintain moisture. |
| Apples & Pears | 30-40°F | 80-90% | Wrap individually in newspaper to prevent them from touching. |
| Canned Goods | 50-70°F | Below 60% | Keep on high shelves to avoid rust from condensation. |
| Dry Goods (Grains, Beans) | 50-60°F | Below 15% | Store in airtight containers with oxygen absorbers. |
| Squash & Pumpkins | 50-55°F | 50-70% | Cure them in the sun first; store on slatted shelves for airflow. |
By strategically placing your food based on this chart, you create a highly efficient system that keeps everything in its prime. This attention to detail is what separates a mediocre food cache from a truly resilient, long-term pantry.
How to Pack and Protect Your Food Stash
Building the perfect cellar is only half the battle. If your food isn’t prepared to last, all that hard work means nothing. How you pack, protect, and manage your inventory is just as critical as the structure itself. Your real goal here is to create multiple layers of defense against the big four: spoilage, moisture, oxygen, and pests.
Tossing a bag of potatoes onto a shelf and calling it a day is a recipe for disaster. The effort you put in before your food even sees the inside of your cellar will directly determine its shelf life and quality months, or even years, down the road.
Preparing Fresh Produce for the Long Haul
For anything coming straight out of the garden, there’s a crucial but often-skipped step: curing. This isn’t just a friendly suggestion; for certain vegetables, it’s a non-negotiable part of achieving long-term storage success.
Curing simply means letting your produce rest in a warm, humid spot for a bit right after harvesting. This simple process allows any nicks or bruises to heal over, thickens the skin, and converts some starches to sugars, which dramatically extends its storage life.
- Potatoes and Sweet Potatoes: These need 1-2 weeks at a mild 55-60°F with high humidity. This develops a tough, protective skin that locks in moisture and keeps rot out.
- Winter Squash and Pumpkins: They like it a bit warmer, requiring about 10 days at 80-85°F. This is what hardens their rind into a durable shell.
- Onions and Garlic: Need a dry, airy place for 2-3 weeks. You’ll know they’re ready when their necks are completely dry and the outer skin gets that classic papery feel.
Once cured, these items are finally ready for the cool, stable environment of your cellar. Rushing this step is a surefire way to introduce mold and spoilage that can quickly spread to everything else.
Oxygen-Free Packing for Dry Goods
When you’re dealing with dry goods like rice, beans, pasta, and grains, your main enemies are oxygen and insects. Oxygen makes fats go rancid and slowly degrades nutritional value. Worse yet, almost all dry goods arrive with microscopic insect eggs just waiting for the right conditions to hatch.
The solution is oxygen-free packing, and it’s a game-changer. All you need are Mylar bags and oxygen absorbers.
Mylar is a tough, non-porous material that acts as an incredible barrier against light, moisture, and air. When you seal an oxygen absorber inside a Mylar bag, it sparks a chemical reaction that pulls all the available oxygen out of the air, removing over 99.9% of it and creating a vacuum-like seal.
This oxygen-free environment does two critical things: it stops spoilage dead in its tracks and prevents any insect eggs from ever hatching. It’s the gold standard for preserving dry goods for decades.
If you’re looking to maximize your food preservation, combining methods is always a smart move. Our guide on how to vacuum seal food for storage covers additional techniques that work perfectly alongside this approach.
Pest-Proofing and Inventory Management
Your final layers of defense are all about fortifying the cellar itself and keeping a meticulous eye on your supplies. Pests are relentless, and a disorganized stash is a wasteful one.
First, seal every single potential entry point. Cover all ventilation pipes with sturdy ¼-inch hardware cloth. This fine, strong mesh lets air flow but is impossible for mice, snakes, or large insects to chew through. Double-check your door for a tight seal all the way around; a simple rubber weatherstrip can close any gaps that pests could squeeze through.
Finally, live by the First-In, First-Out (FIFO) system. The idea is simple: use your oldest supplies first. The easiest way to manage this is with clear, bold labeling. Grab a Sharpie permanent marker and write the contents and storage date directly on every single container, bucket, or Mylar bag. Organize your shelves so new stuff goes to the back and older items are always front and center, ready to grab. This simple discipline ensures nothing goes to waste and makes rotation effortless.
Answering Your Questions About Underground Food Storage
Even the most meticulously planned underground food storage project will throw a few curveballs your way. It’s only natural to have questions pop up, especially when you’re digging into the nitty-gritty details.
Let’s walk through some of the most common hurdles people face during the planning and building stages. Think of this as your go-to reference for solving problems before they get out of hand, saving you a ton of time and sweat down the road.
How Deep Should I Dig My Root Cellar?
The magic number for depth all comes down to your local frost line. To lock in that perfect, stable temperature of 50-55°F (10-13°C) year-round, you need to get the ceiling of your cellar below the deepest point the ground freezes solid in winter.
For a good chunk of the U.S., this means you’re looking at a dig of at least 8 to 10 feet. If you’re up in the colder northern states, you might even need to push a bit deeper. The whole point is to get the structure fully earth-sheltered, letting the immense thermal mass of the surrounding soil do all the temperature regulation for you. A cellar that’s too shallow will always fight you, fluctuating with the seasons instead of staying cool and stable.
What’s the Best Way to Manage a High Water Table?
Hitting water while you’re digging doesn’t have to be a project-killer, but it does mean you need to pivot your strategy. Trying to force a fully buried cellar into soggy ground is a recipe for disaster—you’ll be in a constant battle with flooding, moisture, and intense hydrostatic pressure pushing on your walls.
A high water table is a challenge, not a dead end. Instead of digging deep, consider a hillside design or a partially bermed structure to achieve the same earth-sheltered benefits without fighting against nature.
Here are a few smarter ways to adapt:
- Build into a hillside: This is often the best solution. By excavating horizontally into a natural slope, you get fantastic natural drainage and keep your structure well above the saturated soil.
- Create an earth-bermed shed: If you don’t have a hill, make one. Build a sturdy structure above ground using concrete or block, then pile and compact earth against three of the walls and over the roof. You’re effectively creating the same insulating blanket as a fully underground cellar.
- Install a French drain and sump pump: In borderline situations where the water table is just a nuisance, a well-designed drainage system can be your saving grace. A French drain will divert groundwater away from the foundation, while a reliable sump pump acts as your last line of defense. Just make sure you have a backup power source, like a Jackery portable power station, so it keeps working when the grid goes down.
Can I Store Canned Goods and Fresh Produce Together?
Technically, yes, but it’s not ideal without some smart organization. The conflict is simple: canned goods need a cool, dry place to prevent lids from rusting, while your potatoes and carrots crave a cool, damp environment to stay firm and fresh. Tossing them all in the same open space means one of them (or both) will suffer.
The solution is to create different “microclimates” within your cellar.
It’s actually pretty simple. Keep your jars and canned goods on shelves up high, where the air is naturally a bit warmer and drier. Down below, store your fresh produce in bins directly on a gravel or dirt floor, where humidity will be at its highest. This basic separation can dramatically extend the shelf life of everything you’re storing. If you’re still worried about moisture, you can always pack extra-sensitive dry goods in sealed, waterproof containers for good measure.

