
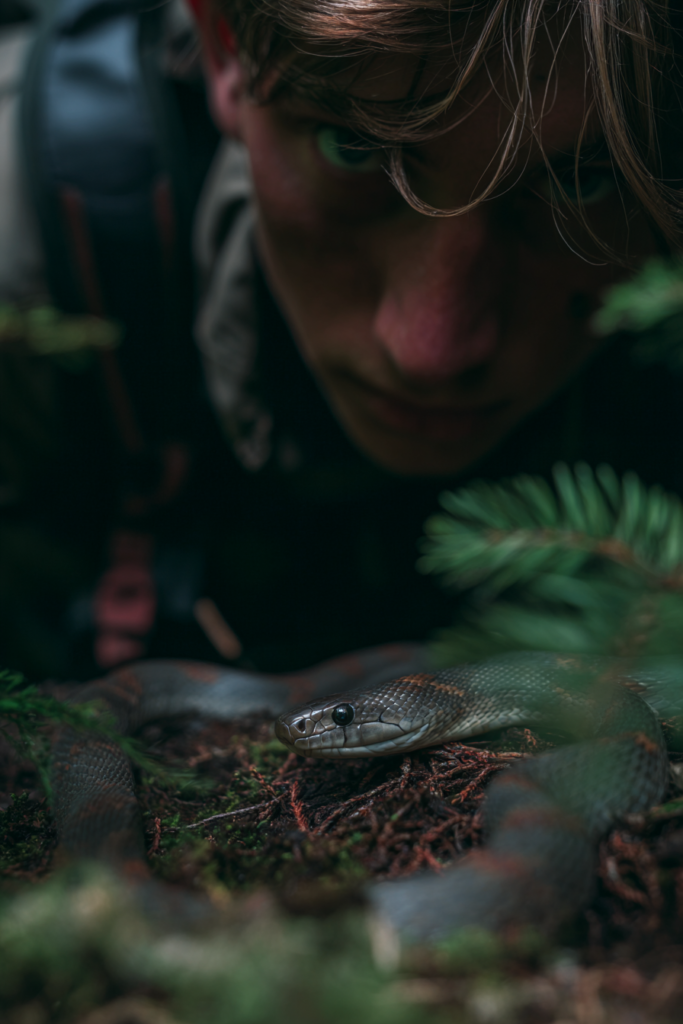
Knowing how to treat snake bites starts with one fundamental rule: stay calm. Your immediate actions should focus on getting the victim away from the snake, keeping the bitten limb still and below the heart, and calling for emergency medical help.
Forget everything you’ve seen in the movies. No cutting, sucking, or tourniquets are ever recommended. Those actions do more harm than good.
Your First Moves After a Snake Bite

The moments right after a snake bite are a true test of your composure and training. Hollywood has filled our heads with dramatic but dangerously wrong ideas. The reality is far less theatrical but demands immediate, correct action.
Your number one goal is to slow the venom’s spread and get professional medical help on the way. The steps you take in these first few minutes can dramatically influence the outcome, turning a potentially lethal event into a manageable emergency.
This isn’t about complicated procedures. It’s about executing a few foundational principles perfectly. The very first thing to do is make the scene safe for everyone.
Secure the Scene and Call for Help
Get the victim a safe distance away from the snake. You don’t want a second bite complicating things. And don’t waste precious time trying to capture or kill the snake for identification—that’s a high-risk move that rarely helps doctors with initial treatment. Modern antivenoms are often polyvalent, meaning they work against a range of venomous snakes common to a region.
Once the immediate threat is gone, your absolute first priority is to call for help. Dial 911 on your cell phone. If you’re deep in the backcountry with no service, this is where a reliable satellite messenger, like a Garmin inReach, becomes a genuine lifesaver. It lets you send an SOS with your exact GPS coordinates to emergency responders—an essential piece of gear for any serious prepper.
Immobilize the Victim Immediately
After that call is made, the single most important thing you can do is keep the victim still and calm. Venom travels through the lymphatic system, and its movement is supercharged by physical activity. Any motion—walking, panicked flailing—will pump that venom through the body much faster.
Key Takeaway: Calmness is a medical tool. A lower heart rate and minimal movement are your best non-medical defenses against the rapid spread of venom. Encourage the victim to take slow, deep breaths.
Have the person lie down in a comfortable position. Try to position the bitten limb so it’s at or slightly below the level of the heart. This uses gravity to help slow the venom’s journey toward the body’s core.
You can learn more by checking out our guide on creating an emergency preparedness kit, which is crucial for handling situations like this.
Prepare for Medical Arrival
While you’re waiting for help, a few simple actions can make a big difference for the medical team when they arrive.
- Remove Constricting Items: Gently take off any rings, watches, bracelets, or tight clothing from the bitten limb. Swelling can be incredibly rapid and severe. These items can quickly become tourniquets, cutting off circulation and causing serious tissue damage.
- Note the Time: Mark the exact time of the bite. This is a critical piece of information for the ER staff to gauge how fast symptoms are progressing and to decide on the best treatment.
Quick-Reference First Aid
When panic sets in, it’s easy to forget the basics. This table is a quick cheat sheet for the most critical actions to take—and what to absolutely avoid.
| What to Do (DO) | What to Avoid (DON’T) | Why It’s Critical |
|---|---|---|
| Move to safety & call 911 | Don’t try to capture the snake | Your priority is the victim, not the snake. Getting help is #1. |
| Keep the victim calm & still | Don’t let the victim walk or run | Movement speeds up venom circulation through the body. |
| Position the limb below the heart | Don’t apply a tourniquet | A tourniquet can concentrate venom and cause severe tissue death. |
| Remove jewelry & tight clothing | Don’t cut or suck the wound | These “movie” methods are ineffective and can cause infection. |
| Note the time of the bite | Don’t give alcohol or caffeine | These can increase heart rate and speed venom spread. |
Keeping these simple dos and don’ts in mind can make all the difference in the world while you wait for professionals to take over.
For those of us in the preparedness community, understanding the global context of snakebites really drives home the urgency. Every 10 seconds, someone in the world is bitten by a snake. This leads to as many as 138,000 deaths annually, mostly in rural areas with poor access to healthcare.
The difference proper care makes is stark. Australia, with antivenom for all its venomous species, sees only 2-4 deaths per year. Meanwhile, some regions in West Africa have an antivenom access rate as low as 2.5%. This just goes to show why proper, immediate first aid isn’t just a suggestion—it’s a critical intervention that buys the time needed to get definitive medical care.
Applying the Pressure Immobilization Technique Correctly
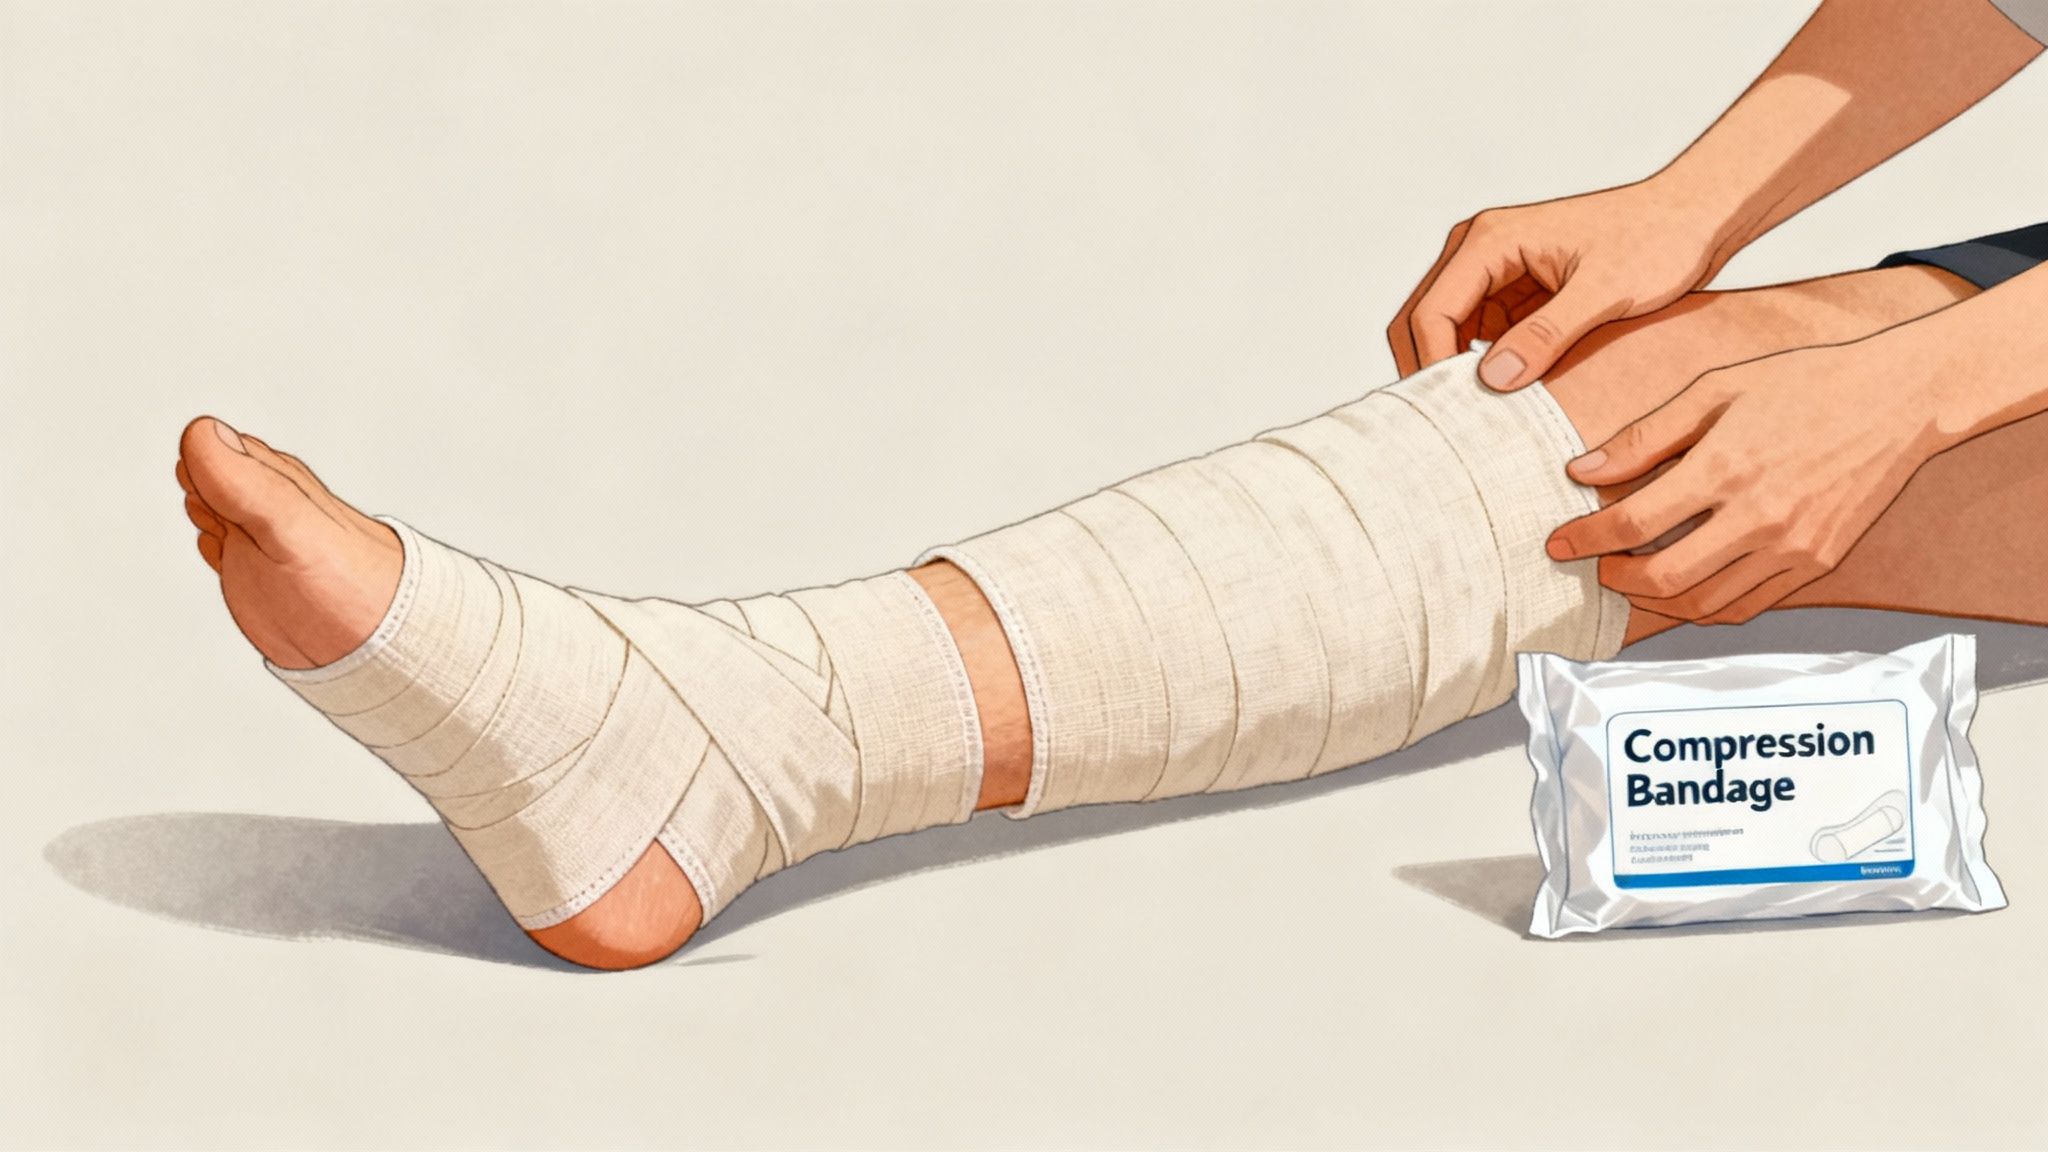
Once the victim is calm, still, and you know help is coming, you might need to apply a Pressure Immobilization Bandage (PIB). This technique is a game-changer for slowing down how fast venom moves through the lymphatic system, buying you precious time.
Let’s be crystal clear about what this is—and what it isn’t. This is not a tourniquet. You are not cutting off blood flow. The goal is to apply firm, even pressure over the entire limb, almost like you’re wrapping a sprained ankle. This compresses the lymphatic vessels just under the skin, which is the superhighway venom uses to travel.
This method is most effective for bites from neurotoxic snakes, like coral snakes in the U.S. or many of the venomous species found in Australia. It’s generally not recommended for the hemotoxic or cytotoxic venom of pit vipers like rattlesnakes. Concentrating that kind of tissue-destroying venom can cause devastating localized damage. If you know local protocols, follow them. If you’re unsure and suspect a pit viper, focus on immobilization without the pressure wrap.
The Right Tools for the Job
In a perfect world, you’d have a purpose-built compression bandage from a high-quality trauma kit. These are designed for consistent pressure and sometimes even have little rectangles printed on them that turn into squares when you’ve hit the right tension. An Israeli Bandage is a versatile and popular option found in many advanced first aid kits for this purpose.
But out in the field, you work with what you’ve got. You can improvise a pressure bandage from all sorts of things:
- Strips torn from clothing or a bandana.
- A rolled-up t-shirt.
- Even a lightweight emergency blanket like an S.O.L. Emergency Bivvy can be cut into usable strips.
The key is to use something with enough width so it applies broad pressure, not a thin, cord-like tourniquet that will do more harm than good.
How to Apply the Bandage
The application has to be methodical. Stay calm and work deliberately. Rushing here can make the whole effort useless or even dangerous.
- Start at the Bite Site: Begin wrapping directly over the bite wound. This puts immediate pressure where the venom was injected.
- Wrap Towards the Body: From the bite, keep wrapping up the limb toward the torso. If the bite is on a hand, wrap to the armpit. If it’s on a foot, go all the way up to the hip.
- Maintain Consistent Pressure: Keep the pressure firm and uniform. A good rule of thumb is that you shouldn’t be able to easily slide a finger between the bandage and the skin.
- Cover the Entire Limb: Don’t stop partway. Overlap the bandage by about half its width on each pass to make sure there are no gaps. The entire limb needs to be covered for this to work.
Expert Tip: The pressure should feel like a firmly wrapped sprain. You must still be able to feel a pulse below the bandage (like in the wrist or foot). The fingers or toes should not become cold, pale, or numb. If they do, the wrap is too tight and you need to take it off and reapply it immediately.
When done right, pressure immobilization can slow venom spread by up to 50% in some neurotoxic cases. That buys critical hours. But remember, antivenom is the only cure. Research shows that if antivenom isn’t given within six hours of a serious bite, the risk of death climbs dramatically. This technique is all about buying time for that to happen.
Splinting for True Immobilization
Applying the bandage is only half the battle. To really slow down the lymphatic system, that limb has to be completely immobilized with a splint. Even small muscle twitches can pump venom through the body, working against everything you just did.
After the bandage is on, secure a rigid object to the limb to keep the joints from bending.
- For legs: Use sturdy sticks, trekking poles, or a tightly rolled-up sleeping pad on either side of the leg.
- For arms: A stick or even a rolled-up magazine can work. Finish it off with a sling to support the arm against the chest.
Use more bandages, belts, or paracord to secure the splint. Make sure your knots are solid but can be undone if necessary. For a refresher on knots that won’t fail you, check out our guide on how to tie a square knot.
And this is critical: once the pressure bandage and splint are on, do not remove them. They should only be taken off by a medical professional. Removing them can cause a sudden, catastrophic flood of venom into the bloodstream.
Recognizing Envenomation Signs and Making the Evac Call
Here’s a hard truth: getting bitten by a snake doesn’t automatically mean you’ve been envenomated. A surprising number of defensive bites from venomous snakes are “dry bites”—all fang, no venom. But you can’t afford to guess. You must always assume venom has been injected and act with urgency until a doctor tells you otherwise.
Your job in the field is to become a calm, methodical observer. You’re watching for the signs that will tell you this situation is escalating into a true medical emergency. The victim’s body will give you the clues you need, but you have to know what to look for. This isn’t a “wait and see” situation; it’s a “watch and act” scenario.
Telltale Signs of Envenomation
The symptoms of a real envenomation fall into two main categories: what’s happening right at the bite site (localized) and what’s happening to the body as a whole (systemic). You have to be vigilant for both, because things can go from bad to worse with terrifying speed.
Localized Symptoms: These are the signs that usually pop up first, right where the fangs went in.
- Intense, Burning Pain: This is the big one. It’s often described as a pain that is wildly out of proportion to the small puncture wounds.
- Rapid Swelling: The area will start to puff up, sometimes within minutes. This isn’t soft, squishy swelling; it’s often firm and can spread up the limb like a rising tide.
- Bruising and Discoloration: As the venom starts breaking down tissue and blood vessels, the skin can turn a dark, ugly purple or even black.
- Blistering: Fluid-filled blisters might form around the bite as the tissue damage gets more severe.
Systemic Symptoms: These are the red alerts. They signal that the venom is now circulating through the bloodstream and are extremely serious.
- Nausea, vomiting, or diarrhea
- Dizziness, weakness, or feeling faint
- Blurred vision or noticeably drooping eyelids (a classic sign called ptosis)
- Trouble swallowing or slurred speech
- Tingling or numbness, especially around the mouth or in the limbs
- Difficulty breathing or a crushing feeling of tightness in the chest
- A strange metallic or minty taste in the mouth
The moment you see any systemic symptom, the game has changed. This is an undeniable, non-negotiable signal that a serious envenomation is underway. Escalate your evacuation plan immediately.
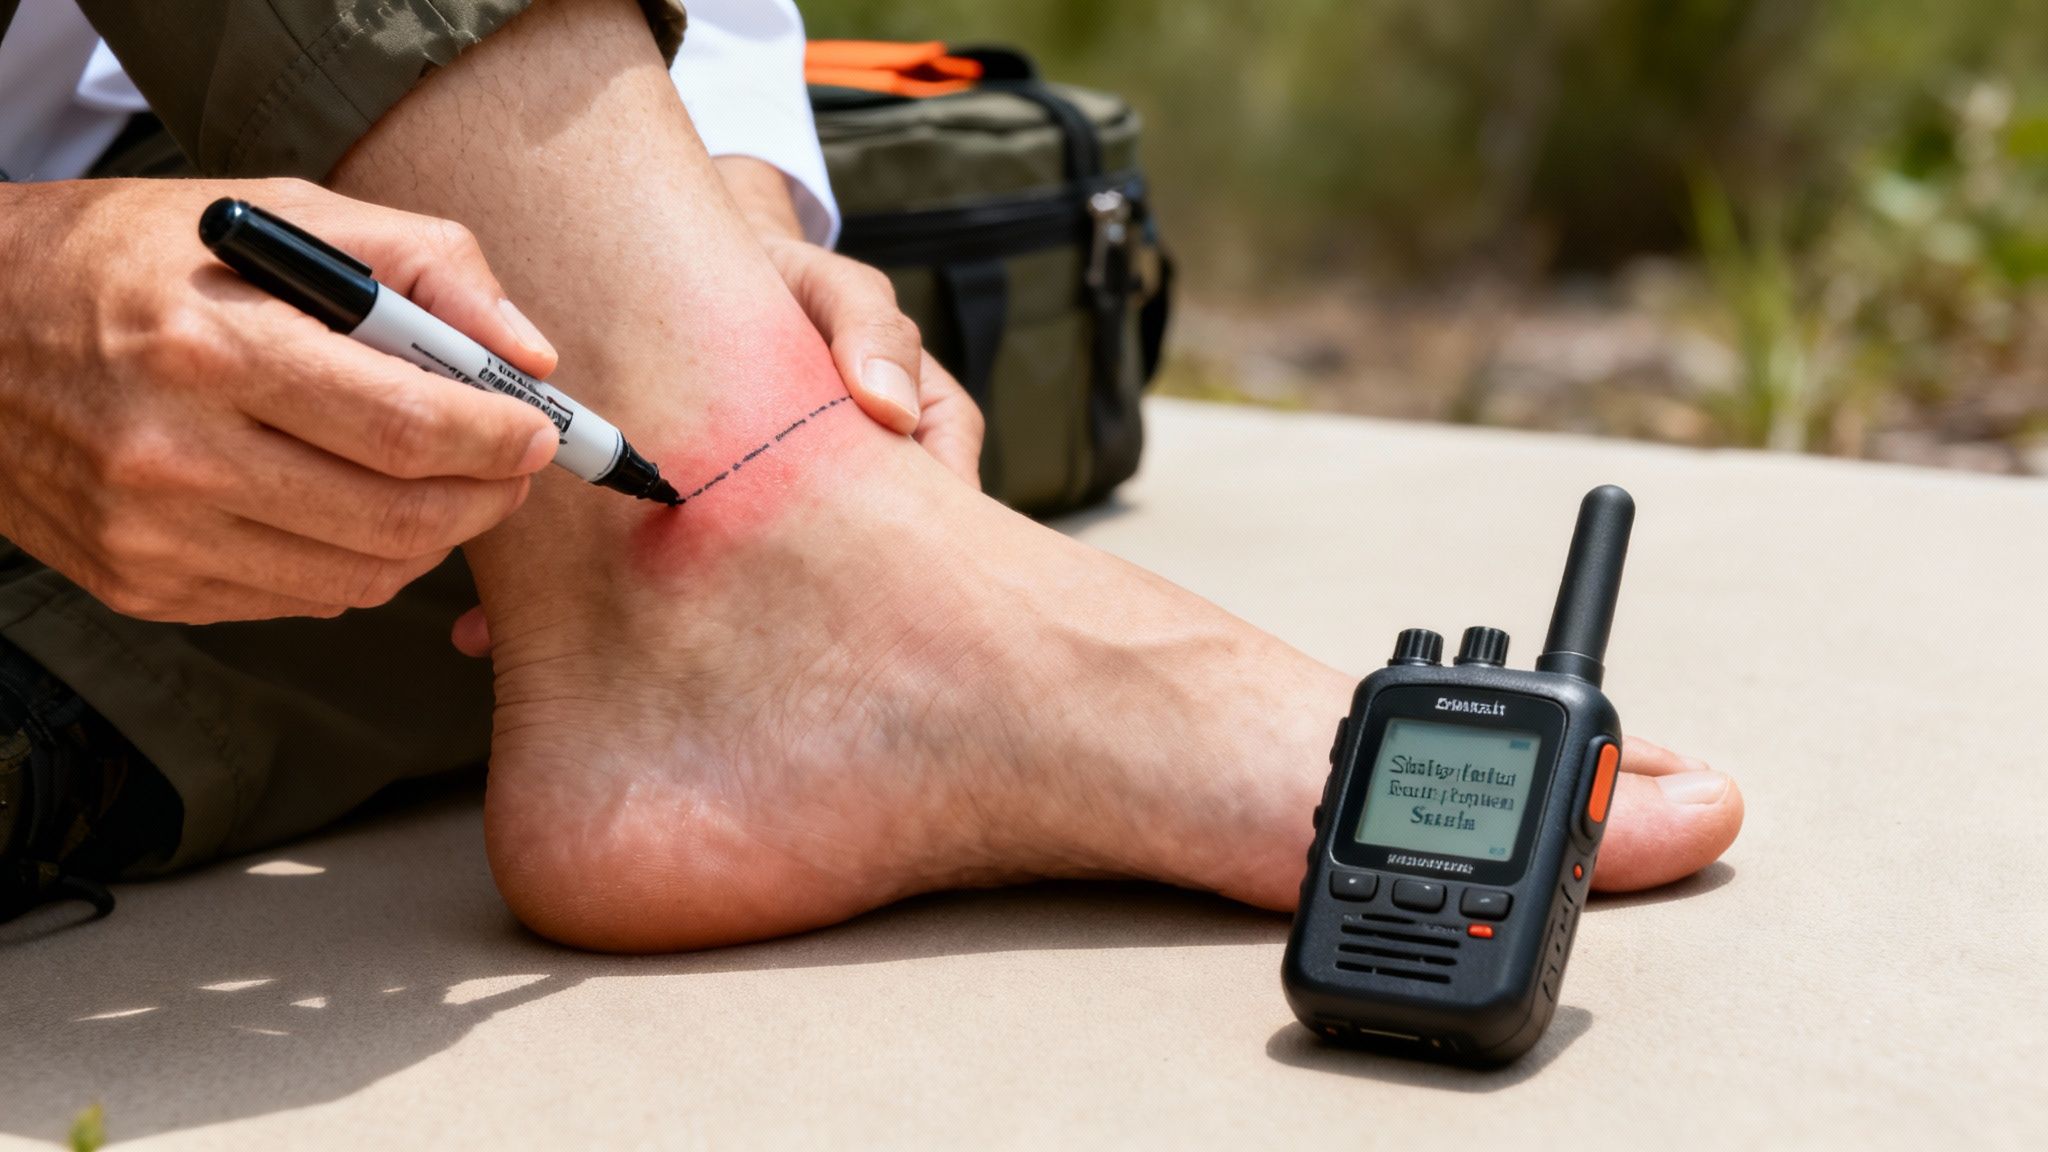
The Power of a Permanent Marker
One of the simplest, most effective tools in your first aid kit is a permanent marker. A Sharpie is a classic for a reason; its ink is durable and reliable for this task. As soon as you notice swelling, draw a circle right at the outer edge of it. Write the current time on the skin right next to that line.
Set a timer. Every 15-30 minutes, check the swelling. If it’s moved past your line, draw a new one at the new edge and write down the new time. This creates a simple, visual timeline of the venom’s progression. When first responders show up, this little trick gives them an invaluable, at-a-glance report on how fast the situation is escalating.
Making the Evacuation Decision
Your most important job is to recognize the danger and get help moving. The question isn’t if you should evacuate, but how fast. If you have cell service, you should have already called 911. If you’re deep in the backcountry, this is where your preparedness truly gets put to the test.
This is the exact scenario where a satellite messenger, like a Garmin inReach or a Zoleo Satellite Communicator, goes from being a cool gadget to an absolute lifeline. Pushing that SOS button sends your precise GPS coordinates to a global emergency response center, taking all the guesswork out of finding you. You can also use it for two-way texting, which is critical for giving responders updates on the victim’s condition and getting instructions back.
When you’re miles from anywhere, every second is precious. A clear head and the right tools can be the difference between a helicopter on the way and a search party wandering the woods for a day. Being ready for this moment is everything, and our detailed evacuation plan checklist can help you build that solid exit strategy. Your ability to make a decisive call and communicate your need for help is the single most critical step in treating a snakebite in the wild.
When you’re faced with a snake bite, what you don’t do is just as critical as what you do. For decades, movies and old-school first aid manuals have pushed some seriously dangerous myths. Getting it wrong can turn a bad situation into a life-threatening one.
To treat a snake bite correctly, you first have to unlearn all the bad advice. These old “remedies” don’t just fail; they actively make things worse. They can destroy tissue, speed up the venom’s spread, and cause horrific secondary injuries. This isn’t optional knowledge—it’s essential.
Debunking Deadly Snake Bite Myths
The Tourniquet Trap
Let’s get this straight: applying a tourniquet is probably the most dangerous myth out there. Your goal is to slow the venom, not trap it. A tourniquet cuts off all blood flow, which concentrates the venom in one place. This drastically increases tissue damage and raises the odds of amputation.
Worse yet, when a medical professional finally removes that tourniquet, a massive flood of venom is released into the body all at once. This can trigger a catastrophic systemic reaction. It’s the exact opposite of what you want to achieve. Stick with pressure immobilization for the right types of snakes, but never use a circulation-stopping tourniquet.
Why Cutting and Sucking Is a Disaster
The image of a hero slicing open a snake bite and sucking out the venom is pure Hollywood fantasy. In reality, cutting the wound just opens up blood vessels, giving the venom a faster route into the bloodstream. It also introduces a huge risk of infection from whatever is on the knife and in your mouth.
On top of that, studies have proven that suction—whether by mouth or a fancy gadget—removes a medically insignificant amount of venom. You simply can’t get enough out to make a difference, but you can easily cause more trauma to the tissue. Commercial suction devices like The Extractor pump are not recommended by medical professionals for this reason.
Ineffective and Damaging Methods to Avoid
Beyond the big myths, a few other harmful ideas still linger. Knowing what not to do is a huge part of proper first aid.
- Ice or Cold Packs: Applying ice won’t neutralize venom. It constricts blood vessels, trapping the venom and worsening local tissue death, much like a tourniquet. You also risk causing frostbite on top of the envenomation.
- Electric Shock: This one is just bizarre. The idea that shocking the bite site can neutralize venom has zero scientific basis. It’s completely ineffective and can cause burns, nerve damage, or even cardiac arrest.
- Alcohol or Caffeine: Giving the victim alcohol to “dull the pain” or coffee to “keep them awake” is a terrible move. Both can increase heart rate, which speeds up circulation and pushes the venom through the body faster. Stick to water only.
The core principle is simple: Do No Harm. Your job is to stabilize the victim and get them to professional medical care. Adding more injury to the situation is counterproductive and dangerous.
This is a global problem. WHO data shows that Africa sees between 435,000 and 580,000 snake bites each year that need medical attention. Disturbingly, in some areas, 59% of victims rely solely on traditional (and often ineffective) remedies, leading to terrible outcomes. You can learn more about the unbalanced impact of snakebites worldwide and see why proven first aid is so critical.
By steering clear of these deadly myths, you’re already giving the victim their best shot at recovery. For more practical advice on handling emergencies, explore these essential survival strategies that focus on what truly works when it counts.
Building Your Essential Snake Bite Kit
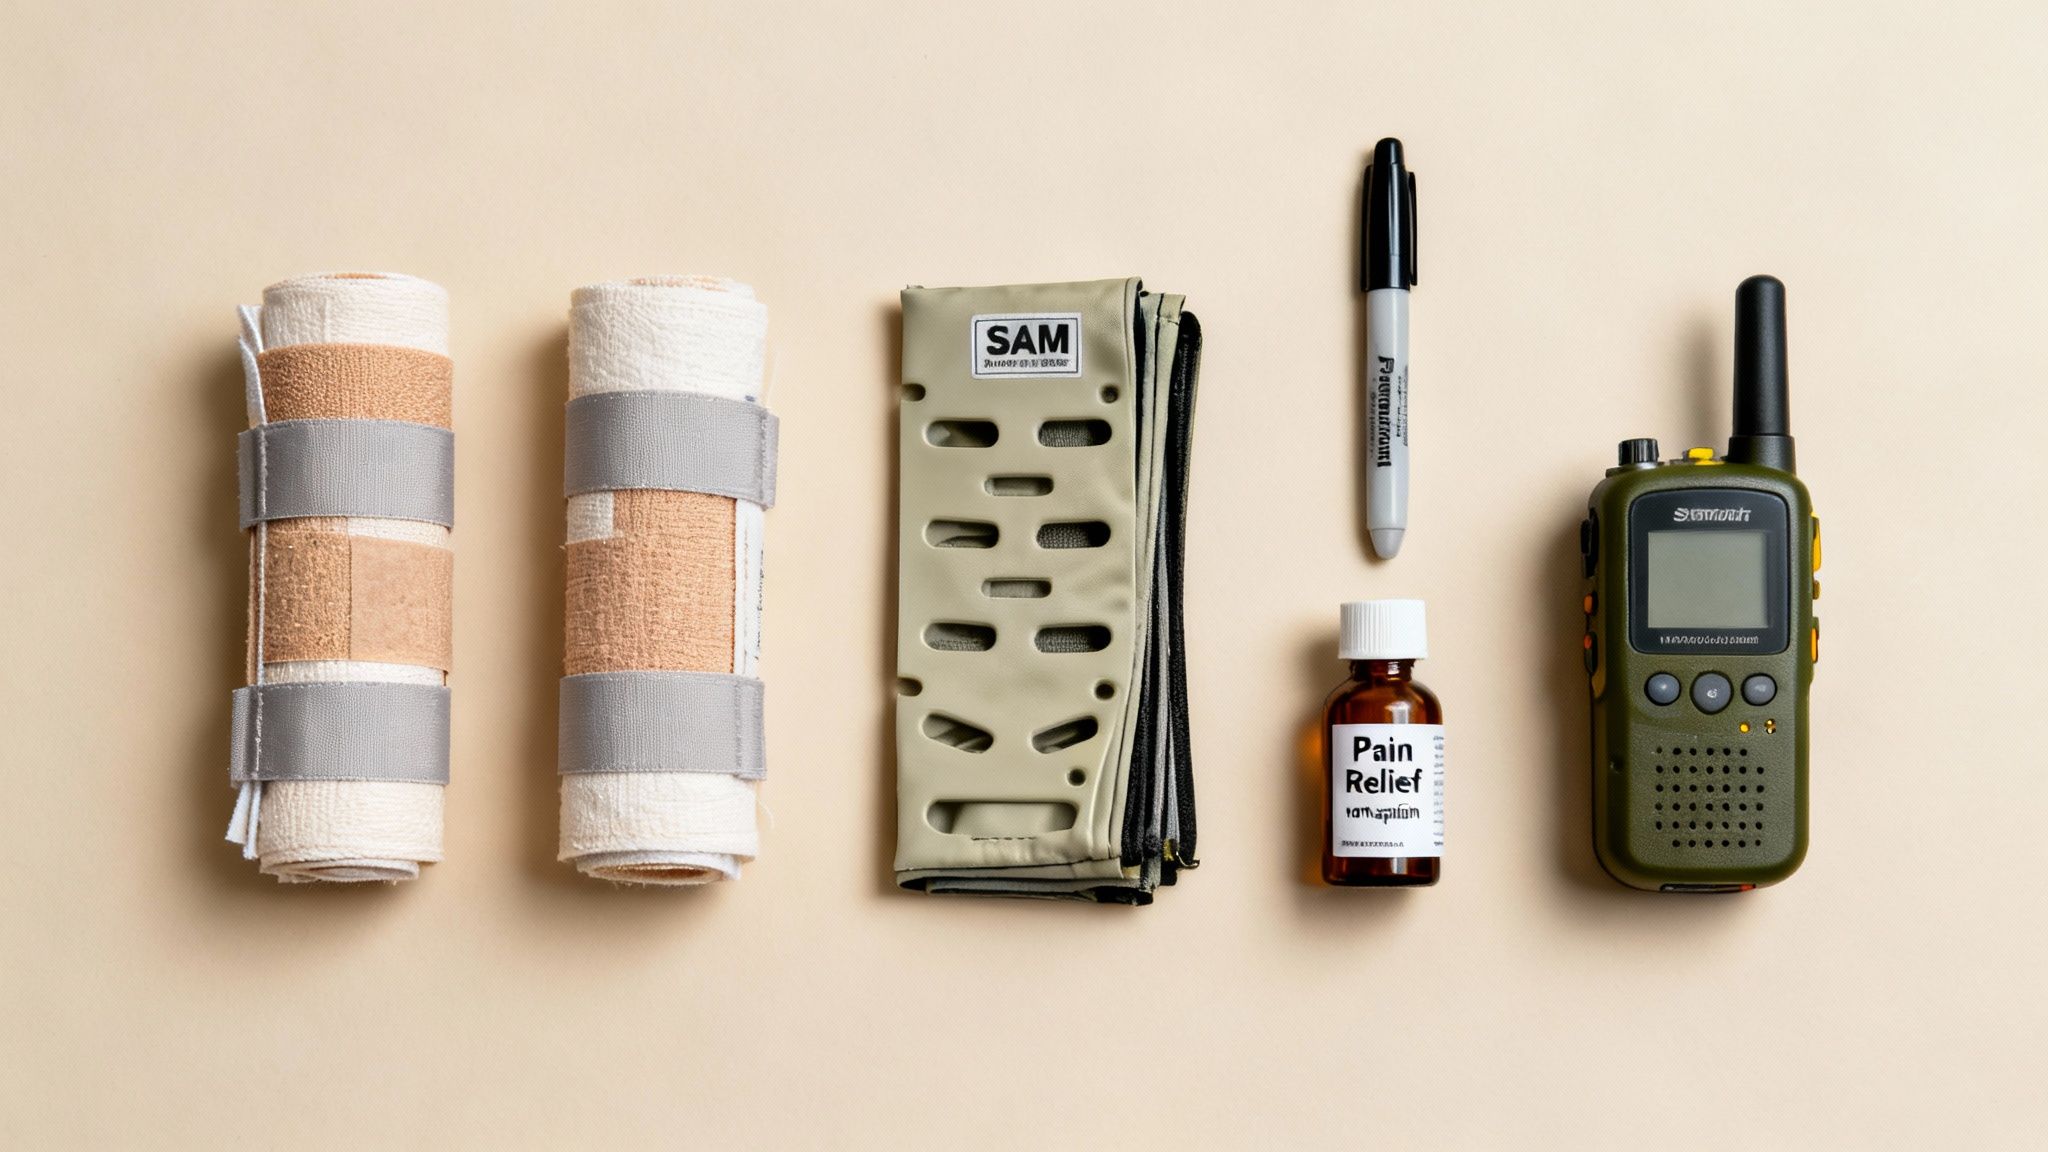
True preparedness is about having the right tools staged and ready before a crisis hits, not just knowing what to do. When you’re learning how to treat snake bites, assembling a dedicated response kit is non-negotiable.
This isn’t about tossing a few extra bandages into your main first aid bag—your snake bite kit should be part of a comprehensive disaster supply kit that covers all emergency scenarios.
This isn’t about tossing a few extra bandages into your main first aid bag. A snake bite is a specific kind of emergency that demands specific gear. Having it all organized in one place, perhaps in a compact Maxpedition pouch, can save you precious minutes when your heart is pounding and adrenaline takes over.
Think of this kit as a standalone module you can grab in an instant. Keep it in your truck, your bug-out bag, or a designated spot in your home. Every single item has a job to do in stabilizing a victim and getting them to help.
Core Medical Components
The heart of your kit is the gear for immediate, on-the-spot care. These are the tools that directly support the stabilization techniques we’ve covered, zeroing in on immobilization and monitoring. Don’t cheap out here—in a real emergency, quality gear is worth its weight in gold.
Your medical checklist should include:
- Multiple Compression Bandages: I recommend packing at least two high-quality elastic or compression bandages. A backup is critical if one gets lost, damaged, or just isn’t enough for a large limb. These are your go-to tool for applying the Pressure Immobilization Technique.
- A Versatile Splint: A real splint is worlds better than trying to lash a couple of sticks to a limb. The SAM Splint is an excellent choice. It’s lightweight, surprisingly strong, and you can mold it to fit any arm or leg, giving you the rigid support needed for true immobilization.
- Permanent Marker: It sounds simple, but this is one of your most powerful tools. As we covered, you’ll use it to mark the leading edge of the swelling, giving doctors a clear visual timeline of how fast the venom is progressing.
- Non-Aspirin Pain Relievers: Pack some acetaminophen (Tylenol) for pain management. You must avoid aspirin or ibuprofen. Their anti-clotting properties can make the bleeding caused by certain venoms much, much worse.
If you’re stranded waiting for evacuation in remote areas, having emergency nutrition is critical—learn how to preserve food for extended survival situations.
Essential Support and Communication Gear
Medical supplies are only half the battle. A snakebite in a remote location is a communication and logistics problem just as much as it’s a medical one. Thinking through these challenges is what separates a basic first-aider from a true prepper.
Having the world’s best first aid kit is useless if you can’t call for help. For anyone who ventures off-grid, a reliable satellite communication device is not a luxury—it’s a core piece of survival equipment.
This part of your kit is all about getting the word out and keeping the victim as stable as possible while you wait for that help to arrive.
- Satellite Communicator: If there’s even a chance you’ll be outside of cell service, a device like a Garmin inReach or a Zoleo Satellite Communicator is your lifeline. The ability to trigger an SOS and text back and forth with rescuers is an absolute game-changer.
In extreme scenarios where emergency services are overwhelmed or unavailable, knowing how to prepare for martial law ensures you can handle medical emergencies independently.
- Emergency Blanket: A compact mylar “space” blanket is essential for preventing shock. It weighs next to nothing and is critical for keeping the victim’s core body temperature from dropping.
For extended backcountry situations, understanding how to preserve meat without refrigeration ensures you maintain nutrition while managing a medical emergency far from civilization.
- Water and Electrolytes: Dehydration is a real risk, and staying hydrated is important for stability. Pack a small water bottle or a portable filter like the Sawyer Squeeze, plus a few electrolyte packets.
Building this kit is how you turn theoretical knowledge into practical capability. For more ideas on what to pack, check out our complete guide to first aid kit supplies, which covers a wider range of emergencies. A well-stocked, purpose-built snake bite kit is a testament to the prepper mindset: hope for the best, but be rigorously prepared for the worst.
Snake Bite Myths and Must-Knows
Even with the best training, a snake bite is a high-stress event. Adrenaline clouds your judgment, and a flood of questions—often fueled by old myths—can rush into your head. Getting clear, no-nonsense answers before you’re in that situation is one of the most important things you can do.
Let’s cut through the noise and tackle the questions that come up most often in the field.
Should I Try to Catch or Kill the Snake for Identification?
Absolutely not. This is probably the single most dangerous myth out there, and trying it gets more people bitten every year.
Your job isn’t to play herpetologist. Your one and only priority is to start first aid and get the victim to a hospital. Wasting time trying to catch or kill the snake is a recipe for a second bite, either to the victim or to you.
Hospitals don’t need the snake’s body. Modern antivenoms are often polyvalent, meaning they work against multiple snake species common to a region. Doctors treat the patient based on their symptoms, not by looking at a dead snake. A quick, clear photo from a safe distance is fine if it doesn’t delay treatment by even a second, but it’s not a requirement.
Do Those Commercial Suction Devices Actually Work?
You see them in every survival store and bug-out bag list, but the answer is a hard no. Major medical bodies like the American Red Cross and the World Health Organization strongly advise against using them. The science is settled: they just don’t work.
At best, a suction device might remove a tiny, medically insignificant amount of venom—often less than 2%. But at worst, the aggressive suction can cause massive tissue damage around the bite, making a bad situation even worse.
Don’t waste a single second on these gadgets. That time is far better spent applying a pressure immobilization bandage (for the right kind of bite) and focusing everything on evacuation. Antivenom is the only real cure, and these devices are a dangerous distraction.
How Can I Tell if a Snake Is Venomous?
In the heat of the moment, you can’t. Not reliably, anyway.
Trying to remember old rhymes like “red on yellow, kill a fellow” or looking for a triangular head is a fool’s game. Many harmless snakes mimic venomous ones, and key features are impossible to spot on a snake that’s moving quickly.
The only safe assumption is to treat every snake bite as venomous until a doctor tells you otherwise. This mindset eliminates deadly guesswork and ensures you give the situation the immediate, serious attention it demands. Assume the worst and act accordingly.
What Is the Recovery Really Like After a Bite?
Getting bitten by a venomous snake isn’t a simple in-and-out hospital visit. Recovery is often a long, painful, and expensive process that can change someone’s life. The outcome depends heavily on the snake, how much venom was injected, and how fast the victim got to antivenom.
- Hospital Stay: Expect to be hospitalized for at least 24-48 hours for observation, even after the antivenom has been given. Doctors have to watch for delayed reactions or a return of symptoms.
- Long-Term Pain: Full recovery can take weeks, months, or longer. Chronic pain, permanent swelling, nerve damage, and loss of function in the limb are all common.
- Tissue Damage: Snakes with cytotoxic venom (like many vipers) can cause devastating tissue death. This can require multiple surgeries, skin grafts, and long-term physical therapy. Some studies show that even with prompt treatment, up to 25% of victims suffer some form of lasting disability in the affected limb.
Hospital care becomes even more critical during infrastructure failures—knowing how to prepare for a blackout means you’ll have backup plans when medical facilities face power disruptions.
The brutal reality of recovery is the best argument for prevention and proper first aid. Your actions in the first few minutes are all about buying time and minimizing damage to get the victim the only thing that truly works: antivenom.

