A solid preparedness plan isn’t about buying a generic kit off a shelf. It starts with a hard look at the specific risks you and your family actually face. Real readiness comes from understanding the most likely threats in your area, figuring out where your household is most vulnerable, and then building a targeted strategy to handle those exact scenarios.

Understanding Your Real-World Risks
The very first step—before you buy a single supply—is to figure out what you’re actually preparing for. Someone living on the Florida coast is staring down a completely different set of emergencies than a family in Kansas. Those generic checklists you find online? They’re a decent starting point, but an effective plan has to be built around your unique geography and personal situation.
Think of this assessment as the foundation of your entire prep. If you skip it, you’re just guessing. You’ll likely waste time, money, and energy on gear and skills that won’t help when your most probable disaster strikes.
Identify Your Regional Threats
First, zoom out and look at the big picture. What major natural disasters are common where you live? Your best bet is to go straight to the experts. Check out the websites for FEMA and your local county or state emergency management office. They have detailed risk maps and historical data on everything from hurricanes and tornadoes to earthquakes, wildfires, and floods.
For region-specific strategies and detailed preparation steps for earthquakes, hurricanes, tornadoes, and more, our comprehensive guide on how to prepare for natural disasters breaks down exactly what you need for each scenario.
Don’t just focus on the headline-grabbing disasters. A nasty winter storm can knock out power for a week, and a long drought can threaten water supplies. The goal here is to come up with a realistic list of the top 3 to 5 scenarios your community is most likely to face.
This isn’t about fear-mongering; it’s about focus. Knowing whether your primary risk is a flood or a wildfire completely changes your priorities. A flood demands an evacuation plan and waterproof document bags, while a wildfire means creating defensible space around your home and stocking up on N95 masks.
Assess Your Household’s Specific Vulnerabilities
Once you’ve got your regional threat list, it’s time to zoom in on your own home and family. A city-wide flood warning means one thing if you live on a hill, but it’s a completely different emergency if your house is in a low-lying area.
To help you get specific, I’ve put together a simple matrix. Grab a piece of paper or open a spreadsheet and use this framework to map out your personal risk landscape.
Personalized Risk Assessment Matrix
Use this table to get a clear, at-a-glance view of what you’re up against. Be honest about the likelihood and potential impact—this is the information that will guide every other decision you make.
| Potential Hazard | Likelihood (Low/Med/High) | Potential Household Impact | Primary Prep Goal |
|---|---|---|---|
| Example: Hurricane | High | Power outage, flooding, structural damage, evacuation | Have shelter-in-place supplies & a “go-bag” ready |
| Example: Wildfire | Medium | Evacuation, poor air quality, potential loss of home | Create defensible space, assemble go-bags, air filters |
| Example: Severe Ice Storm | Medium | Multi-day power outage, trapped at home, frozen pipes | Backup heat, non-perishable food, water storage |
| Example: Grid Failure | Low | Extended power outage, communication loss, civil disruption | Long-term water/food, comms plan, security measures |
Fill this out for your own situation. It turns the vague concept of “disaster” into a concrete set of problems you can actually solve.
As you fill it out, consider these factors:
- Location: Are you in a designated flood zone or a wildfire-urban interface? How close are you to a major fault line?
- Infrastructure: How stable is your local power grid? Billion-dollar weather disasters are becoming more common in the U.S., which puts a massive strain on our aging systems.
- Home Construction: Was your house built to modern codes for earthquakes or hurricanes? Do you have storm shutters or a reinforced safe room?
- Access: Look at a map. How many roads lead out of your neighborhood? A single-exit subdivision can become a dangerous bottleneck during a mass evacuation.
Beyond acts of nature, think about man-made events that could throw a wrench in the works. Things like grid failures, major supply chain breakdowns, or civil unrest are less predictable but worth considering. We’ve got a detailed guide on what an EMP entails; you can get a deeper understanding of that specific threat by understanding an EMP attack. Having a baseline of supplies for these scenarios is part of any truly comprehensive plan.
Going through this process transforms “prepping” from a fuzzy, overwhelming idea into a clear roadmap. You’ll know exactly what you’re up against, which means every action you take will be more efficient and far more effective at keeping your family safe.
Building a Reliable Family Emergency Plan
Alright, you’ve figured out the most likely threats in your area. Now it’s time for the next crucial step: turning that knowledge into a clear, actionable family emergency plan. This isn’t some document you create once and then shove in a drawer to forget. Think of it as a living playbook that cuts through the noise and confusion when stress is high and every second counts.
During a real crisis, chaos is your biggest enemy. A well-thought-out, practiced plan ensures everyone in your household knows exactly what to do, where to go, and how to get in touch. It transforms potential panic into coordinated, effective action.
Establishing Unbreakable Communication Lines
Let’s be realistic. When a disaster hits, cell towers and internet services are usually the first things to go down. Relying solely on your smartphone is a recipe for failure. Your plan absolutely must include multiple, redundant ways for your family to stay in touch.
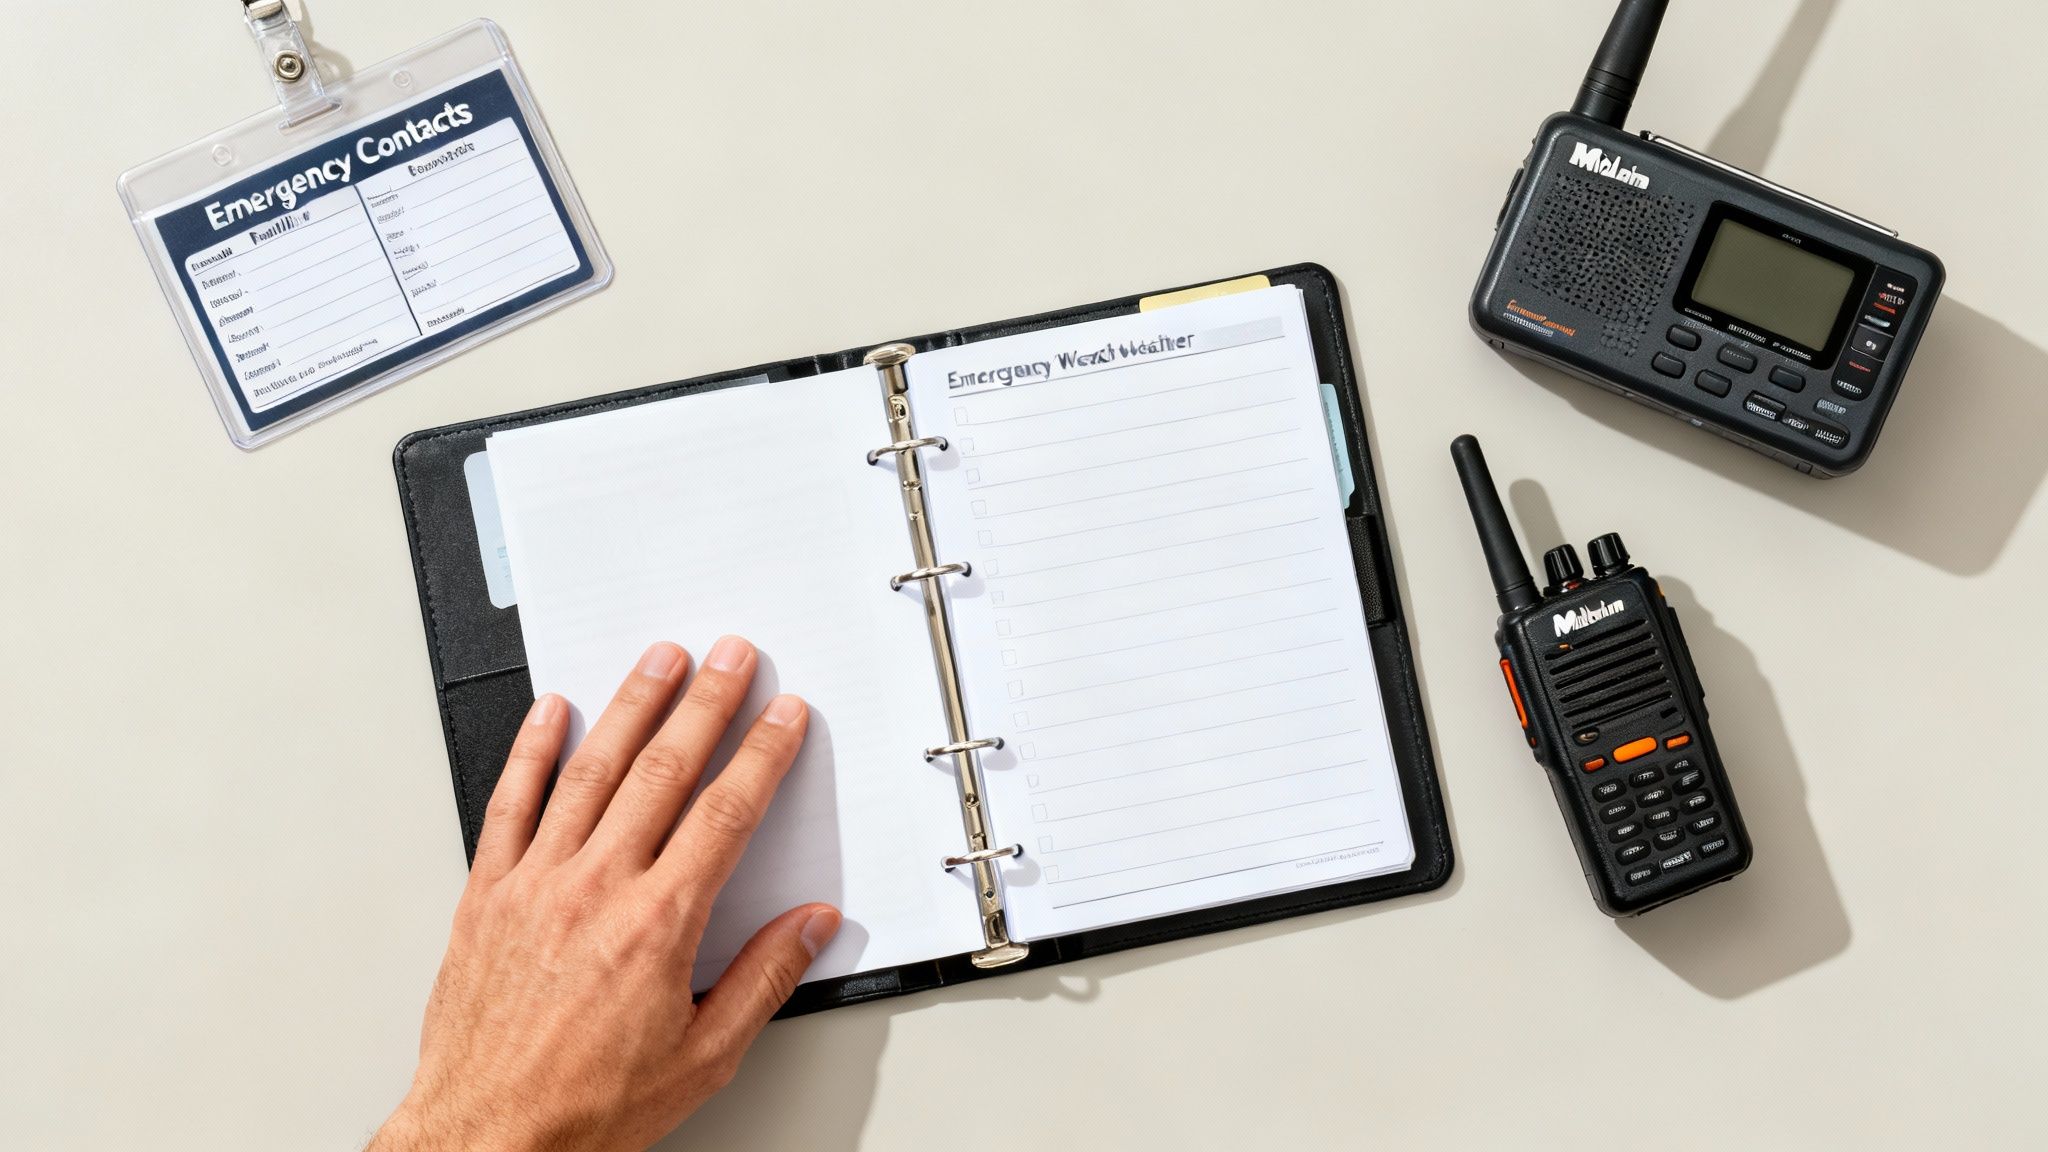
First, designate an out-of-state contact. This person becomes your family’s central information hub. Why out of state? Because it’s often easier to make a long-distance call than a local one when regional networks are overloaded. Every family member should know to call this single contact to report their status, and that person can then relay information to everyone else.
Don’t forget the low-tech solutions. Every person in your family—kids included—needs to carry a physical, laminated contact card in their wallet or backpack. This card should list key phone numbers (including that out-of-state contact), important addresses, and your designated meeting points. It’s a simple tool that still works when all the batteries are dead.
A plan is useless if nobody can find it in an emergency. Store digital copies on a password-protected cloud drive and on a USB flash drive that lives in your go-bag. Most importantly, print out several hard copies. Keep one in an “emergency binder” at home and put another in each of your vehicles.
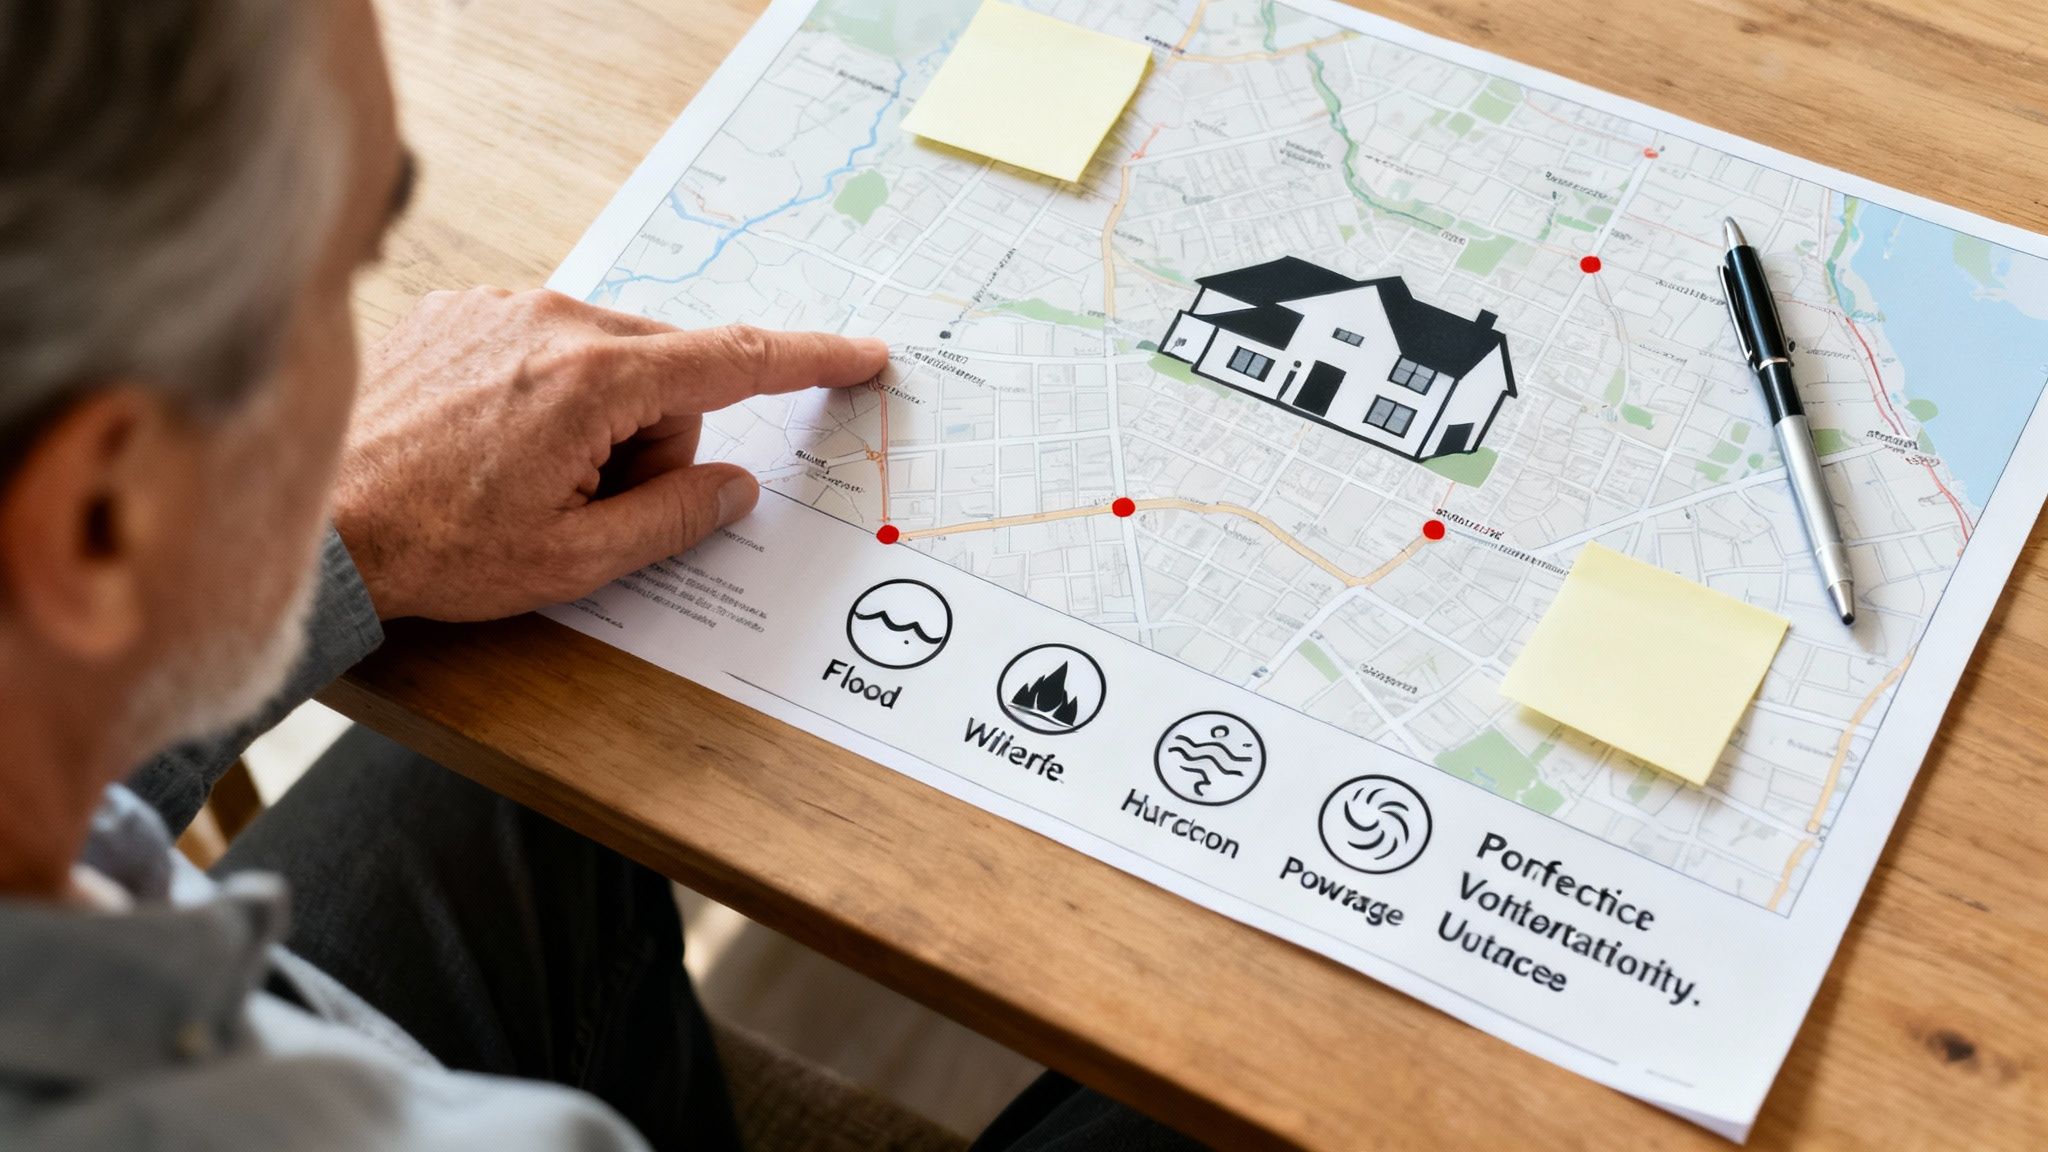
Setting Rally Points and Assigning Roles
Confusion is dangerous in an emergency. Your plan needs to eliminate guesswork by clearly defining where to meet and who is responsible for what. You’ll want to establish two distinct rally points:
- Primary Rally Point: This needs to be a safe, easily identifiable spot just outside your home—think a specific neighbor’s mailbox or that big oak tree at the end of the block. This is for sudden events like a house fire where you need to get out fast.
- Secondary Rally Point: Pick a location further away, outside your immediate neighborhood. A local library, a specific park pavilion, or a trusted friend’s house are all good options. This is for larger-scale emergencies where you can’t return home or the entire area is being evacuated.
To make your response smooth and efficient, assign specific roles to each capable family member. This prevents people from running over each other and ensures critical tasks don’t get missed in the adrenaline rush. For example, one person grabs the emergency binder and go-bags, another is in charge of the pets and their supplies, and a third is tasked with shutting off utilities if it’s safe and necessary.
For a detailed walkthrough and some really helpful fillable worksheets, check out our emergency preparedness plan template. It makes this whole process much simpler.
Investing in Reliable Communication Gear
When modern infrastructure fails, you need gear that doesn’t depend on it. A hand-crank or battery-powered emergency weather radio, like those from Midland, is non-negotiable. It’s your lifeline to crucial NOAA alerts and official updates when the power and internet are completely out. For off-grid power, many people rely on portable power stations like Grid Doctor EMP 3300, Anker, and Jackery, which can be charged by solar panels.
For two-way communication, a good set of walkie-talkies can be a game-changer for keeping track of family members in your immediate area. They don’t rely on cell networks, giving you a direct line of contact that’s vital for coordinating movements during an evacuation or just checking on a neighbor next door. These simple tools ensure you’re never truly cut off from information or each other.
Assembling Your Essential Supply Caches
Once your family has a solid plan, the next step is gathering the physical supplies that will see you through when life gets disrupted. This isn’t just about stashing a few water bottles and some canned chili. A truly effective strategy means building two separate but connected systems: a deep supply cache at home for sheltering in place, and a lightweight, mobile “go-bag” for evacuations.
For a complete breakdown of what belongs in your disaster supply kit, including specific brand recommendations and quantity guidelines, check out our detailed guide.
This layered approach is crucial because it builds flexibility into your prep. One disaster might have you hunkered down for weeks, while another could force you out of your home with only minutes to spare. With both systems ready to go, you’re prepared for whatever comes your way.
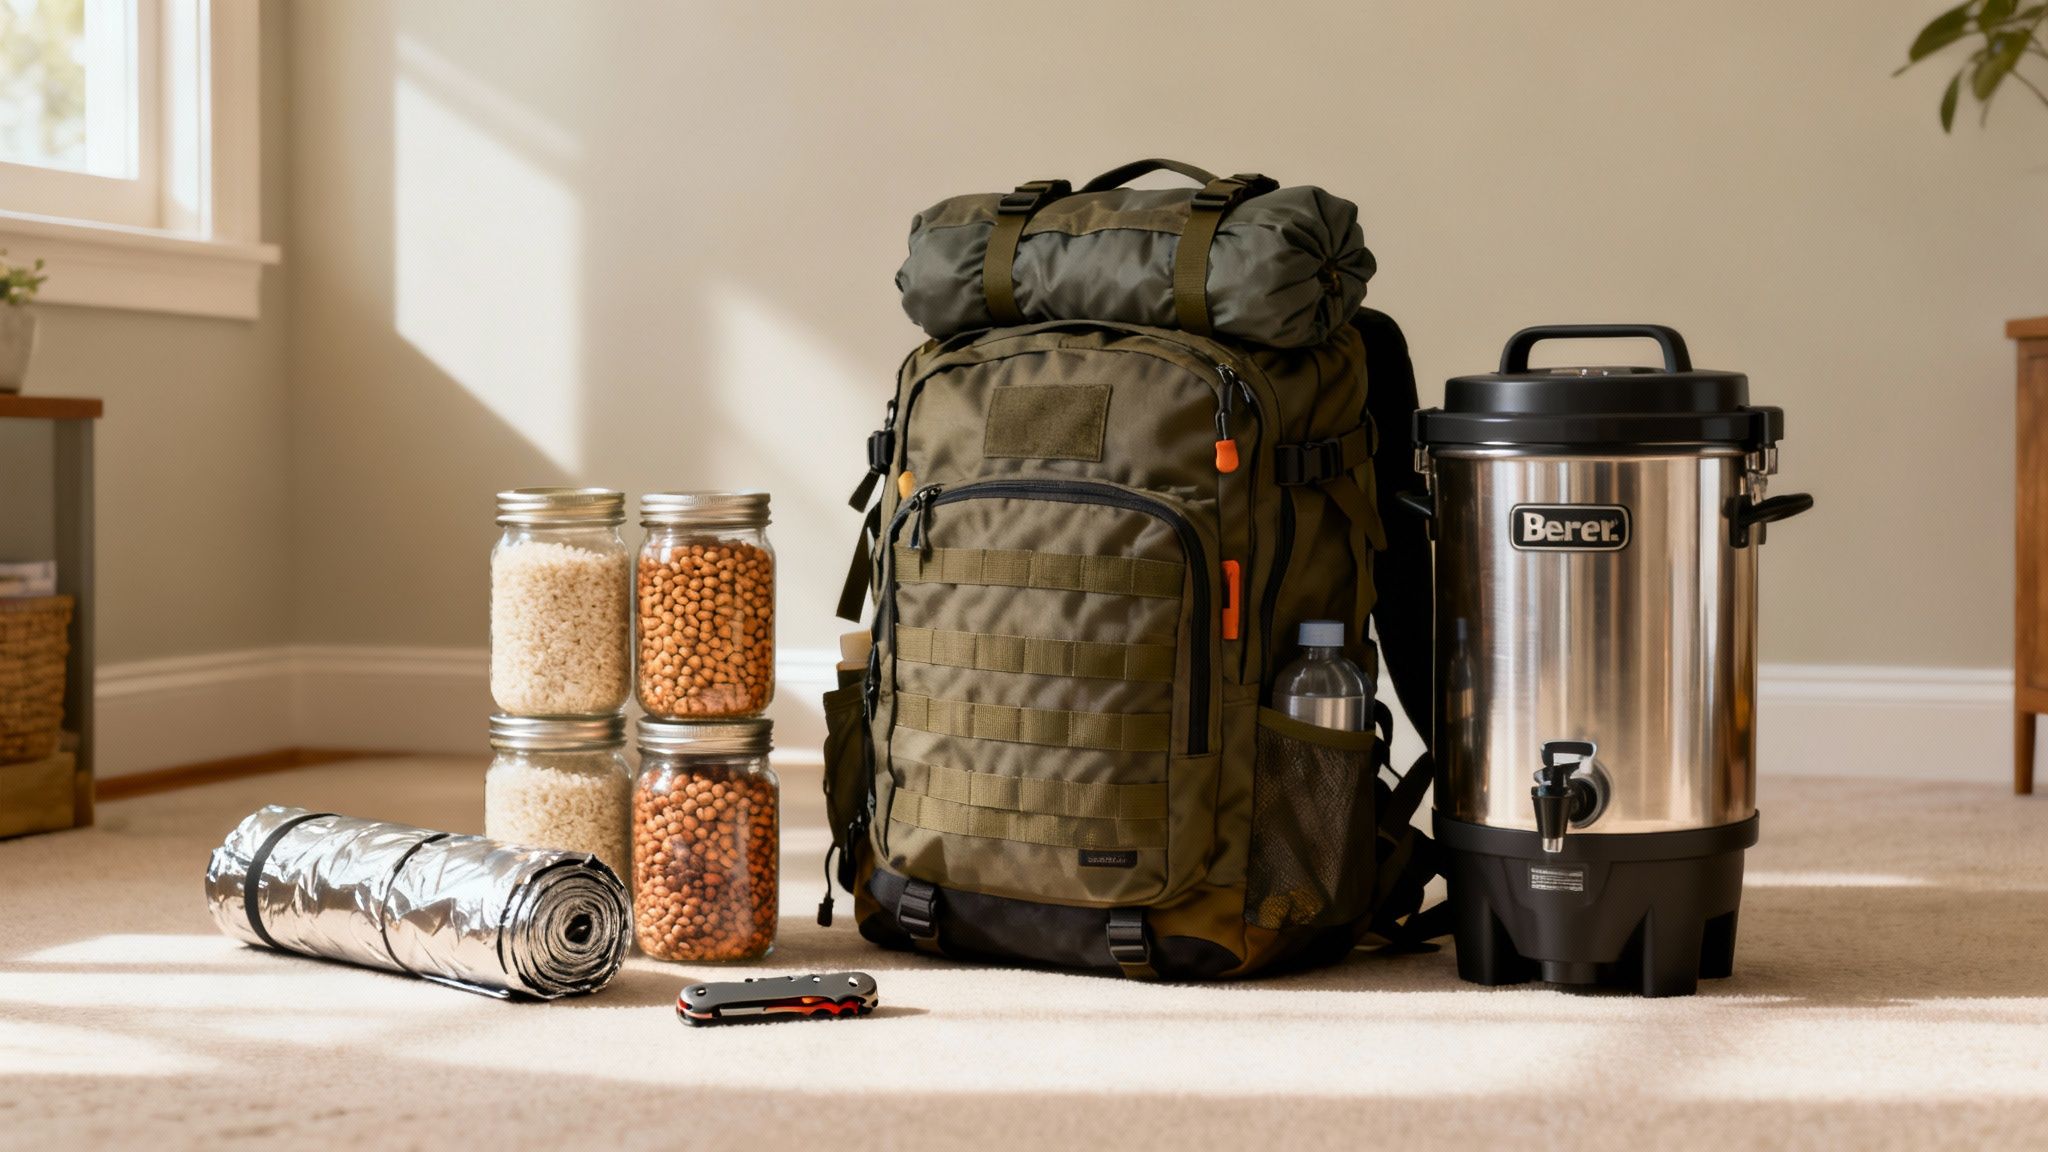
Building Your Home Cache for Sheltering in Place
Think of your home as your primary fortress. Your home cache should reflect that—it’s your deep reserve of supplies designed to keep everyone safe, fed, and comfortable for an extended time. The common advice is two weeks, but more is always better. The goal here is complete self-sufficiency when the grocery stores are empty, the power is out, and the tap water is unsafe.
Water is always priority number one. The standard advice of one gallon per person per day is a bare minimum for drinking and cooking. A more realistic goal also accounts for basic hygiene. A high-capacity, gravity-fed water filter like a Berkey system can be a game-changer, giving you the ability to purify large amounts of water from questionable sources like rain barrels or a nearby creek.
For food, you’re not just buying a few extra cans of soup; you’re building a “deep pantry” with long-lasting staples.
- Bulk Staples: Large bags of white rice, dried beans, oats, and pasta are the caloric backbone of your supply. Stored correctly in sealed buckets with oxygen absorbers, they can last for decades.
- Canned Goods: Stock up on nutrient-dense items your family will actually eat—canned meats, fish, vegetables, and fruits are perfect. Make sure to rotate these into your regular meals to keep your supply fresh. For longer-term needs, some people invest in freeze-dried meals from brands like Ready Hour, Mountain House or Augason Farms, which offer a 25+ year shelf life.
- Comfort Items: Never underestimate the morale boost that comes from having coffee, tea, powdered drink mixes, or even hard candy during a stressful time.
This isn’t just an expense; it’s a direct investment in your family’s resilience. The United Nations Office for Disaster Risk Reduction has found that preparedness pays off significantly, noting that every dollar invested in hurricane prep can more than halve the economic losses.
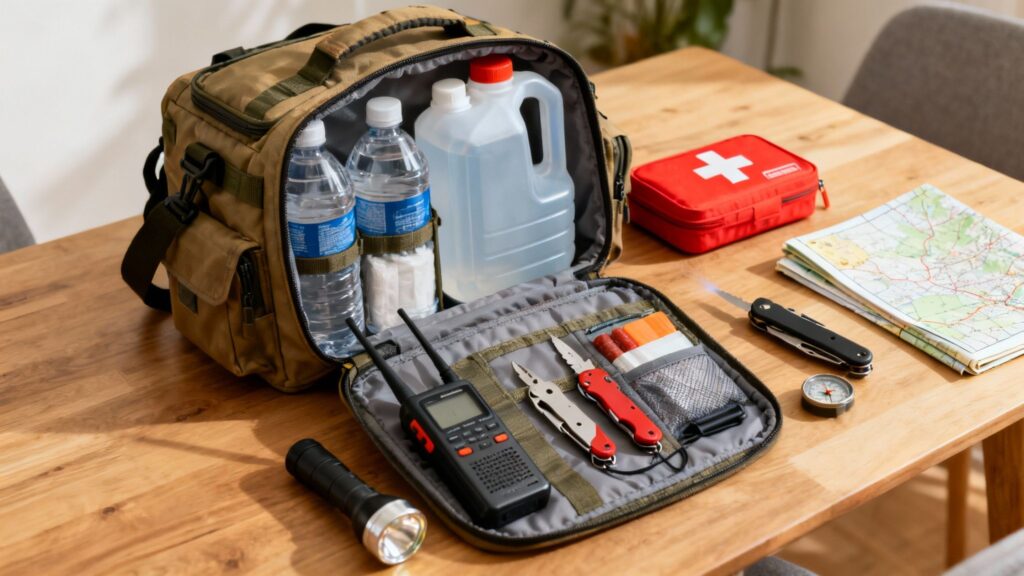
Crafting Your Go-Bag for Rapid Evacuation
While your home cache is built for endurance, your go-bag—also known as a bug-out bag or 72-hour emergency kit—is all about speed and mobility. This is a pre-packed backpack for each family member, ready to grab at a moment’s notice. The philosophy is completely different: every single item must be lightweight, compact, and serve a critical purpose.
Your go-bag is your lifeline for the first three days of an evacuation, a time when emergency services are almost always overwhelmed. It needs to contain the absolute essentials to keep you safe until you can get to a more secure location.
A common mistake is packing a go-bag until it’s too heavy to carry comfortably. Test it out. Can you carry it for a mile without being exhausted? If not, you need to rethink what’s truly essential and find lighter alternatives.
When it comes to your go-bag, prioritizing is everything. This means high-calorie food bars that don’t need cooking, a personal water filter, and multiple ways to start a fire. Multi-use items are your best friend here—think a quality multi-tool like a Leatherman, duct tape, and mylar space blankets that can double as warmth and emergency shelter.
The following table breaks down the different mindsets for stocking your home cache versus your go-bag.
Home Cache vs Go-Bag Checklist
| Supply Category | Home Cache (Shelter-in-Place) | Go-Bag (Evacuation) |
|---|---|---|
| Water | Multiple gallons of stored water; large capacity filter (e.g., Berkey) | 1L metal water bottle; personal filter (e.g., Sawyer MINI) |
| Food | 2+ weeks of bulk staples (rice, beans) and canned goods | 3 days of high-calorie, no-cook food bars and jerky |
| Shelter | Your home, reinforced with tools and supplies | Lightweight tarp, emergency bivvy, or mylar blankets |
| First Aid | Comprehensive medical kit with prescription meds | Compact trauma kit with tourniquet, bandages, essentials |
| Tools | Full-size tools (axe, shovel, wrench) | High-quality multi-tool and a fixed-blade knife |
| Documents | Originals in a fireproof safe; digital backups | Laminated copies of IDs, deeds; cash in small bills |
| Clothing | Seasonal clothing for all family members | One spare set of durable, layered clothing and socks |
This comparison really highlights the difference in strategy. Your home cache is about long-term comfort and sustainability, while your go-bag is about immediate, lightweight survival.
For a complete, item-by-item breakdown, our comprehensive guide on building a 72-hour emergency kit covers everything you need to include. By building these two complementary systems, you ensure that whether the order is to stay put or get out, you have the right resources ready to go.
Developing Skills That Outlast Any Gear
All the gear in the world won’t save you if you don’t know how to use it. Or worse, what to do when it breaks. True preparedness isn’t about what you have—it’s about what you can do.
Skills are weightless, can’t be taken from you, and never run out of batteries. This is where you shift from being dependent on supplies to becoming genuinely self-reliant. Mastering a few critical, hands-on techniques builds a confidence that no piece of equipment ever will.
Mastering Water Purification
Safe drinking water is your absolute first priority in nearly any disaster. Dehydration can knock you out in hours, and waterborne pathogens are just as dangerous. Stored water is great, but it’s a short-term fix. You have to know how to make questionable water sources safe to drink.
The old-school method is still the best: boiling. Bringing water to a rolling boil for just one minute kills bacteria, viruses, and protozoa. It’s simple, effective, and only requires a metal pot and a heat source.
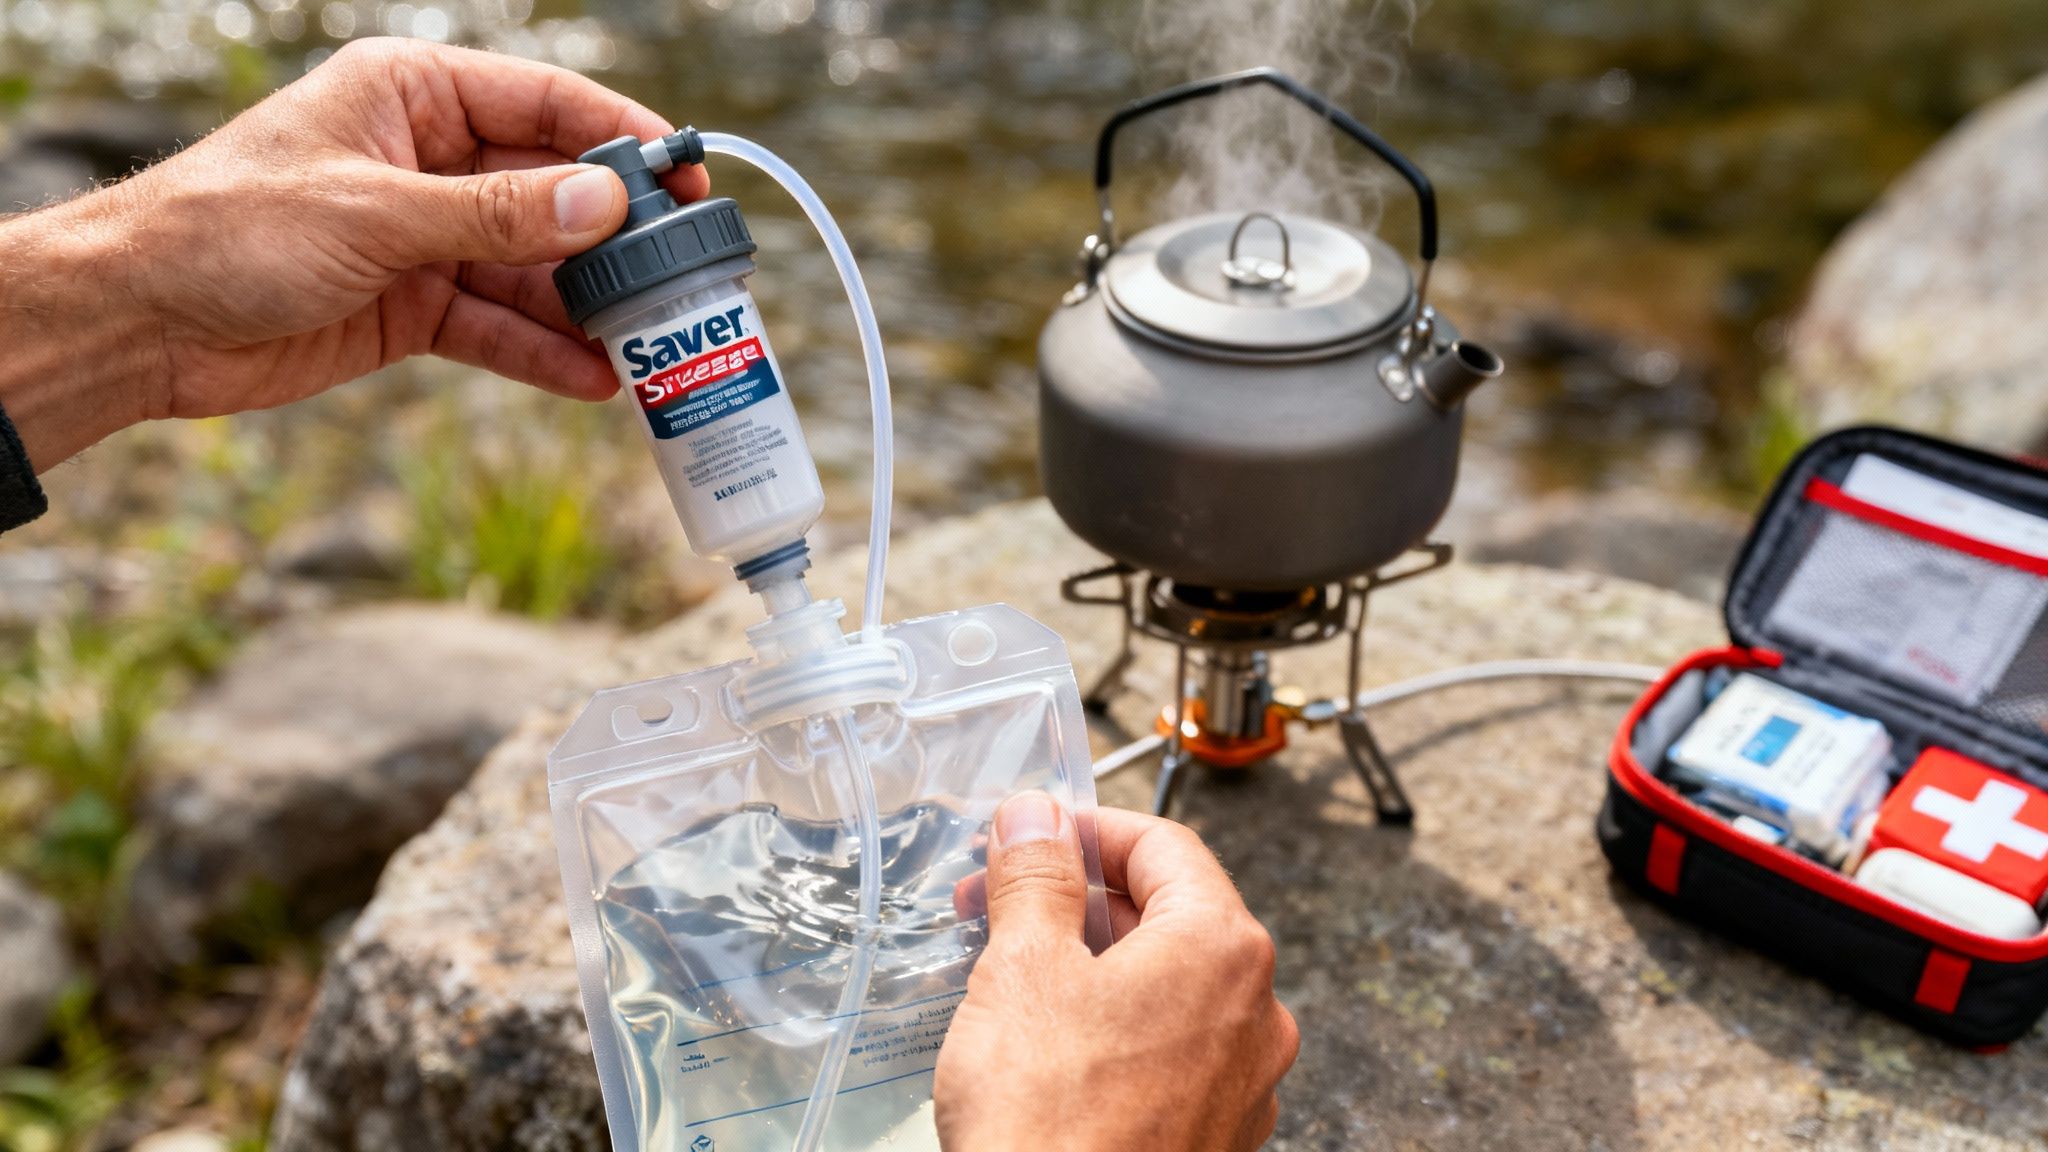
A portable water filter is another non-negotiable piece of kit. A high-quality filter like the Sawyer Squeeze can process thousands of gallons, removing harmful contaminants with almost no effort. It’s an indispensable item for any bug-out bag or vehicle, turning streams, lakes, and ponds into safe drinking water.
Essential First Aid and Trauma Care
When 911 is overwhelmed, you’re the first responder. Basic medical knowledge is one of the most powerful skills you can possess. It’s not about becoming a surgeon; it’s about knowing how to manage the most common and life-threatening injuries until help can arrive.
You should focus your training on these key areas:
- Controlling Severe Bleeding: Learn how to apply direct pressure, pack a wound, and properly use a tourniquet. A CAT Tourniquet is a widely trusted tool for this purpose.
- Treating Burns and Blisters: Knowing how to clean, dress, and care for burns prevents infection and manages pain, which is vital for maintaining morale and mobility.
- Managing Sprains and Fractures: The ability to immobilize a limb with a splint can prevent further injury and make someone much more comfortable while waiting for help.
Your goal isn’t to become a doctor overnight. It’s to build competence in handling the “Big Three” of trauma—bleeding, breathing, and shock. A good first-aid course from a reputable organization is an invaluable investment.
Off-Grid Cooking and Food Preservation
In a long-term grid-down situation, your ability to preserve food without a refrigerator becomes vital. Knowing how to preserve food through methods like pressure canning, dehydrating, and fermentation can extend your supplies’ shelf life by months or even years. Simple water purification techniques, like using 8 drops of plain household bleach per gallon, can also make contaminated sources safe in a pinch.
Just as important is knowing how to cook without a modern stove. Practice cooking over an open fire, using a simple rocket stove, or firing up a propane camp stove. The more you practice, the more it becomes second nature. To expand your knowledge, it’s worth exploring the other essential survival skills you must master that round out these capabilities.
Fire-starting is the foundation for cooking, boiling water, and staying warm. Never rely on a single method. Master at least three different ways to make fire, like using a ferro rod, waterproof matches, and a simple lighter. A reliable fire starter, such as an Exotac, is a smart addition to any kit. This redundancy ensures your family can stay fed, hydrated, and warm, no matter what happens to the power grid.
Putting Your Preparations to the Test
Having a detailed plan and a perfectly stocked supply cache looks great on paper. But until you put them into action, they’re just theories. The absolute worst time to find out your go-bag is too heavy or your kids don’t remember the meetup spot is in the middle of a real disaster.
This is why running regular, realistic drills is one of the most critical parts of being truly prepared.
The goal isn’t to run a high-stress, military-style exercise. It’s about building muscle memory for your entire family. The idea is to turn that carefully written plan into a set of automatic, instinctual responses. When everyone knows exactly what to do, panic gets replaced with purposeful action.
The Timed Evacuation Drill
One of the best ways to pressure-test your readiness is with a timed “bug-out” drill. The concept is simple, but what it reveals is invaluable. Announce that a simulated evacuation order has been issued and the family has exactly 15 minutes to get their gear, secure the pets, and be in the primary vehicle, ready to go.
This simple exercise brings weaknesses to the surface fast. You might find out:
- Go-bags are buried in the back of a closet.
- Essential items like car keys or the emergency binder aren’t where they’re supposed to be.
- Someone’s bag is packed so poorly it’s too heavy or awkward to carry in a hurry.
After the drill, get everyone together and talk about what went right and what went wrong. Use that feedback to refine your plan, reorganize your gear, and make adjustments. For more detailed guidance, our complete evacuation plan checklist can help you structure both your plan and your drills for maximum effectiveness.
The Weekend Power Outage Simulation
While an evacuation drill tests your speed, a power outage simulation tests your endurance and your at-home supplies. Pick a weekend and intentionally flip the main circuit breaker off from Friday evening to Sunday afternoon. For those 48 hours, your family has to live entirely off your stored supplies.
The purpose of a drill is to fail in a controlled environment. Every mistake made, every piece of gear that doesn’t work, and every flaw you find in your plan during practice is a lesson that makes you safer during a real crisis.
This simulation forces you to answer some important questions. Do you have a reliable way to cook meals off-grid? A simple propane stove from a trusted brand like Coleman is a popular choice because it’s easy to use and store. Can you keep everyone entertained without screens? Do you have enough light sources, like headlamps and lanterns, to move around the house safely after dark? Having a few reliable flashlights, such as those from Streamlight, is always a good idea.
This kind of hands-on experience is something you can’t get from reading a book. You’ll quickly find out if your food storage includes things your family will actually eat, if your water supply is adequate, and if your non-electric entertainment options are up to the task. Running these drills a couple of times a year transforms your preparedness plan from a static document into a living, proven strategy you can actually count on.
Common Questions About Disaster Preparedness
Diving into preparedness can feel like a huge undertaking. It’s totally normal to feel a bit overwhelmed, trying to balance the need for security with real-world questions about time, money, and where to even start. To cut through the noise, I’ve put together answers to the questions I hear most often from people just getting started.
How Much Water Do I Really Need to Store?
You’ll hear the standard advice everywhere: one gallon of water per person, per day. But anyone who’s been through a real-world emergency knows that’s cutting it dangerously close. That’s a bare-minimum survival number, not a comfortable living number.
A much safer and more realistic target is 1.5 to 2 gallons per person, per day. This gives you enough for drinking, cooking, basic hygiene, and cleaning without having to ration every last drop from day one.
For a family of four, that means you need to store 6 to 8 gallons a day. A solid two-week supply adds up quickly—we’re talking around 100 gallons. You can get there with a layered approach. Keep cases of bottled water for grab-and-go convenience, but store the bulk of it in larger, food-grade containers. Stackable jugs like the Aqua-Tainer are a popular, space-efficient choice. No matter what, a reliable water filter is a non-negotiable part of your plan.
What Are the Biggest Mistakes Beginners Make?
The path to being prepared is a long game, not a weekend project. I’ve seen a lot of well-intentioned people make a few common mistakes right out of the gate. Knowing what they are is the best way to avoid them and build a plan that actually works.
Here are the top three slip-ups:
- Focusing on Gear Over Skills: A top-of-the-line axe is just an expensive paperweight if you’ve never split wood. A trauma kit packed with advanced supplies is useless if you don’t know how to stop a bleed. Always prioritize learning and practicing skills first, then get the gear that supports what you know.
- Preparing for Only One Scenario: It’s easy to get tunnel vision on a specific threat, like a hurricane if you live on the coast or an earthquake if you’re on a fault line. True preparedness is about resilience. Your plans and supplies should be flexible enough to handle a blizzard, a sudden evacuation, or a month-long power grid failure.
- ‘Setting It and Forgetting It’: This isn’t a one-and-done task. Preparedness is a lifestyle. You have to rotate your food and water at least twice a year, check the expiration dates on batteries and medical supplies, and constantly update your plans as your family grows and situations change.
How Can I Prepare on a Tight Budget?
You don’t need a massive budget to become prepared. In fact, some of the most critical preps—like your family’s plan, your skills, and your neighborhood connections—don’t cost a dime. It’s all about being resourceful and consistent.
Start small and build your way up. You can store tap water for free in sanitized two-liter soda bottles. Add just one or two extra non-perishable items to your cart every time you go grocery shopping. Focus on cheap, calorie-dense staples like white rice, pinto beans, and oats. You can slowly build out your own first-aid kits and go-bags over time, often using gear you already have from camping or hiking.
If you’re completely new to this and feeling overwhelmed, our guide on how to start prepping walks you through the exact first steps to take, regardless of your budget.
Your most powerful preparedness assets are your knowledge and your community. Knowing how to purify water, tend a garden, or mend clothing is invaluable. Building relationships with neighbors creates a support network that is more resilient than any individual.
Should I Shelter in Place or Evacuate?
This is the big one, and the answer is simple: it depends entirely on the disaster and, most importantly, on the instructions from your local authorities. Listen to them. They have the big-picture view and access to information you simply don’t.
Generally speaking, you’ll shelter in place for localized events like winter storms or short-term power outages. Your home is your primary fortress, where all your deep supplies are stored.
But for fast-moving threats like wildfires or large-scale floods, getting out is the only option. Your emergency plan has to account for both scenarios. This means your home needs to be stocked for a long stay, but you also need to have your go-bags packed, ready by the door, and multiple evacuation routes already mapped out. This dual-track approach means you’re ready to react no matter which way things go.

