Getting around without a compass means falling back on the timeless tools nature gives us—the sun and stars—or using good old-fashioned maps and terrain. The two most reliable tricks in the book are the shadow-tip technique for daytime travel and finding the North Star (Polaris) at night. When technology gives up on you, these methods won’t.
Why Analog Navigation Is Your Ultimate Backup Plan
Picture this: you’re miles down a remote trail when the sky opens up. Your phone, the fancy GPS you rely on, is now a waterlogged brick. Or maybe a widespread power grid failure knocks out every piece of tech you own. Understanding off-grid living essentials becomes critical when modern infrastructure fails and you need to rely on fundamental survival skills. This isn’t just prepper paranoia; it’s a real risk that turns knowing how to navigate “the old way” from a neat hobby into a life-saving skill. In extreme scenarios where you need to know how to prepare for martial law, having navigation skills that don’t depend on technology becomes even more crucial.
Putting all your faith in modern gadgets creates a dangerous illusion of safety. Sure, a satellite communicator like the Garmin inReach is a fantastic tool for hitting the SOS button, but it still depends on a battery and a clear view of the sky. It’s a fragile link. When it goes dark, you’re on your own.
The True Meaning of Self-Reliance
This is where analog navigation becomes your ace in the hole. It’s not about ditching your gadgets, but about having layers of capability that build real-world resilience. When you master these methods, you know for a fact that you can get yourself and others to safety when the modern world fails. These navigation skills are part of a broader self-sufficiency mindset that anyone interested in off-grid living for beginners should develop. It also connects you to your environment in a way a screen never can. It’s one of the core survival skills you must master to be truly ready for anything.
Building these skills gives you a serious edge:
- It Always Works: These techniques don’t need batteries, cell service, or a subscription. They work anywhere on Earth, anytime.
- You See More: Instead of staring at a screen, you’re looking at the world. You start noticing wind patterns, how plants grow, and the tiny clues the landscape offers. Your awareness skyrockets.
- Real Confidence: True confidence isn’t in a piece of gear. It’s knowing you have the skills to solve your own problems, no matter what.
The real goal isn’t just to get through a bad situation. It’s having the skills to stop it from becoming a full-blown crisis in the first place. Old-school navigation is the bedrock of that competence.
In the end, learning these techniques means you own a skill that can’t be broken, lost, or run out of power. It’s an investment in yourself that pays off when everything else fails, ensuring you’re never truly lost as long as you can read the world around you.
Using the Sky as Your Map
When your GPS dies and your compass is gone, look up. The sky is the oldest, most reliable map humanity has ever known. The sun, moon, and stars don’t need batteries, and their movements are predictable constants in an unpredictable world. Learning to read them isn’t just a cool party trick; it’s a foundational survival skill.
This isn’t just theory. Think about the massive 2003 Northeast blackout that left 50 million people in the dark. In that kind of chaos, knowing how to find your way using the sky could literally be the difference between being stranded and getting home safely. Ancient Polynesian navigators mastered this, crossing millions of square miles of open ocean by memorizing over 100 star positions. It’s a skill so critical that the U.S. military still drills it into soldiers for when technology inevitably fails. If you want to dive deeper into how our ancestors did it, you can explore the evolution of sea navigation before GPS.
Finding Direction with the Sun
During the day, the sun is your best friend. We all know it generally rises in the east and sets in the west, but that’s a rough guide. For a much more precise bearing, you can rely on a couple of simple, time-tested methods.
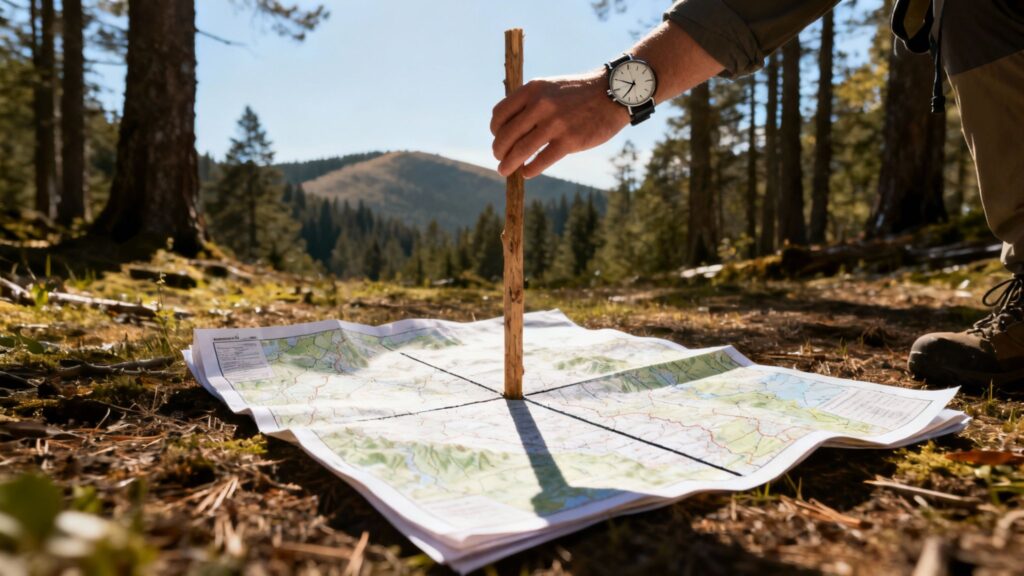
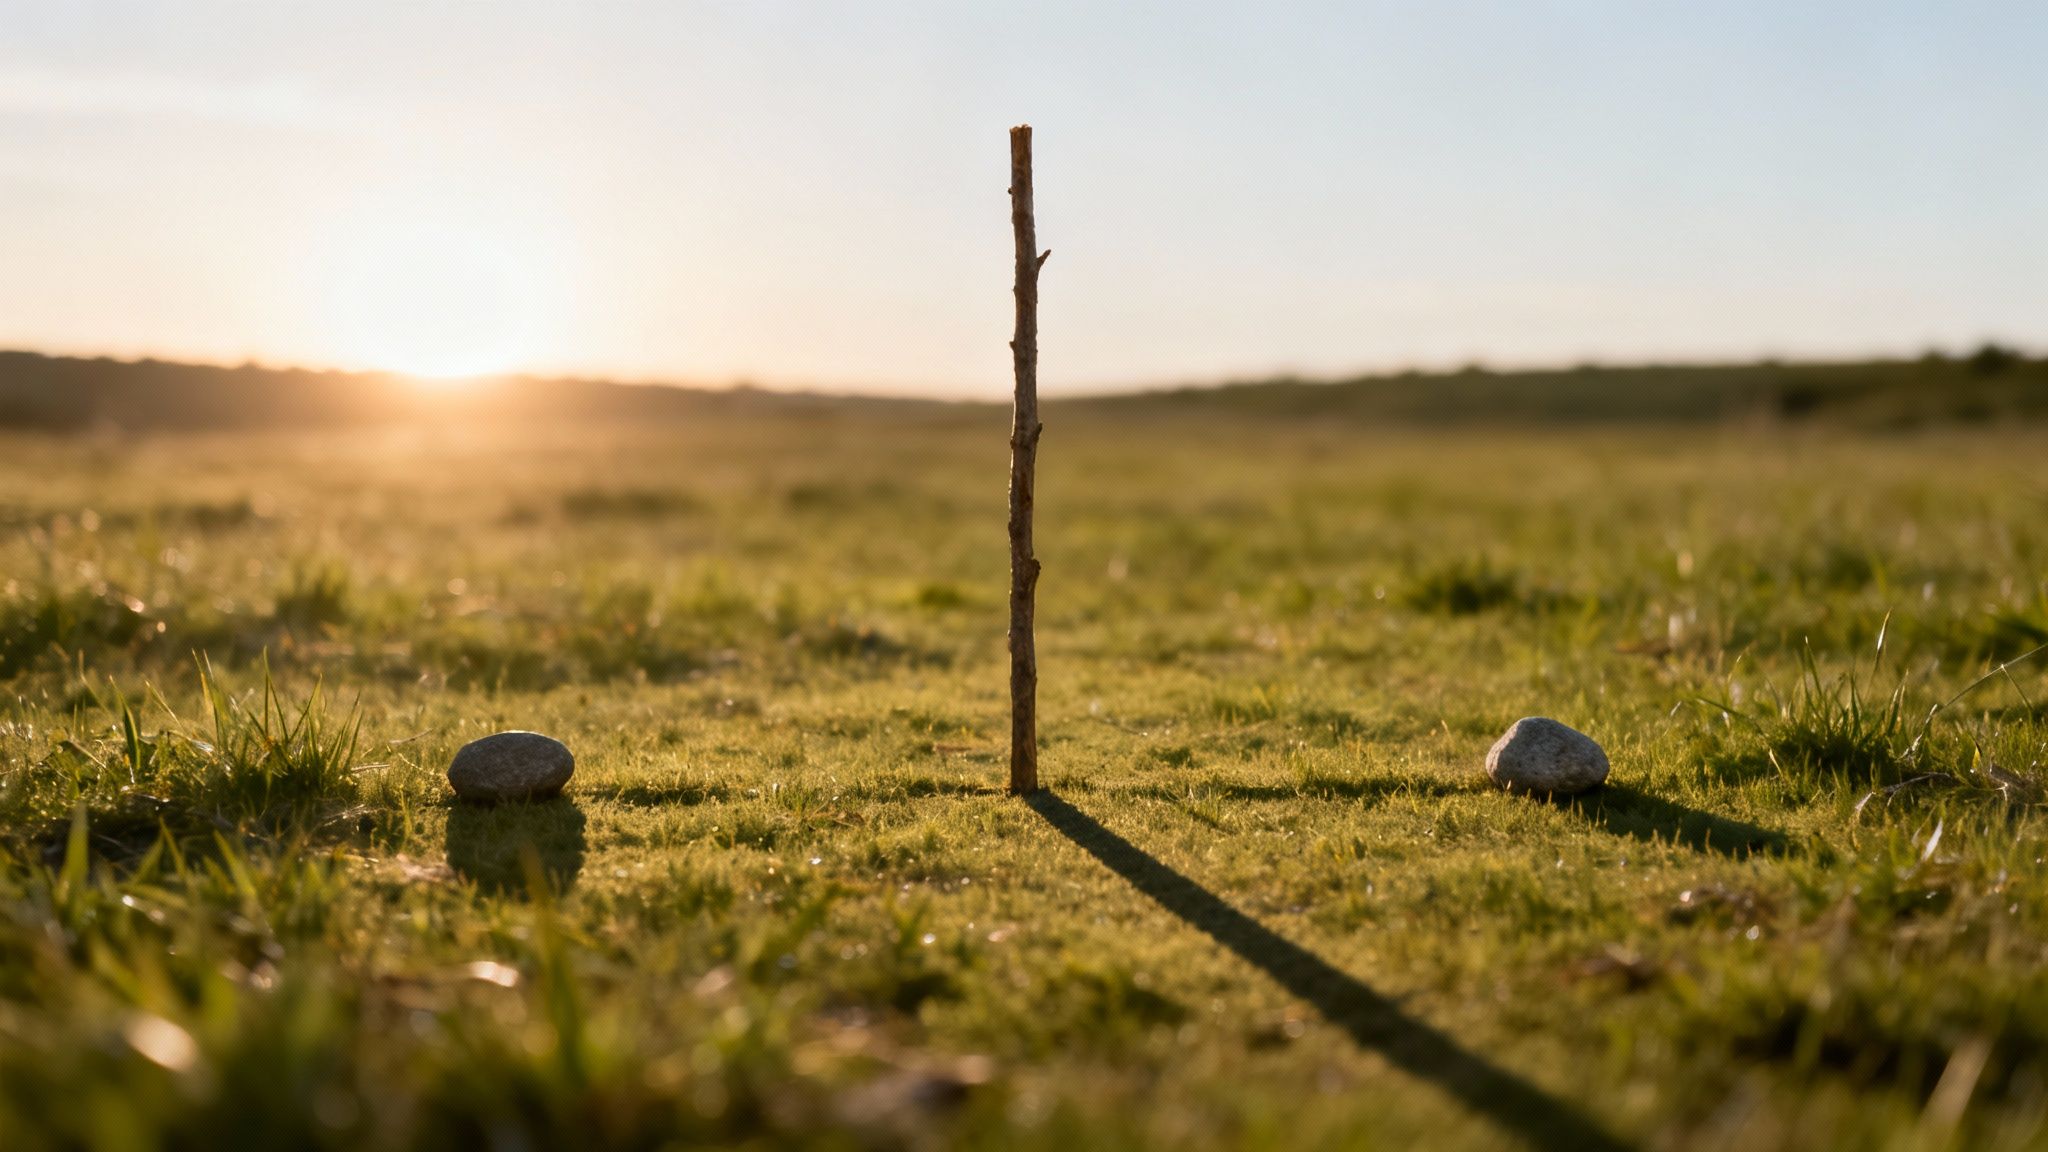
The shadow-tip method is one of the most accurate ways to draw a true east-west line. All you need is a straight stick, a patch of level ground, and about an hour of sun. It’s an incredibly powerful technique that gives you a solid directional baseline.
Here’s the breakdown:
- Plant a Stick: Shove a straight stick (around three feet long is perfect) vertically into the ground.
- Mark the First Shadow: Find the very tip of the shadow it casts and mark that spot with a small rock. This first point is west.
- Wait and Watch: Give it 15-20 minutes. As the sun moves, the shadow will creep across the ground.
- Mark the Second Shadow: Place another rock at the new tip of the shadow.
- Draw Your Line: The line connecting your first rock (west) and your second rock (east) is a true east-west line. If you stand with the west marker on your left and the east on your right, you’ll be facing true north.
The Analog Watch Method
Got an old-school analog watch? You’ve got a quick-and-dirty compass right on your wrist. This trick is perfect for the Northern Hemisphere. It’s not as pinpoint accurate as the shadow-tip method, but it’s fast and great for getting a general bearing on the fly. Watches like the Casio G-Shock are popular choices for their durability in tough conditions.
Point the hour hand of your watch directly at the sun. Now, find the midway point on your watch face between the hour hand and the 12 o’clock mark. That halfway point is south. So, if it’s 4 PM, point the ‘4’ at the sun. The midpoint between 4 and 12 is 2. The ‘2’ on your watch now points south.
Important Tip: Don’t forget about daylight saving time. If it’s in effect, use the 1 o’clock position as your reference instead of 12 o’clock. This small tweak keeps your reading from being an hour off.
Navigating by Starlight
When the sun goes down, a whole new set of navigational tools appear. The night sky can feel overwhelming, but a few key constellations are all you need to find your way.
In the Northern Hemisphere, your go-to is Polaris, the North Star. The reason it’s so reliable is that it barely moves; it sits almost directly over the Earth’s North Pole. Find it, and you’ve found true north.
- Find the Big Dipper: This is usually the easiest constellation to spot. It looks like a big saucepan.
- Use the “Pointer Stars”: Look at the two stars that form the outer edge of the Dipper’s “bowl.”
- Follow the Line: Draw an imaginary line from those two stars, extending straight out of the top of the bowl. Polaris is the first bright star you hit, about five times the distance between the two pointer stars.
If you find yourself in the Southern Hemisphere, you’ll be looking for the Southern Cross, also called Crux.
- Locate the Southern Cross: It’s a small but bright group of four stars that form a kite or a cross.
- Extend the Line: Imagine a line starting at the top star of the cross and running through the bottom star. Extend that line out about 4.5 times its own length.
- Find South: That imaginary spot in the sky marks true south. Just drop a line straight down to the horizon from there to get your bearing.
These aren’t just bits of trivia; they are real, life-saving skills. Don’t wait for an emergency to try them. Go out in your backyard on a clear day or night and practice. The more you do it, the more second nature it becomes, giving you a powerful internal compass wherever you go.
How to Read Clues in the Natural World
When thick cloud cover rolls in, hiding the sun and stars, you have to start reading the subtle language of the landscape itself. Nature is full of directional clues, but it’s a world filled with more myths than truths. The real skill isn’t finding one magic sign; it’s about developing an eye for patterns and stacking multiple pieces of evidence until you have a confident picture of your direction.
Many of us grew up hearing that moss only grows on the north side of a tree. That’s probably the most unreliable piece of wilderness lore out there. Moss grows where it’s damp and shady. In a dense forest or a wet ravine, that could be literally anywhere. Trusting that myth alone is a fast track to getting even more turned around.
Instead of looking for a silver bullet, you need to observe the broader environmental patterns that are much harder to misinterpret. These clues take a little more patience to read, but they won’t lead you astray.
Decoding Vegetation and Sun Exposure
Trees and plants are great storytellers if you know what to look for. In the Northern Hemisphere, the sun spends most of its time tracking across the southern part of the sky. This one simple fact has a huge impact on how everything grows, creating reliable patterns you can learn to spot.
Keep an eye out for these consistent signs:
- Denser Growth: The south-facing side of a hill gets way more sunlight. Because of this, the vegetation on that slope is almost always thicker, taller, and healthier than the sparser growth on the shadier, north-facing side.
- Tree Branches: Look at an isolated tree. It will often have more and bigger branches reaching toward the south to soak up as much sun as possible. The northern side might look a bit thinner in comparison. For a deeper dive, check out our guide on interpreting tree signs for survival.
- Snow Melt: In spring or early winter, snow melts faster and retreats higher up on south-facing slopes. It will hang around much longer in the shadows of the northern inclines.
The secret to using natural signs is triangulation. Never trust a single indicator. If the vegetation density, tree growth, and wind patterns all point in the same general direction, your confidence in that bearing should be high.
Following the Flow of Water
Water is a powerful and predictable force. It always, always obeys gravity. This makes rivers, streams, and creeks incredibly useful navigational aids—outdoors experts often call them “handrails” because you can just follow them.
Every small trickle of water wants to join a larger body. Tiny streams flow into bigger creeks, which flow into rivers. Those rivers almost always lead to a coastline or a large lake, and that often means civilization. If you find a water source, following it downstream is one of the most reliable strategies for finding your way out of a remote area. This is why having a way to purify water, such as a Sawyer Squeeze filter, is a critical part of any survival kit.
Observing Wind and Weather Patterns
Prevailing winds leave their mark on the landscape, giving you another layer of directional evidence. This is especially helpful in open country or coastal areas where the wind is a constant force.
Look at the “flagging” on evergreen trees at the treeline—their branches are often swept to one side, pointing away from the prevailing wind. In snowy areas, snowdrifts (called sastrugi) form in predictable lines with the wind. By noticing these patterns and knowing the typical wind direction for your region, you can get a rough directional estimate.
Remember, using nature to navigate is an art of observation and synthesis. One clue is a guess. Two is a hint. Three or more consistent indicators pointing the same way? That’s a reliable bearing you can follow.
Finding Your Way with a Map and Terrain
When the sun and stars decide to hide, your single most powerful navigation tool is an old-school classic: a physical map. Forget the flimsy tourist handout. A proper topographic map isn’t just paper; it’s a detailed conversation with the landscape around you.
Learning to use one is how you shift from being a lost hiker to an active navigator. It’s all about mastering a skill called terrain association.
This is the art of looking at the world—the slope of a hill, the bend in a creek, a distant peak—and matching it to the symbols and contour lines on your map. You’re basically orienting the map in your hands until it mirrors the reality you see, turning the entire landscape into one giant compass.
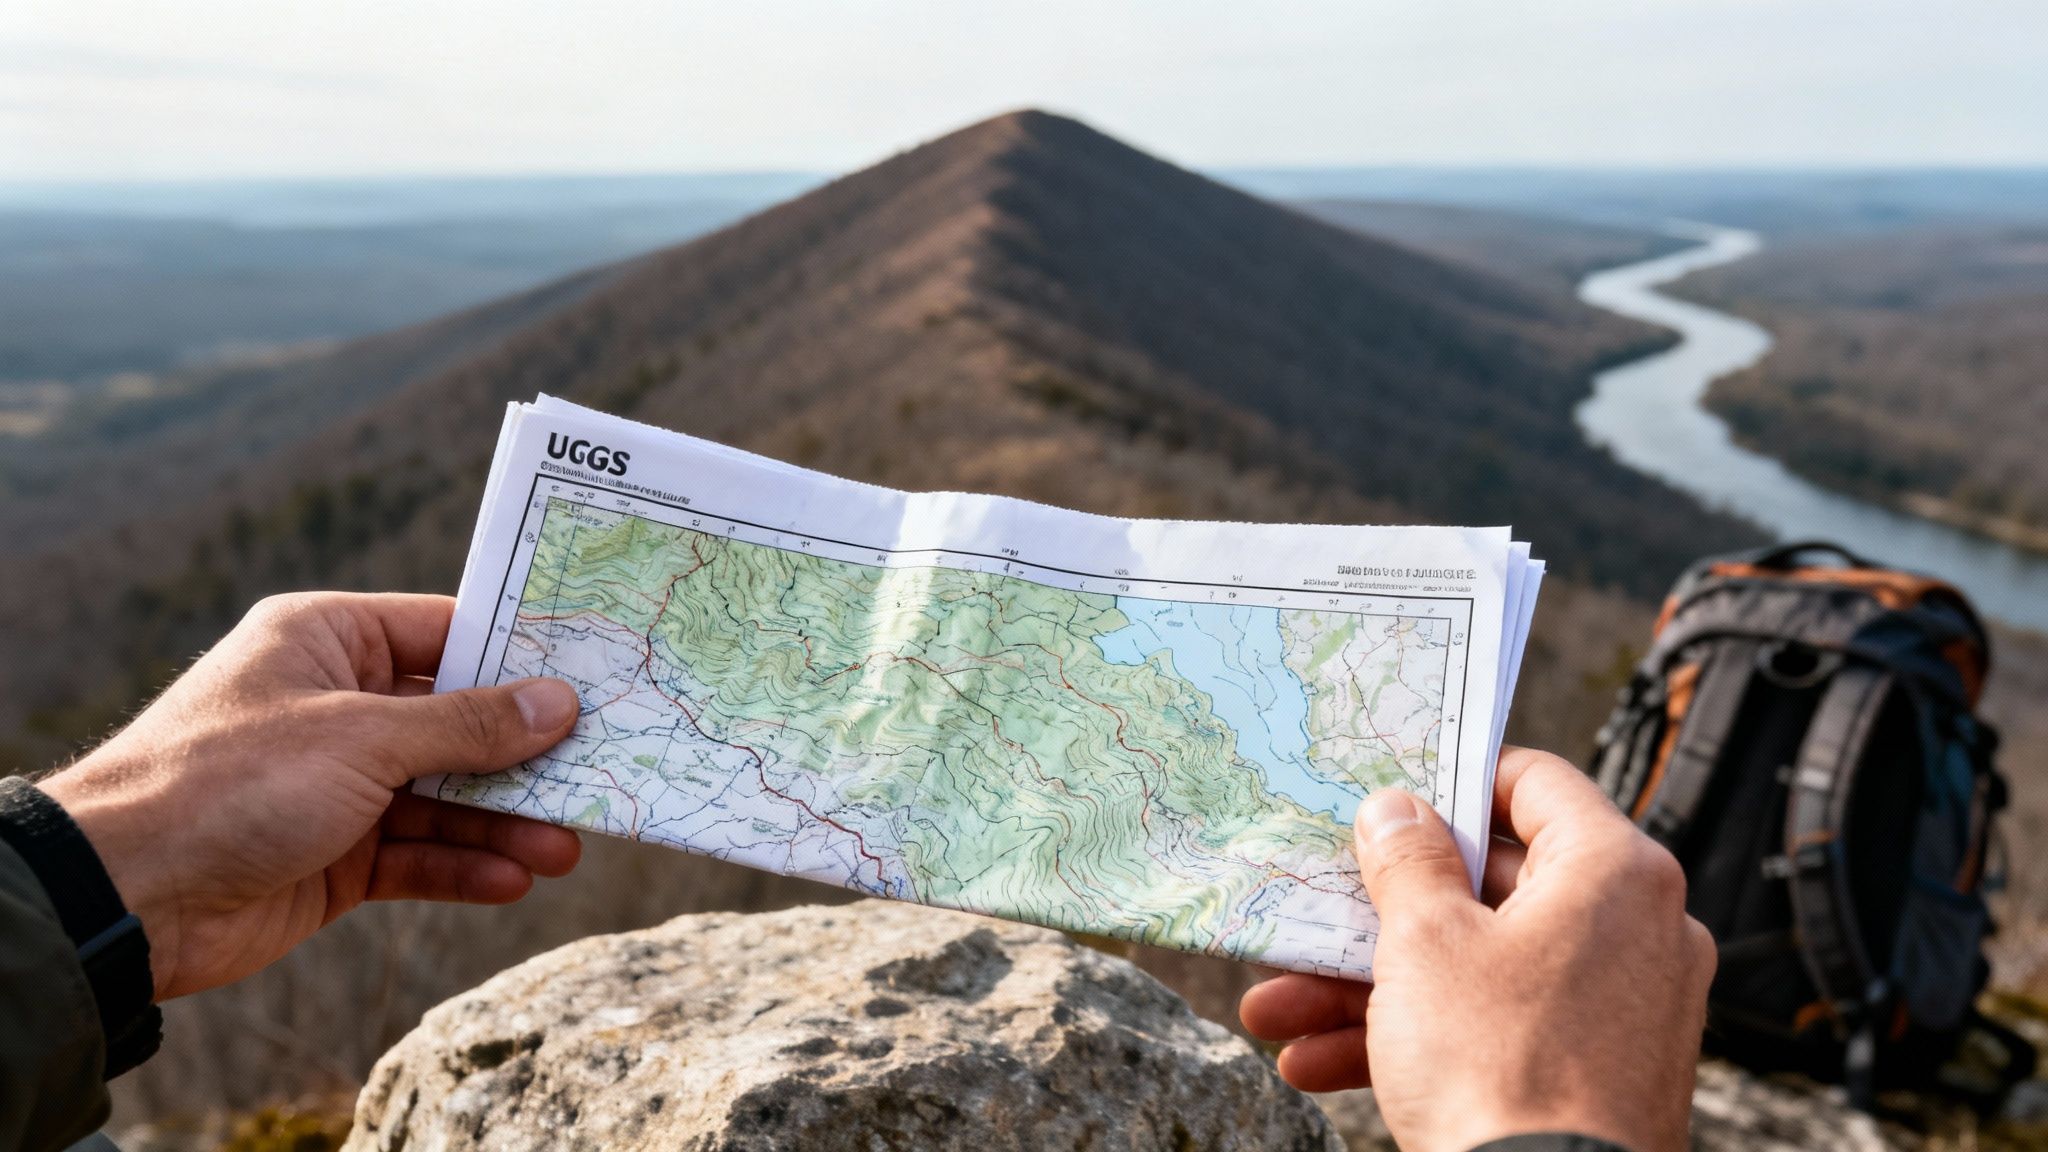
Choose the Right Map
Success here starts long before you ever hit the trail. It begins with picking the right map. A simple park brochure or road atlas just won’t cut it when you’re trying to find your way through the backcountry.
You need a detailed topographic map that shows the land’s elevation and features. The gold standard for decades has been the quadrangle maps from the U.S. Geological Survey (USGS). They offer incredible detail. For more customized or updated options, services like MyTopo let you print durable, waterproof maps centered right on your specific route.
A high-quality, physical map is a non-negotiable part of any serious loadout. For more on what to pack, check out our guide on building the ultimate wilderness survival kit.
Orienting Your Map Without a Compass
With the right map in hand, your first job is to get it oriented. Without a compass, you’ll use prominent landmarks to do this. Scan the horizon and find at least two distinct features you can see and also pinpoint on your map. This could be anything—a mountain peak, a lake, a sharp bend in a river, even a cell tower.
Lay your map on a flat surface and turn it until the symbols for those landmarks line up with the real things. For example, if there’s a mountain to your left and a lake off to your right, you’ll rotate that map until the mountain symbol is to your left and the lake symbol is to your right. Just like that, your map is oriented to the terrain.
This simple act of alignment is a game-changer. Suddenly, the squiggles and lines on the paper stop being abstract symbols and become a direct representation of the ground beneath your feet.
Using Handrails and Catching Features
Once your map is oriented, you can use the landscape itself to guide you. This is where two of my favorite navigation concepts come into play: handrails and catching features. They are the secret to moving confidently without a compass.
Handrails are linear features you can follow, just like holding a handrail on a staircase. They keep you moving in a consistent direction.
- Rivers and Streams: Following a creek downstream is a classic, reliable strategy.
- Ridgelines: Walking along the spine of a ridge often provides clear views and a natural path.
- Roads or Power Lines: Man-made features are unmistakable and almost always lead somewhere.
Catching Features (also called backstops) are large, can’t-miss-it landmarks that signal when you’ve gone too far or need to change direction.
- A Major River: If your plan is to head west but not cross the big river, that river becomes your catching feature.
- A Mountain Range: Knowing you need to turn north before you hit the base of the mountains gives you a clear boundary.
- A Highway: If you stumble onto the highway, you know you’ve overshot your smaller, intended target.
By picking a handrail to follow and a catching feature to mark your endpoint, you create a navigational safety net. For instance, your plan might sound like this: “I’ll follow this creek (my handrail) south until I hit the old logging road (my catching feature), then I’ll turn east.” It’s a simple but incredibly powerful way to navigate large areas.
Reading Contour Lines
The final piece of this puzzle is getting a feel for contour lines. These wavy lines on a topo map represent changes in elevation.
When they are packed tightly together, the terrain is steep. When they are spaced far apart, it’s flat or gently sloped. Recognizing the shapes they form allows you to “see” the landscape in 3D without ever looking up. A series of concentric circles is a hilltop. V-shaped lines point up a valley or gully.
By matching these patterns to the hills and valleys you see, you can pinpoint your location with surprising accuracy, making that map your ultimate guide when all else fails.
Keeping Track with Dead Reckoning and Pacing
Once you’ve figured out which way is north using the sun or stars, the real work begins. Knowing your direction is only half the battle; you also have to know how far you’ve gone. This is where a classic navigation technique called dead reckoning comes into play.
Don’t let the name scare you. It’s a straightforward way to track your position by combining a known direction with the distance you’ve traveled. Instead of just wandering and hoping for the best, you turn your movement into a series of calculated steps, letting you pinpoint your location on a map with surprising accuracy. The secret to making it work? Knowing your pace count.
Calculating Your Personal Pace Count
Your pace count is simply the number of steps it takes you to walk a set distance—usually 100 meters. This isn’t a one-size-fits-all number; it’s unique to you, your stride, and the terrain you’re crossing. Figuring this out is easy and something you should do long before you’re ever in a situation where you actually need it.
Here’s how to find your baseline pace:
- Measure Out a Course: Find a flat, straight stretch of ground and measure out exactly 100 meters. A measuring tape is best for this.
- Walk and Count: Walk the course at a normal, comfortable pace. Count every time your left foot hits the ground.
- Get Your Number: The final count is your baseline pace for 100 meters. Do this a few times and take the average to get a really solid number.
But here’s the thing: your pace changes. You’ll take longer strides going downhill and much shorter ones climbing a steep hill or pushing through thick brush. To make your distance estimates truly reliable, you need to know your pace count for these different conditions, too.
Pro Tip: Don’t stop at flat ground. Go find a hill and figure out your uphill and downhill pace count. Do it again while wearing a heavy pack. Knowing these variations is what makes dead reckoning a truly powerful tool. Packing the right gear is just as important; building a solid get-home bag ensures you have what you need.
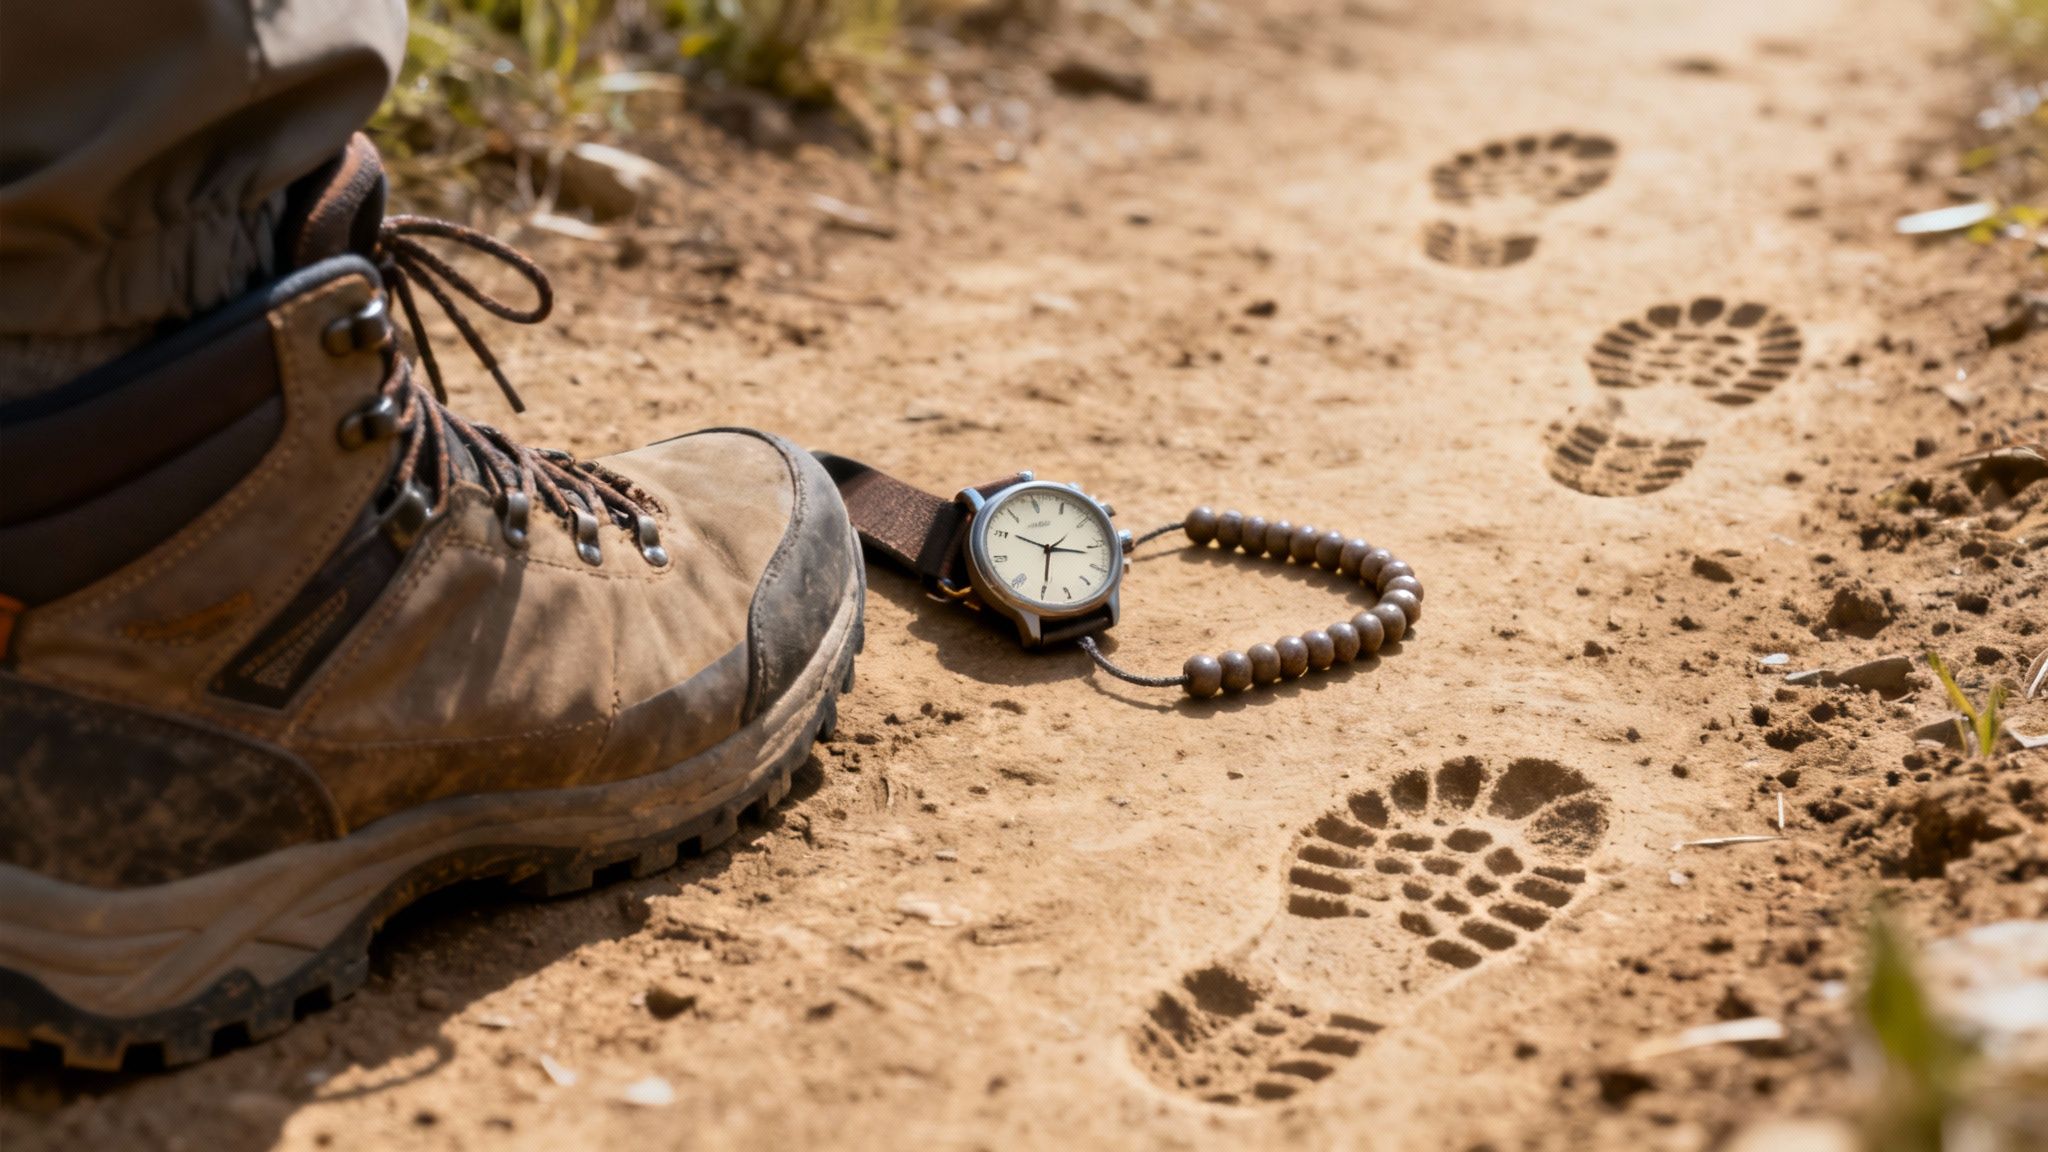
Using Pace Beads to Track Distance
Trying to remember if you’ve taken 867 or 876 steps is nearly impossible, especially when you’re tired, stressed, or dehydrated. Your brain has more important things to do. That’s where pace beads come in.
Also known as ranger beads, this is a dead-simple tool for keeping count. You can buy them from companies like UCO Gear, but they’re incredibly easy to make yourself with some paracord and a handful of beads.
A typical set has two sections separated by a knot: 9 beads on the bottom and 4 beads on top.
- Tracking 100 Meters: Each time you walk your 100-meter pace count, you slide one of the bottom 9 beads down.
- Tracking Kilometers: After you’ve moved all 9 lower beads (that’s 900 meters), you walk one final 100-meter stretch. Then, you slide all 9 beads back to the top and pull down one of the 4 upper beads. That single top bead now marks 1 kilometer traveled.
With this simple system, you can easily track up to 5 kilometers before needing a reset. It’s a low-tech, foolproof way to offload the mental work of counting, freeing you up to focus on the trail ahead. When you combine this measured distance with the direction you found earlier, you can move from point to point with confidence, keeping yourself found when others might be hopelessly lost.
Knowing how to find your way without a compass is a huge part of the survival puzzle. But there’s another piece that’s arguably even more important: good judgment.
Making the right call—when to push on, when to stay put—can turn a bad situation into a manageable one. It all starts with being prepared before you even step foot on the trail.
This doesn’t mean hauling a massive pack stuffed with gear. It’s about a few smart, multi-functional items. A simple, well-thought-out navigation kit is the perfect place to start.
Your Core Navigation Kit
Even if you leave your compass at home, these three things give you a massive edge:
- A Local Topographic Map: Keep it in a waterproof case. This is your single most valuable tool, period.
- An Analog Watch: Absolutely essential for finding direction with the sun and, just as importantly, for keeping track of time.
- A Notebook and Pencil: Grab a waterproof notebook like a Rite in the Rain. Use it to log your travel time, pace count, and key landmarks you pass. It’s your field journal for getting un-lost.
The S.T.O.P. Framework
The second you get that sinking feeling in your gut—the moment you realize you’re lost—your biggest enemy is panic. It short-circuits your brain and leads to terrible decisions.
Before you take a single step, run through the S.T.O.P. acronym. It’s a mental brake that helps you get back in control.
- Stop: Just stop. Right where you are. Fight that primal urge to rush forward. Sit down, have some water, and take a few deep breaths.
- Think: Assess the situation calmly. How did I get here? What was the last thing I remember seeing that I recognized?
- Observe: Look around you. Can you spot any features on your map? Listen. Do you hear cars, a train, or running water?
- Plan: Only after you’ve done the first three steps should you even consider making a plan.
Your first decision is the most critical: move or stay put? There is no one-size-fits-all answer here. Moving without a solid plan can easily make a bad situation much, much worse.
To make the right call, you need to weigh the factors honestly.
| Factor | Move If… | Stay Put If… |
|---|---|---|
| Your Condition | You’re uninjured, hydrated, and have the energy and supplies for the journey. | You or anyone in your group is hurt, exhausted, or sick. |
| Weather | The weather is clear and stable, with plenty of daylight left. | A storm is rolling in, visibility is terrible, or it’s getting dark. |
| Rescue Probability | Someone knows exactly where you were going and when you were due back. A search party is a real possibility. | Nobody has a clue where you are or when you were supposed to return. |
| Location | You are 100% confident you know where you are and have a clear, safe path to a known point. | You’re in a spot with decent shelter and access to water. |
In the end, real preparedness isn’t just about skills or gear. It’s about the discipline to make calm, smart decisions when the pressure is on. You can get a head start by building a solid emergency preparedness checklist that covers all your bases before you head out.
Common Questions About Navigating Without a Compass
What’s the single best way to find your direction if you don’t have a compass?
Hands down, the most accurate method depends on whether it’s day or night. In the Northern Hemisphere, nothing beats using Polaris (the North Star) at night. It’s a fixed point in the sky, making it an incredibly reliable guide.
During the day, the shadow-tip method is your best bet, as long as you have consistent sunlight and about an hour to spare. Both of these techniques are far more dependable than trying to read moss on a tree.
So, How Reliable Is Reading Natural Signs Like Moss?
Honestly, natural signs are the least trustworthy method out there. They should be your absolute last resort.
Local conditions like shade, wind direction, and moisture levels have a much bigger impact on things like moss growth than the general direction of north. Never trust a single sign. If you’re forced to rely on them, always look for multiple indicators pointing the same way before making a decision.
Can I Still Use My Smartphone for Navigation Without a Signal?
Absolutely, as long as you’ve still got battery life. Your phone’s built-in GPS receiver can pinpoint your location without needing a cell or Wi-Fi signal to do it. Having a reliable power bank, like one from Anker, is a smart way to extend your phone’s usability in an emergency.
The catch is that you won’t be able to see where you are on a map unless you’ve planned ahead. You’ll need an offline mapping app like Gaia GPS with maps of your area pre-downloaded to your device.

