A get home bag is your personal insurance policy for the commute. It’s a small, pre-packed kit built for one specific job: getting you from wherever you are back to the safety of your home during an emergency. It’s loaded with just enough gear to sustain you for 24-48 hours if regular transportation grinds to a halt.
Your Lifeline When You Are Stranded

Picture this: you’re at the office, miles from home, and a crisis hits. It could be a city-wide blackout, a sudden natural disaster, or civil unrest that shuts down every road and rail line. Your car is stuck in a sea of gridlock, and the cell networks are completely jammed.
This is exactly the kind of scenario a get home bag (GHB) is designed for.
Its mission is brutally simple: give you the tools to make that unexpected journey on foot, safely and without drama. The contents are all about mobility and solving immediate problems—not long-term wilderness survival. This laser-focus on getting you home is what makes it so different from other preparedness kits.
Get Home Bag vs. Bug Out Bag vs. EDC
It’s easy to get these terms mixed up, but each kit has a very distinct role. Confusing them can leave you with the wrong gear when you need it most. A get home bag and a bug out bag, in particular, are worlds apart in their purpose.
To clear things up, here’s a quick rundown of the big three preparedness setups. While a bug out bag is designed for extended evacuation, a get home bag focuses on a shorter, more specific journey—making it ideal for urban commuters.
Preparedness Bags At a Glance
| Bag Type | Primary Purpose | Timeframe Covered | Typical Weight |
|---|---|---|---|
| Everyday Carry (EDC) | Immediate, daily needs and minor emergencies. | Seconds to minutes | A few ounces to 2 lbs |
| Get Home Bag (GHB) | To get you from your current location back home. | 24-48 hours | 15-25 lbs |
| Bug Out Bag (BOB) | To evacuate your home and survive elsewhere. | 72+ hours | 35-50+ lbs |
As you can see, each kit serves a unique function, from the items in your pockets to the full-blown evacuation pack.
Let’s break them down a bit more:
- Everyday Carry (EDC): This is the stuff you have on you all the time. Think phone, wallet, keys, and maybe a small pocket knife or flashlight. It’s for dealing with life’s little hiccups, right here and now.
- Get Home Bag (GHB): This is a dedicated kit that lives in your vehicle or at your workplace. Its sole job is to bridge the gap between where you are and your front door when disaster strikes.
- Bug Out Bag (BOB): This is the big one. It’s a much larger, more comprehensive kit designed to keep you alive for 72 hours or more if you’re forced to evacuate your home. For a deep dive, check out our guide on what a bug-out bag is.
The need for a GHB was driven home for thousands of people during events like 9/11, when countless commuters faced treks of 10 hours or more on foot to get out of the city. It’s a purpose-built tool for a very specific, high-stakes job. It’s not about thriving in the woods for a week; it’s about covering those critical miles back to your sanctuary.
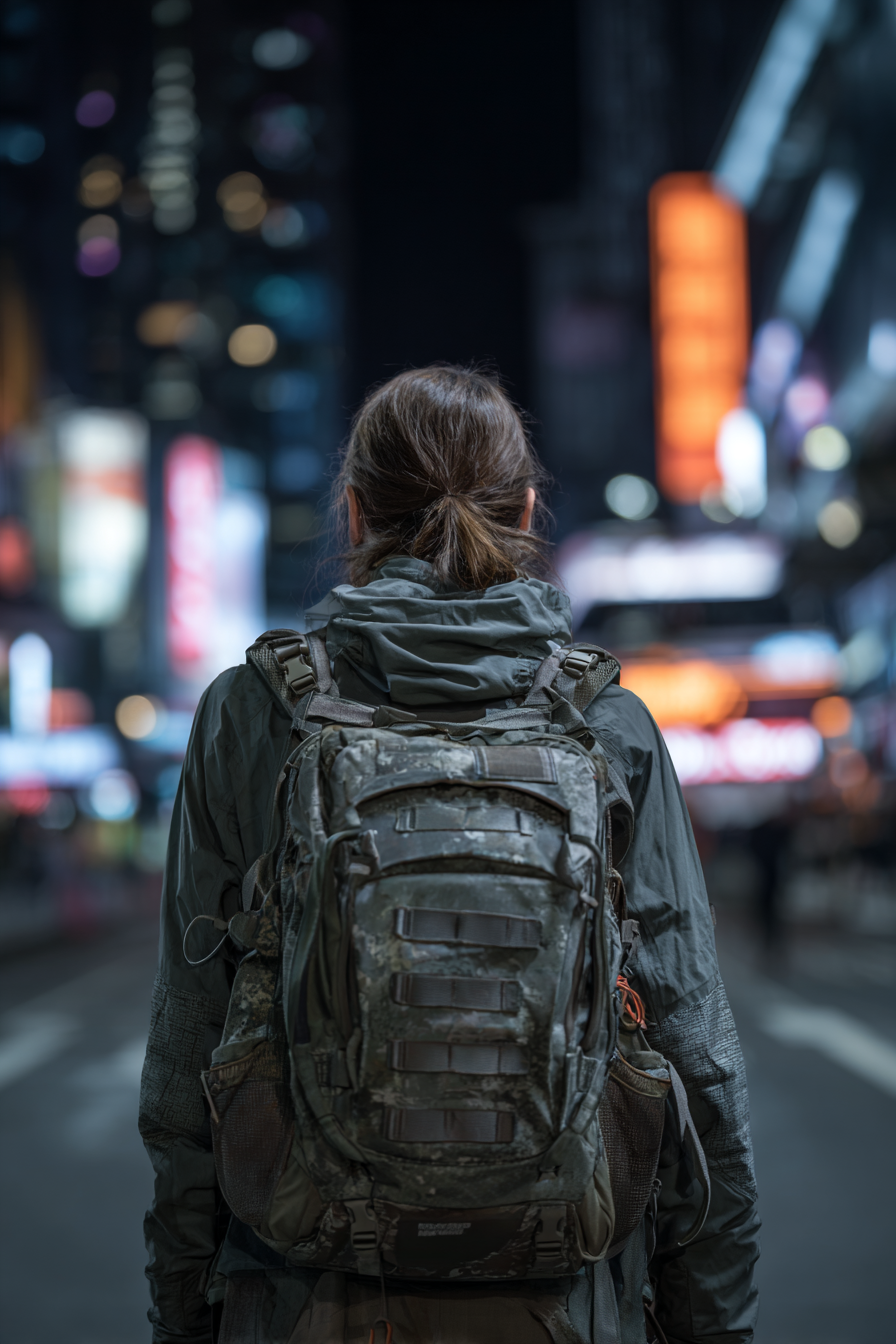
Choosing a Pack That Blends In
The backpack you choose is more than just a container; it’s the very foundation of your get-home system. It’s easy to get drawn to the tactical look—MOLLE webbing, camo patterns, the works. But in a real crisis, that kind of gear paints a giant target on your back.
The smartest move, especially in an urban environment, is to look like you don’t have anything worth taking. This is the “gray man” philosophy. Your goal is to melt into the background. A normal-looking backpack, the kind you’d see on a college campus or a day hike, lets you move through a crowd without anyone giving you a second thought. That anonymity is your first and best line of defense.
Finding the Right Balance of Features
Of course, blending in is only half the battle. Your bag has to be tough enough to survive the journey home. Look for a pack somewhere in the 20 to 35-liter range. That’s the sweet spot—big enough for your essentials without turning into a heavy, bulky monster.
Durability is non-negotiable. Stick with proven materials like Cordura or high-denier nylon that can take a beating without ripping or tearing. Just as important is comfort. You could be wearing this thing for hours, maybe even days. Well-padded shoulder straps and a solid back panel are an absolute must to prevent fatigue and injury when you can least afford it.
Your goal is a pack that appears completely ordinary to the casual observer but offers the rugged performance you need to navigate a difficult situation. It’s a tool, not a statement.
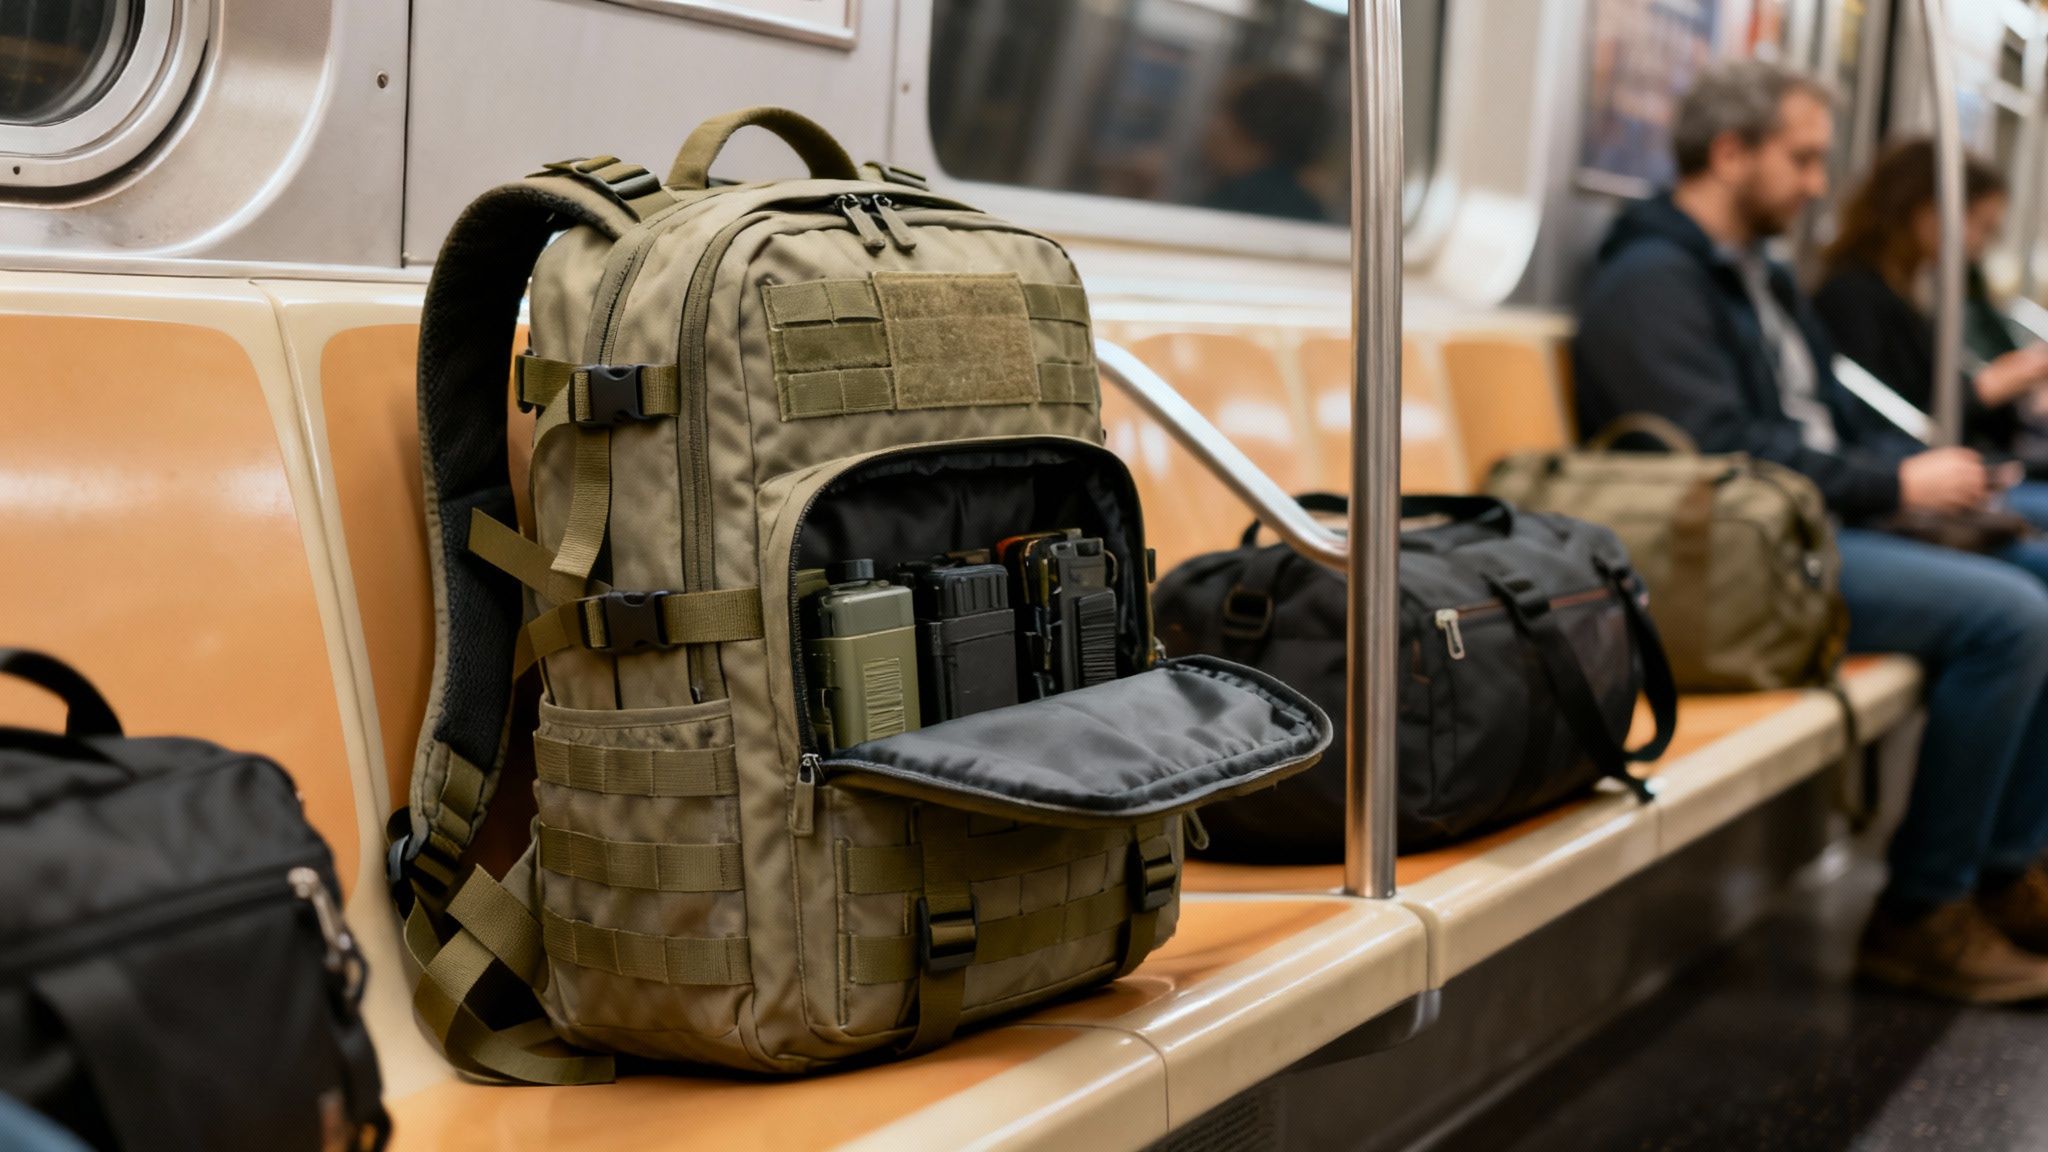
Pack Recommendations for Every Style
Plenty of great bags walk this line, offering low-profile looks with high-performance guts. Some are designed specifically for covert use, while others are just exceptionally well-made civilian packs that fit the bill perfectly.
- Covert Tactical: Look at bags like the Vertx Gamut or the 5.11 Rush24 2.0 in a neutral color like gray or black. They give you incredible organization and bombproof construction in a package that doesn’t scream “military.”
- Civilian Performance: You can’t go wrong with brands like Osprey and Deuter. They make ridiculously comfortable and tough packs for the hiking world that are perfect for a get-home bag. Their internal frames and advanced suspension systems make carrying a load feel much lighter over long distances.
Ultimately, the right pack is one that fits your body, holds your gear, and helps you disappear into the scenery. While this setup is designed for a major event, many of its components are useful in smaller emergencies, too. Building on this idea, you can learn more about creating a compact survival kit for more common, everyday situations.
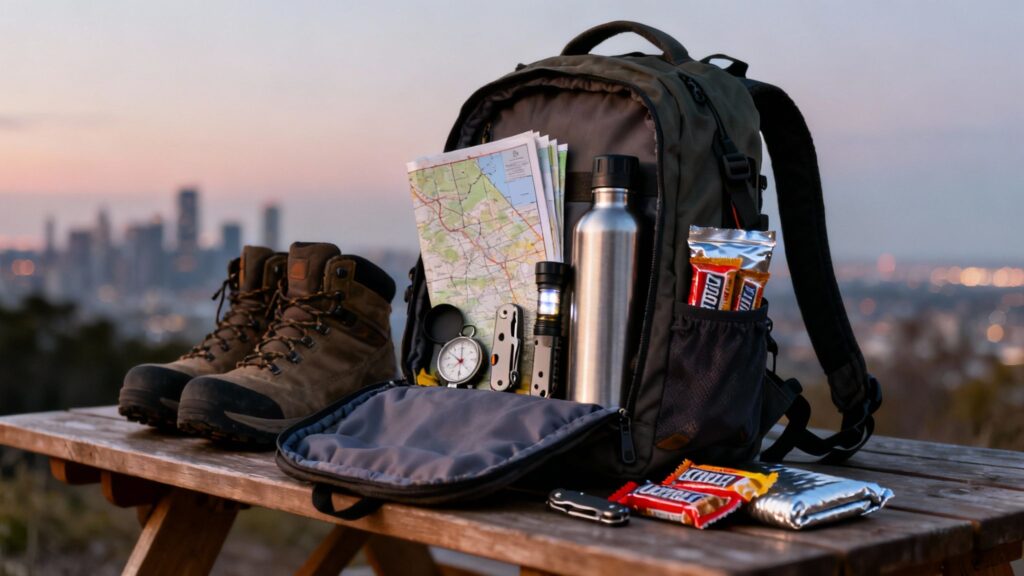
Your Core Get Home Bag Checklist
Alright, you’ve picked out a solid, low-profile bag. Now for the important part: filling it with gear that will actually get you home. I’ve seen two common mistakes—people either overpack with gear that’s too heavy and complicated, or they underpack and leave a critical gap in their capabilities.
The secret is focusing on the absolute core survival functions. Every single item needs to earn its place by being lightweight and, whenever possible, serving more than one purpose. This isn’t just a random list; it’s a strategic framework for building a kit you can trust your life with. We’ll break it down by category so you understand the “why” behind each choice.
Let’s dig in. Here’s a high-level look at the essentials we’re about to cover. Think of this as your starting point for building a truly reliable get home bag.
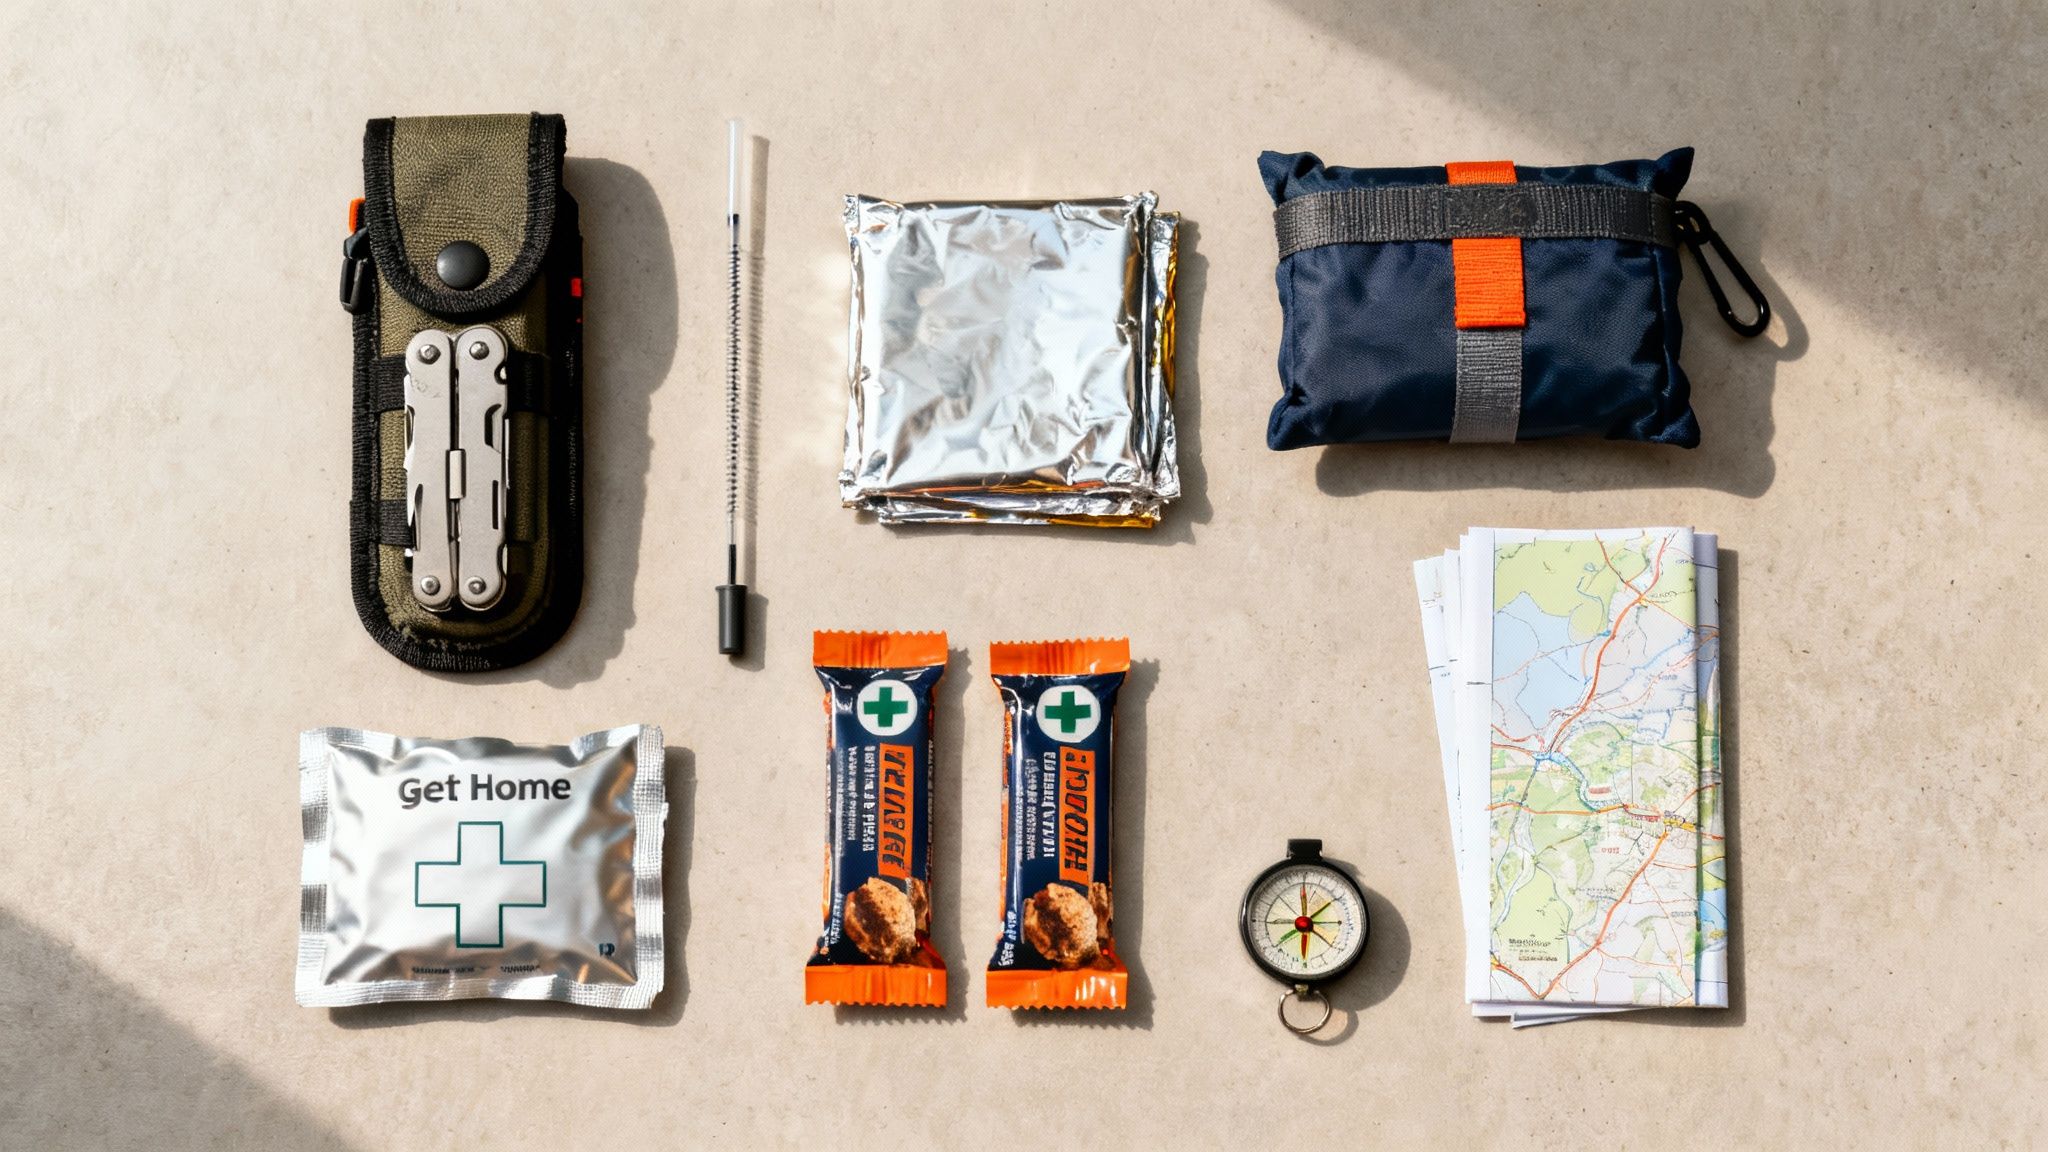
Get Home Bag Core Checklist
| Category | Essential Item | Purpose |
|---|---|---|
| Water & Hydration | Water Bottle & Filter | Carries immediate water supply and purifies additional sources. |
| Nutrition & Energy | High-Calorie Bars | Provides quick, no-cook energy to keep you moving. |
| First Aid & Medical | Trauma Kit & Basics | Manages everything from small cuts to life-threatening injuries. |
| Tools & Fire | Multi-Tool, Knife, Headlamp | Solves problems, provides light, and creates fire for warmth/signaling. |
| Navigation | Map & Compass | Ensures you can find your way home without relying on technology. |
| Shelter & Protection | Emergency Poncho/Blanket | Protects from rain, wind, and cold, preventing exposure. |
| Communication | Whistle & Power Bank | Signals for help and keeps your phone charged for as long as possible. |
| Self-Defense | Pepper Spray or Other Tool | Provides a layer of personal protection in uncertain situations. |
This checklist is your foundation. As we go through each category, you’ll see how these items form a cohesive system to overcome the most likely challenges you’ll face.
Water and Hydration
Dehydration is your worst enemy out there. It tanks your judgment, saps your energy, and can become a serious medical emergency in just a few hours—especially if you’re hoofing it. You need to tackle water from two angles.
First, carry some with you. A tough, reusable bottle like a Nalgene or a stainless steel Klean Kanteen is perfect. Make sure you have at least one liter full and ready to go at all times.
Second, you absolutely must have a way to make more safe water. You can’t predict how long it’ll take to get home, and you might pass streams or other questionable sources. A simple, lightweight water filter like the Sawyer MINI is non-negotiable. It’s your insurance policy against running dry.
Nutrition and Energy
Think of your trip home as a marathon, not a sprint. You’re going to be burning a shocking number of calories, and you have to replace them to stay mentally sharp and physically capable. The name of the game here is calorie density and zero prep time.
For long-term sustenance, consider canned vs freeze-dried food options, which offer extended shelf life and minimal preparation—perfect for emergency situations.
Forget anything that needs cooking. Your food has to be ready to eat while you walk.
- High-Calorie Energy Bars: Look for bars packing at least 300-400 calories a pop. Brands like Clif Bar or dedicated survival rations like SOS Food Lab Emergency Rations are made for this.
- Trail Mix or Nuts: A simple bag of nuts and dried fruit gives you a quick hit of protein, fats, and sugars for sustained energy. It’s simple, but it works.
- Electrolyte Packets: Toss a few Liquid I.V. packets in your kit. Adding one to your water helps replace the salts you lose sweating, which is crucial for preventing cramps and fatigue.
First Aid and Medical
Out on the road, a minor injury can turn into a showstopper. A twisted ankle, a nasty cut, or even a few bad blisters can bring your journey to a grinding halt. Your first aid kit has to be more than a little box of cartoon bandages.
It needs to handle both the small stuff and serious trauma. A pre-made kit like the MyFAK from MyMedic is a great starting point, but you can definitely build your own. Just make sure it includes trauma gear like a CAT tourniquet and a pressure dressing alongside the basics like blister care, pain relievers, and antiseptic wipes. For a really deep dive on what to pack, check out our guide on essential first aid kit supplies.
Tools and Fire
A couple of well-chosen tools can solve an incredible number of problems. You don’t need a heavy toolbox—just a few versatile workhorses. A quality multi-tool like a Leatherman Wave is indispensable; it gives you pliers, wire cutters, a knife, and screwdrivers all in one.
I also recommend adding a sturdy, full-tang fixed-blade knife for tougher jobs. A reliable headlamp (with extra batteries) is mandatory for moving after dark while keeping your hands free. And for fire, never rely on just one method. Pack a ferro rod and a waterproof tube of stormproof matches. Redundancy is key.
A get home bag is a system of overlapping capabilities. Your poncho is shelter, your knife is a tool, and your water filter is a health item. Each piece should work together to solve the core problem: getting home safely.
Tailoring Your Kit to Your World
A generic checklist is a decent starting point, but it won’t get you home. The single most critical step in building a get-home bag that actually works is customizing it to your real-world commute, climate, and personal situation.
Think about it: the journey home from a downtown high-rise is a completely different beast than a commute that winds through rural backroads. Your bag has to reflect your reality. What works for someone else might just be dead weight for you—or worse, leave you unprepared for the exact challenges you’re most likely to face.
Urban vs. Rural Environments
The landscape you have to cross dictates your gear. A city dweller is up against a different set of problems than someone out in the sticks.
- Urban Kit: You’re navigating a concrete jungle. A small pry bar or a multi-tool like the Gerber Shard can be a lifesaver for jammed doors or accessing tight spaces. An N95 or P100 respirator mask is non-negotiable for filtering out the dust, smoke, and other nasty airborne stuff that fills the air in urban disasters.
- Rural Kit: Out here, the challenges shift from man-made obstacles to mother nature. Your shelter and fire-starting gear suddenly become a lot more important. You’ll want to pack a more substantial survival blanket like the SOL Emergency Bivvy, and carrying a reliable UCO Stormproof Match Kit moves way up the priority list.
Your get-home bag isn’t a one-size-fits-all solution. It’s a highly specialized tool designed for a single mission: your unique journey home. Walk your route, analyze your commute, and pack for the obstacles you will actually encounter.
Climate and Seasonal Adjustments
Your environment isn’t just about geography; it’s also about the weather. A bag packed for a Minnesota winter is completely useless during an Arizona summer. You absolutely have to adapt your kit to the seasons.
During the hot months, you’ll probably want to double your water-carrying capacity and throw in some electrolyte powders to fend off heat exhaustion. Sunscreen, a wide-brimmed hat, and lightweight, light-colored clothing are must-haves.
When it gets cold, the game changes to staying warm and dry. Swap out the light layers for thermal underwear, Darn Tough wool socks, and a good pair of insulated gloves. Chemical hand warmers are a lightweight, high-impact addition, and your food should include more calorie-dense fats to help your body generate its own heat.
Personal and Family Considerations
Your get-home bag is for you, but you’re rarely an island. If you have a family, their needs have to be part of the plan.
Does your spouse have a get-home bag in their vehicle, too? Do your kids have a smaller, age-appropriate kit at school with emergency contact info and a comfort item? These are the kinds of questions that need answers long before you ever need the bags.
In the event of civil unrest or preparing for martial law, having a well-thought-out plan and a reliable get home bag can be critical for your safety and that of your family.
And of course, your personal needs are non-negotiable. This means packing:
- A 7-day supply of any prescription medications.
- A spare pair of eyeglasses or extra contact lenses.
- Copies of important documents stored on a password-protected USB drive.
Don’t forget about your four-legged family members, either. If getting home involves picking up a pet, you need a plan for that, too. To get started, check out our comprehensive guide for building a pet emergency kit so no one gets left behind.
Personalizing your gear is what turns a generic bag of stuff into a true lifeline.
Keeping Your Get Home Bag Ready for Action

Putting together your get-home bag is a fantastic first step, but it’s just that—the beginning. A bag that sits forgotten in a trunk for five years isn’t a lifeline; it’s a liability. The real work lies in the ongoing care and practice that turns a simple collection of gear into a system you can actually bet your life on.
This process starts with smart staging. For most of us, the best place to keep a get-home bag is in the car. It’s the one place you’re most likely to be separated from your home base when a crisis hits. If you use public transit, a dedicated bag at your workplace is your next best bet. The goal is simple: accessibility. To ensure you’re fully prepared, download our emergency preparedness checklist PDF for a comprehensive guide on what to include in your kit. If you can’t get to your bag when you need it, it’s useless.
Establish a Simple Maintenance Routine
Maintenance doesn’t have to be some monumental task. A simple, semi-annual check-up is all it takes to keep your kit in peak condition. An easy way to remember is to tie it to daylight saving time. Twice a year, when you’re changing your clocks, set aside 30 minutes to go through your bag.
- Rotate Consumables: Swap out all food and water. Even long-shelf-life items degrade, especially when they’re baking and freezing in a car trunk year-round.
- Check Batteries: Replace the batteries in your flashlight, headlamp, and any other electronics. Don’t just swap them—turn each device on to make sure it’s working perfectly.
- Inspect Gear: Give everything a quick once-over. Look for wear and tear on the bag itself, rust on tools, or any leaks in your water containers.
- Update Personal Items: Make sure your medications haven’t expired, your spare clothes are right for the upcoming season, and your emergency contact list is current.
This simple schedule is a critical habit, but it’s one most people skip. Despite the growing interest in preparedness, only 34% of Americans actually maintain a ready kit. That gap between owning supplies and maintaining them is a dangerous one. You can find more strategies for building a robust system in our guide to emergency kit maintenance.
Practice Is Not Optional
Owning a map and compass is not the same as knowing how to use them. The single biggest mistake you can make is assuming you’ll figure it all out when the pressure is on. You won’t. You have to practice with your gear and, more importantly, practice the journey itself.
Your get-home bag is not just a collection of gear; it’s a plan. A plan is useless until it has been tested against reality.
Physically walk your primary and alternate routes home. This does a few critical things. First, it gives you a brutal, honest feel for the time and effort required. Second, it reveals choke points, hazards, and even helpful shortcuts you’d never spot on a map. Finally, it lets you test your gear in the real world. You’ll find out fast if those “comfortable” shoes give you blisters after three miles or if your pack is a pound too heavy.
This proactive approach—routine maintenance plus hands-on practice—is what builds true confidence. It ensures that when you actually need it, your get-home bag will be the reliable tool you intended it to be.
Answering Your Get Home Bag Questions
Once you start putting a get home bag together, the questions start popping up. With so much advice out there—some good, some not so good—it’s easy to get lost in the weeds. Let’s cut through that noise and tackle the most common questions head-on.
Think of this as the practical advice you’d get from someone who’s already made the mistakes, so you don’t have to. The goal is a bag that actually works for you when you need it most.
How Heavy Should My Get Home Bag Be?
Keep it under 20 pounds. Seriously. The entire point of a get home bag is to stay mobile. Every single ounce will feel like a brick after a few hours on your feet, so you have to be absolutely ruthless about what makes the cut.
A heavy bag doesn’t just slow you down; it drains your will to keep moving and opens the door to injuries like blisters and strained muscles. Once you’ve packed your first draft, throw it on and walk a couple of miles. If it feels clumsy or heavy, it is. Go back and question every item’s weight versus its real value for a 24-hour trek home.
What Are the Biggest Mistakes People Make?
The classic mistake is overpacking with shiny, heavy gadgets while forgetting the absolute basics. I’ve seen bags loaded with expensive gear but missing a good pair of wool socks or having shoes that aren’t broken in. Those simple things are far more likely to make or break your journey than some complex tool.
Another huge error is the “set it and forget it” mentality. A bag tossed in a trunk and ignored for three years is a liability, not an asset. The food inside has likely gone bad, the water tastes like a plastic bottle, and you can bet the batteries in the flashlight are corroded. Regular maintenance isn’t just a good idea—it’s essential.
The biggest failure isn’t choosing the wrong piece of gear. It’s failing to maintain the gear you already have. An unmaintained bag gives you a false sense of security, which is more dangerous than having no bag at all.
Should I Pack a Weapon for Self-Defense?
This is a personal call, and it depends entirely on your local laws, your training, and the environment you’ll be moving through. Your best strategy is always going to be avoiding trouble and staying unseen in the first place. Often, a non-lethal tool is the smarter choice. A powerful flashlight, like a Streamlight ProTac, can disorient an attacker, while pepper spray can create the distance you need to escape. Remember, pulling out a weapon can escalate a situation and make you a target.
Where Is the Best Place to Keep My Bag?
For most of us, the answer is your vehicle. Your car is usually with you or close by when you’re away from home, which makes it the perfect place to stage your bag from. If you commute via public transit, keeping a dedicated get home bag at your workplace is the next best thing. The whole point is making sure you can actually get to your bag when the normal way home is no longer an option.

