In an era of unpredictable supply chains and increasingly frequent extreme weather events, the old advice of having a simple 72-hour kit is dangerously outdated. True resilience isn’t just about surviving the first few days; it’s about creating a robust, multi-layered system that can sustain your household through extended disruptions, power outages, and unforeseen emergencies. The traditional “go-bag” is a great start, but it represents only one component of a much larger strategy for genuine self-reliance.
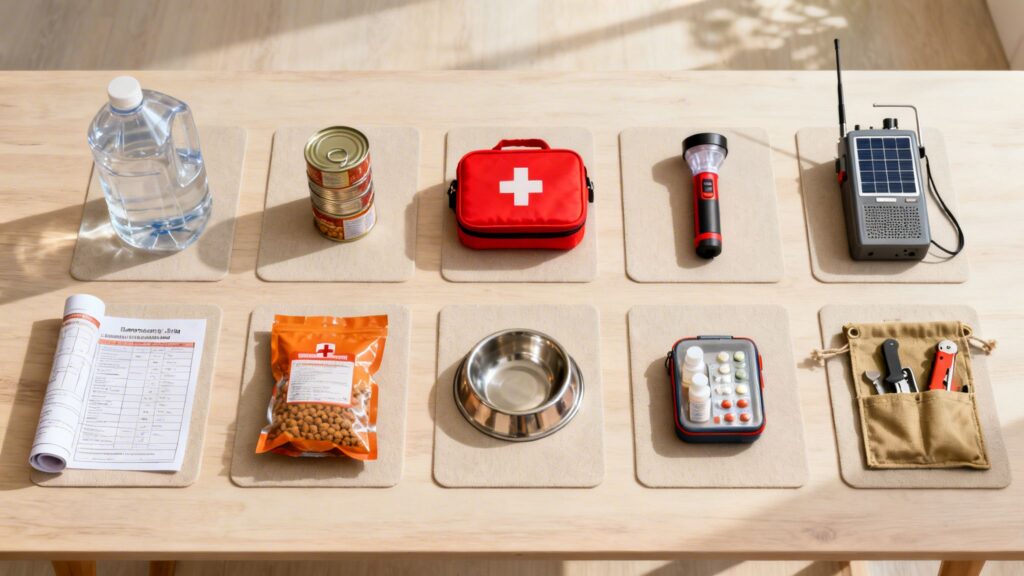
This comprehensive disaster preparedness checklist moves far beyond the basics, offering a prioritized and actionable framework. We will detail ten essential pillars of preparedness that cover everything from securing a long-term water supply with systems like the LifeStraw Family purifier to establishing off-grid communication and hardening your home against physical threats. The goal is to shift your mindset from short-term survival to long-term sustainability and security.
Whether you are a beginner building your first kit or an experienced prepper refining a seasoned plan, this guide provides the detailed insights you need. We’ll explore specific tools, tangible strategies, and practical steps for implementing each item on the list. Forget the generic advice. This checklist is designed to help you build a functional plan that provides not just a stockpile of supplies, but true peace of mind when conventional systems fail. Let’s get started.
1. Water Storage and Purification System
Water is the cornerstone of any disaster preparedness checklist. While humans can survive for weeks without food, we can only last three to five days without water. A comprehensive water management system ensures you have access to clean, safe drinking water when municipal supplies are compromised, whether due to power outages, contamination events, or widespread infrastructure failure. This goes beyond simply stockpiling bottles; it involves a multi-layered strategy of storage, purification, and sourcing.

The 2021 Texas winter storm, which left millions without potable water, is a stark reminder of how quickly a modern utility can fail. A robust plan addresses both short-term needs and extended disruptions, ensuring your family’s hydration and sanitation needs are met.
Actionable Steps for Implementation
Your primary goal is to secure a minimum of one gallon of water per person, per day. For a family of four, this means storing at least 12 gallons for a 3-day emergency.
- Storage: Use food-grade, BPA-free containers. Options range from purpose-built stackable water bricks like the WaterBrick to larger 55-gallon barrels. Store them in a cool, dark place like a basement or closet to prevent algae growth and plastic degradation.
- Purification: Never rely on a single method. Redundancy is key. Equip your kit with a high-quality water filter like the Sawyer MINI, which is trusted by hikers and preppers for its portability and long lifespan. Back this up with Potable Aqua purification tablets or unscented liquid bleach for chemical treatment.
- Knowledge: Practice using your equipment before an emergency. Learn how to boil water effectively for purification (a rolling boil for one minute) and identify potential emergency water sources near your home, such as rivers, lakes, or even your water heater.
Key Insight: A “belt and suspenders” approach to water is non-negotiable. Your primary stored water is your belt; your filters and purification tablets are your suspenders. If one fails, the other keeps you safe.
Finally, proper maintenance is critical. Rotate your stored water every 6-12 months by using it and replacing it. Clearly label each container with the date it was stored. For those looking to deepen their understanding, you can learn more about water purification for survival and the various methods available.
2. Emergency Food Supply and Pantry Staples
A well-stocked food supply is the second pillar of any disaster preparedness checklist, ensuring nutritional resilience when supply chains are broken. Unlike pre-packaged emergency meal kits, this strategy focuses on building a deep pantry of versatile, shelf-stable staples. The goal is to create a robust food system with ingredients like rice, beans, flour, oils, and canned goods that enable you to prepare varied, familiar meals for 30-90 days or longer without power or grocery stores.

The widespread supply chain disruptions seen during the 2020 pandemic highlighted how quickly store shelves can empty. Homesteaders and followers of the Mormon Food Storage program have long practiced this deep pantry method, proving its effectiveness for maintaining household stability during extended crises. This approach provides not just calories, but comfort and normalcy when they are needed most.
Actionable Steps for Implementation
Your primary goal is to build a supply of foods your family already eats, focusing on long-term storage and nutritional density. Aim for a minimum 30-day supply and expand from there as space and budget allow.
- Storage: Use food-grade containers to protect your investment. Five-gallon buckets, often paired with mylar bags and oxygen absorbers, are the gold standard for preserving dry goods like wheat, rice, and beans for decades. Store everything in a cool, dry, dark location, ideally between 50-70°F, to maximize shelf life.
- Inventory & Rotation: Implement a “First In, First Out” (FIFO) system. When you buy a new can of beans, place it at the back of the shelf and bring the oldest one forward to be used next. This prevents spoilage and waste. Maintain a simple spreadsheet to track quantities and expiration dates.
- Knowledge: Your pantry is only as good as your ability to use it. Practice cooking meals entirely from your stored staples at least once a month. This builds skill and confidence. Include comfort foods like coffee, chocolate, and hard candies for morale, which is a critical but often overlooked component of survival.
Key Insight: Don’t just store what you eat; eat what you store. Integrating your emergency pantry into your regular meal planning through a consistent rotation system makes preparedness a seamless and sustainable lifestyle, not a static, forgotten project.
Finally, a deep pantry requires a foundational understanding of food preservation. This knowledge extends the life of your supplies and allows you to supplement them with fresh food from a garden or other sources. You can learn more about how to preserve food without electricity to enhance your long-term self-sufficiency.
3. First Aid Kit and Medical Supplies
A box of adhesive bandages and antiseptic wipes is insufficient when professional medical help is unavailable. A comprehensive first aid kit is a critical component of any disaster preparedness checklist, designed to manage everything from minor cuts to life-threatening trauma. During a crisis, emergency services can be overwhelmed, making your ability to provide immediate medical care a lifesaving skill. Your medical system must account for injuries, illnesses, and the management of chronic conditions when the 911 system is down.

The lessons learned from civilian-focused programs like the “Stop the Bleed” initiative, which brings combat-proven hemorrhage control techniques to the public, underscore a vital truth: the person next to a victim is their first and most important responder. A well-stocked kit, paired with the knowledge to use it, transforms you from a bystander into a capable immediate care provider.
Actionable Steps for Implementation
Your goal is to build a tiered medical response system with separate, well-organized kits for your home, vehicles, and portable go-bags.
- Build in Layers: Start with a solid foundation of basic supplies like Band-Aid brand bandages, gauze, medical tape, and pain relievers. Progress to intermediate items like blister treatments, burn gel, and basic splinting materials. Finally, add advanced trauma supplies such as a high-quality tourniquet like the CAT (Combat Application Tourniquet), chest seals, and a hemostatic agent like QuikClot.
- Knowledge is Key: The best supplies are useless without the training to deploy them. Take a certified first aid and CPR course. Practice applying a tourniquet and learn the fundamentals of wound care and splinting. You can even learn more about how to make a splint with everyday items.
- Medication Management: Secure a 30- to 90-day backup supply of all essential prescription medications for your family. Store these in a cool, dark, and dry location. Maintain a printed list of all medications, dosages, and allergies for each family member.
Key Insight: Your medical kit should be dynamic, not static. It must be tailored to your family’s specific needs, your skill level, and the most likely risks in your environment. An urban apartment dweller’s kit will look different from that of a rural homesteader.
Finally, organize your supplies for rapid access. Use waterproof containers or durable bags with clear labeling. Regularly inspect your kits every six months to check for expired items and replenish any supplies that have been used. This proactive maintenance ensures your medical gear is ready the moment you need it.
4. Backup Power and Lighting Systems
Modern life is built on electricity, and its absence can cripple communication, refrigeration, medical devices, and basic safety. A comprehensive disaster preparedness checklist must prioritize redundant power and lighting systems to counter grid failures caused by severe weather, infrastructure damage, or other large-scale events. This involves more than a single flashlight; it requires a layered strategy that provides immediate light, short-term device power, and long-term generation capability.

The 2021 Texas winter storm, which left millions in the dark for over a week, demonstrated how quickly modern comforts can vanish. A robust power plan prepares you for everything from a few hours of darkness to an extended, multi-day outage, ensuring your family remains safe, informed, and comfortable.
Actionable Steps for Implementation
Your goal is to create a tiered system that meets escalating needs. Start with immediate, simple solutions and build up to more sustainable, long-term options for a complete power strategy.
- Layer 1 – Immediate Lighting: Your first line of defense is accessible, non-electric light. Place LED flashlights, headlamps, and battery-powered lanterns in multiple key locations like bedrooms, the kitchen, and your emergency kit. Maintain a healthy stock of appropriate batteries, like long-lasting Energizer Lithium batteries, and rotate them annually.
- Layer 2 – Short-Term Device Power: For charging phones, radios, and other small electronics, portable power banks from brands like Anker are essential. For greater capacity, a portable power station like those from Jackery or Goal Zero can power larger devices for 24-72 hours and can often be recharged via portable solar panels.
- Layer 3 – Extended Generation: For prolonged outages, a generator is critical. Options include gasoline, propane, or dual-fuel models from brands like Honda or Champion. Propane has a longer, more stable shelf life, making it a reliable choice. Always operate generators outdoors, at least 20 feet away from windows and doors, to prevent deadly carbon monoxide poisoning.
Key Insight: Treat your power plan like a pyramid. The broad base is abundant, simple lighting (flashlights/lanterns), the middle is short-term device power (battery banks), and the peak is a long-term generation solution (generator/solar). Each layer supports the one above it.
Finally, consistent maintenance is non-negotiable. Test all battery-operated devices and generators quarterly. If you have a gasoline generator, use a fuel stabilizer like STA-BIL to prevent degradation. For those seeking to build a resilient power system, you can learn more about how to prepare for a long-term power outage and explore advanced solutions.
5. Communication Equipment and Emergency Contact Plan
When primary infrastructure fails, communication is the first casualty. A multi-layered communication plan is a critical part of any disaster preparedness checklist, ensuring you can receive vital alerts and connect with loved ones when cell towers and internet services are overwhelmed or destroyed. This system combines modern technology with time-tested, non-digital methods to create a resilient network for staying informed and coordinated.
Events like the 9/11 attacks and Hurricane Katrina provided harsh lessons in modern communication fragility, as overloaded cell networks left millions unable to connect. A prepared household plans for this failure, equipping itself with redundant systems to bypass downed traditional channels and maintain essential contact.
Actionable Steps for Implementation
Your goal is to create a system that allows you to both receive information from authorities and communicate with your family. This requires a mix of hardware, written plans, and practiced procedures.
- Hardware: Equip your kit with a battery-powered or hand-crank emergency weather radio from a brand like Midland to receive NOAA alerts. For local, short-range communication, a set of reliable two-way radios is invaluable. For long-distance, off-grid needs, a satellite communicator like the Garmin inReach Mini can be a literal lifesaver.
- Written Plan: Create physical, waterproofed copies of an emergency contact list. Designate an out-of-state contact person to act as a central communication hub for family members to check in with. Establish clear primary and secondary meeting locations for both local and regional emergencies.
- Practice: A plan is useless without practice. Conduct drills with your family to test your equipment and review meeting points. Teach children how and when to call 911 and who to contact if they are separated from you. Test your walkie-talkies to understand their range limitations in your neighborhood.
Key Insight: Technology is a tool, not a complete plan. Your primary communication system should be your documented and practiced family plan. Radios and satellite devices are the backup that makes the plan work when all else fails.
Finally, ensure all your communication devices have a reliable power source, such as a solar charger or a stockpile of extra batteries. Building a comprehensive plan is crucial for peace of mind. For a deeper dive, you can learn more about creating a family emergency communication plan and the specific steps involved.
6. Important Documents and Digital Backup System
In the chaos following a disaster, proving who you are, what you own, and what you need is paramount. An organized system for your critical documents ensures you can access insurance, apply for aid, and re-establish your life without delay. This isn’t just about stashing papers in a folder; it’s a deliberate strategy that combines physical protection with digital redundancy to safeguard your identity and assets against fire, flood, theft, or forced evacuation.
During the devastating California wildfires, many evacuees found their insurance claims and federal aid applications stalled because they couldn’t produce deeds, policies, or identification lost in the fire. A resilient document system anticipates this catastrophic loss, ensuring your most vital information survives even when the physical copies do not.
Actionable Steps for Implementation
Your primary goal is to create a multi-layered defense for your documents, making them accessible to you but secure from others. This involves protecting originals, creating physical copies, and establishing encrypted digital backups.
- Secure Originals: Store irreplaceable documents like birth certificates, social security cards, passports, and property deeds in a high-quality, bolted-down fireproof and waterproof safe. For added protection, consider a safe deposit box at a bank in a different geographic area.
- Create a “Go-Binder”: Assemble a binder with physical copies of all essential documents. This includes driver’s licenses, insurance policies, bank statements, and a household inventory with photos. Keep this in your primary evacuation kit.
- Digitize and Encrypt: Scan every important document and save it as a PDF. Store these files on an encrypted USB flash drive, such as one from IronKey, and keep it with your go-binder. Additionally, upload the encrypted files to a secure cloud service and share access instructions with a trusted, out-of-state family member. Use a reputable password manager like Bitwarden to manage complex passwords for these accounts.
Key Insight: Treat your digital documents with the same security as your physical ones. Encryption is the digital equivalent of a fireproof safe. A simple scan saved to your desktop is a vulnerability, not a backup.
Finally, review and update your document system annually or after any major life event like a marriage, birth, or significant purchase. Test your access to digital files to ensure you remember passwords and that the files are not corrupted. A complete document plan is a critical component of any disaster preparedness checklist, providing the foundation for a swift and successful recovery.
7. Cash Reserves and Financial Contingency Plan
In a crisis, modern financial systems are surprisingly fragile. Power outages, cyberattacks, or widespread economic panic can render ATMs, credit cards, and digital payment apps completely useless. A financial contingency plan ensures you can still purchase essential supplies and services when the digital economy grinds to a halt. This is about more than just pocket money; it’s a strategic reserve of physical currency and assets to maintain your purchasing power when others cannot.
Events like the 2019 Lebanese financial crisis, where strict capital controls made accessing bank funds nearly impossible, demonstrate the critical need for physical cash. In such scenarios, cash is not just king; it is the only viable medium of exchange, making this a vital component of any disaster preparedness checklist.
Actionable Steps for Implementation
Your goal is to build a readily accessible cash reserve that can cover essential expenses for an extended period, while also considering non-cash assets for long-term value preservation.
- Build Your Reserve: Gradually accumulate a cash fund. Start with a goal of $500 to $1,000 and build toward 1-3 months of essential living expenses. Focus on small bills ($1, $5, $10, and $20) as vendors may be unable to make change for larger notes.
- Secure Storage: Do not keep all your cash in one place. Diversify your storage locations to mitigate the risk of total loss from theft or fire. Use a waterproof and fire-resistant pouch or a small safe like the SentrySafe CFW20201 for added protection. Inform one trusted family member of the locations.
- Diversify Assets: For longer-term wealth preservation during severe economic downturns or hyperinflation, consider tangible assets. Small, divisible precious metals like 1-ounce silver rounds or 1/10-ounce gold coins can act as a stable store of value and a tool for barter when cash becomes devalued.
Key Insight: Digital wealth is a promise, but physical cash is a tool. When digital systems fail, your cash reserve becomes your family’s primary means of securing food, fuel, and other critical resources from those who are still able to sell them.
Finally, enhance your financial resilience by reducing debt and building barter skills. Identify valuable skills or goods you possess (e.g., medical knowledge, mechanical repair, gardening) and build relationships within your local community. A strong local network can be as valuable as cash in a prolonged crisis.
8. Secure Shelter and Home Hardening
Your home is your primary shelter, but during a prolonged emergency, its ability to protect you can be severely tested. Secure shelter and home hardening involve transforming your residence into a fortified refuge, capable of withstanding both natural disasters and security threats. This proactive approach focuses on reinforcing structural weak points and creating a defensible environment, ensuring your home remains a safe haven when external conditions become hazardous.
From hurricane-prone areas where homeowners install storm shutters, to wildfire zones where clearing brush is critical, the principles are the same. A 2007 study in Bluff Creek, California, found that home hardening measures reduced property loss from wildfire by an astonishing 82%. This demonstrates how strategic improvements can be the deciding factor in whether your home survives a disaster.
Actionable Steps for Implementation
The goal is to identify and mitigate your home’s most significant vulnerabilities based on the most likely threats in your region. A systematic assessment is the first step toward a more resilient dwelling.
- Reinforce Entry Points: Your doors and windows are the most common points of failure. Upgrade door locks to a Schlage Grade 1 deadbolt and install a heavy-duty strike plate secured with 3-inch screws that anchor into the wall stud. For windows, consider applying a 3M Safety & Security Window Film, which helps prevent shattering from impact or blast pressure.
- Create Defensible Space: This is crucial for wildfire and security preparedness. Clear flammable vegetation, deadwood, and debris within a 5 to 30-foot radius of your home. This simple landscaping tactic can stop a ground fire from reaching your structure and eliminates potential hiding spots for intruders.
- Establish a Safe Room: Designate an interior room with no windows, such as a walk-in closet or basement area, as your safe room. This space serves as a final retreat during a home invasion or extreme weather event like a tornado. Stock it with basic emergency supplies.
Key Insight: Home hardening isn’t about creating an impenetrable fortress; it’s about making your home a “harder target.” Small, incremental improvements significantly increase your resilience and deter opportunistic threats, buying you valuable time to react during a crisis.
Finally, conduct regular maintenance. Have your roof inspected annually, clean your gutters to prevent water damage and fire hazards, and test backup heating systems before the cold season arrives. These routine tasks are a vital part of any comprehensive disaster preparedness checklist.
9. Tools, Equipment, and Repair Supplies
When professional services are unavailable, your ability to perform basic repairs becomes a critical survival skill. A well-stocked toolkit ensures you can manage everything from a leaky pipe to a damaged door, maintaining the safety and integrity of your shelter. This component of your disaster preparedness checklist moves beyond simple convenience; it’s about maintaining essential systems like plumbing, security, and shelter when you are the only one who can.
The surge in DIY home repairs during the 2020 pandemic highlighted a modern dependency on specialized labor. In a true grid-down scenario, knowing how to use a wrench or secure a window could mean the difference between a minor inconvenience and a major crisis. This self-reliance is the core principle of long-term preparedness.
Actionable Steps for Implementation
Your goal is to build a versatile kit that can handle the most common household failures, from plumbing and electrical to structural repairs.
- Foundation: Start with a robust multi-tool like the Leatherman Wave+ and a quality mechanic’s tool set from a brand like Craftsman. This should include a hammer, adjustable wrenches, a socket set, pliers, a handsaw, and a variety of screwdrivers.
- Expansion: Customize your kit based on your home’s specific needs. Add a pipe wrench and plumber’s tape for plumbing, a non-contact voltage tester for electrical safety, and a pry bar for structural access or debris removal. Keep an inventory of common items like nails, screws, Gorilla Tape, and zip ties.
- Skills: Owning tools is only half the battle. Regularly practice basic repairs on non-critical items. Watch instructional videos to learn skills like patching drywall or shutting off your home’s main water valve. Keep manuals for your major appliances and systems in a waterproof bag with your tools.
Key Insight: Your tools are useless without the knowledge to wield them. Invest as much time in learning basic repair skills as you do in acquiring the equipment itself. A simple fix performed correctly can prevent a catastrophic failure.
Finally, organize your tools for rapid access. A designated toolbox or a clearly labeled section of your garage ensures you aren’t searching for a wrench in the dark. Regularly inspect your tools for rust or damage, and keep cutting edges sharp and moving parts lubricated.
10. Personal Security, Evacuation and Bug-Out Bag
A comprehensive disaster preparedness checklist must address the harsh reality that some events require you to leave your home immediately, or defend it. This combined strategy prepares you for both scenarios by integrating home security measures, a well-rehearsed evacuation plan, and a pre-packed “bug-out bag” (BOB). It’s a proactive approach that ensures you can protect your family and, if necessary, be self-sufficient for at least 72 hours on the move.
Events like the rapid California wildfire evacuations or the sudden need for families to flee during Hurricane Katrina underscore a critical lesson: when authorities say “go,” you may only have minutes. A pre-established plan and a ready-to-go bag mean the difference between a panicked scramble and a safe, orderly evacuation.
Actionable Steps for Implementation
Your goal is to create a seamless transition from a secure home to a mobile survival unit, ensuring you are never caught flat-footed. A bug-out bag should be tailored to your environment and be light enough for the least capable family member to carry.
- Build Your Bag: Start with a durable backpack like an Osprey or 5.11 RUSH model. Pack it with essentials for 72 hours: a water filter, high-calorie food bars, a lightweight tarp for shelter, a first-aid kit, a multi-tool, a flashlight, hygiene items, and copies of important documents in a waterproof bag.
- Plan Your Evacuation: Map out at least two primary and two secondary evacuation routes from your home, work, and school. Designate several rendezvous points: one near your home, one in your neighborhood, and one out of town.
- Practice and Train: A plan is useless without practice. Conduct quarterly family drills where you grab your bags and drive your evacuation routes. Supplement this with practical training in first aid, trauma care, and self-defense to build confidence and capability.
Key Insight: Your bug-out bag is not a long-term survival kit; it is a 72-hour bridge to safety. Prioritize mobility and life-sustaining essentials over comfort items. Every ounce counts when you are on foot.
Finally, maintain your system. Rotate the food, water, batteries, and medications in your bag every six months. Update your document copies annually and review your evacuation routes for any changes like new construction or road closures. This continuous cycle of preparation and practice turns a theoretical plan into an instinctual response.
10-Item Disaster Preparedness Comparison
| Item | Implementation complexity | Resource requirements | Expected outcomes | Ideal use cases | Key advantages |
|---|---|---|---|---|---|
| Water Storage and Purification System | Medium — setup and periodic maintenance; basic purification skills | Space for containers, filters/tablets, fuel for boiling, storage containers | Reliable potable water for short and extended periods; reduced illness risk | Contamination events, power outages, bug-out scenarios, supply chain failure | Multiple purification redundancy; scalable; immediate health benefit |
| Emergency Food Supply and Pantry Staples | Medium — planning, rotation, and basic cooking skills | Significant storage space, containers/mylar bags, inventory system, cooking fuel | Sustained caloric and nutritional supply (30–90+ days) with meal variety | Long-term outages, supply disruption, economic hardship, everyday backup | Cost-effective, versatile meals; morale support; integrates with routine food use |
| First Aid Kit and Medical Supplies | Medium–High — tiered buildup and formal training advised | Medical supplies, medications, sterile storage, training courses, rotation | Treat minor to severe injuries, manage chronic meds, reduce morbidity | Mass-casualty events, remote/wilderness scenarios, delayed EMS access | Life-saving trauma supplies; infection control; medical self-sufficiency |
| Backup Power and Lighting Systems | High — system integration, fuel management, electrical knowledge | Generators/battery banks/solar panels, fuel, inverters, storage space, maintenance | Maintain critical systems (refrigeration, medical devices, comms) during outages | Extended grid failure, medical needs, prolonged severe weather | Restores essential functions; layered redundancy; portable options |
| Communication Equipment and Emergency Contact Plan | Medium — device setup plus planning; licensing may be required | Radios/satellite devices, spare batteries, printed plans, training/drills | Continued information flow, family/community coordination, receive alerts | Infrastructure failure, evacuation, community response, isolation scenarios | Multiple independent channels; reduces congestion; improves coordination |
| Important Documents and Digital Backup System | Low–Medium — organization, scanning, encryption, routine updates | Waterproof/fireproof safe, scanner, encrypted cloud/drives, password manager | Preserved identity/ownership records; faster insurance/legal recovery; fraud protection | Evacuation, property loss, insurance claims, identity recovery after disaster | Redundant access; legal/financial continuity; reduces recovery friction |
| Cash Reserves and Financial Contingency Plan | Low–Medium — financial planning and secure storage practices | Physical cash in small bills, secure hidden locations, diversified assets | Immediate liquidity when electronic systems fail; basic transaction ability | ATM/network failures, economic instability, short-term barter economies | Immediate purchasing power; privacy; hedge against electronic outages |
| Secure Shelter and Home Hardening | High — structural work, possible permits, professional labor | Materials, labor, significant cost, ongoing maintenance | Improved physical security, weather resilience, established refuge | Civil unrest, storms, wildfires, long-term sheltering at home | Deterrence of intrusion; reduces damage; creates defensible refuge |
| Tools, Equipment, and Repair Supplies | Medium — incremental build and skill learning | Hand/power tools, spare parts, consumables, organized storage, training | Enables DIY repairs/maintenance; extends asset life; reduces service dependence | Off-grid living, rural locations, supply-chain disruptions, home repairs | Self-reliance; cost savings; versatile long-term utility |
| Personal Security, Evacuation and Bug-Out Bag | Medium–High — planning, training, legal considerations for defenses | Bug-out bag items, evacuation planning, self-defense training, regular drills | Rapid evacuation capability; enhanced personal/family safety for 72+ hours | Immediate threats, sudden evacuations, civil unrest, rapid-onset disasters | Mobility and readiness; integrated planning; improves survival odds |
From Checklist to Lifestyle: Putting Your Plan Into Action
Completing a comprehensive disaster preparedness checklist is a significant accomplishment, but it’s crucial to understand that this is the beginning of a journey, not the final destination. The true goal is to transition from a static list of items to a dynamic, living system that integrates seamlessly into your daily life. Preparedness is not a one-time task you can check off and forget; it is an ongoing practice, a skill set, and most importantly, a mindset. This transition from checklist to lifestyle is where true resilience is forged, moving you beyond mere survival and into a state of confident self-reliance.
Your Immediate Next Steps: Bridging the Gap from Planning to Doing
The sheer volume of information can feel overwhelming, but progress is made one step at a time. The key is to start small, build momentum, and create a sustainable routine. Avoid the temptation to tackle everything at once, which often leads to burnout. Instead, focus your energy on achievable, high-impact actions.
Here is a practical roadmap to get you started:
- Prioritize the “Rule of Threes”: Before anything else, ensure you have a plan for the absolute essentials. This means securing three days’ worth of water (one gallon per person, per day), a three-day supply of non-perishable food, and a way to stay warm and dry (shelter). This is your foundational safety net.
- Assemble Your “Go-Bag” First: Even if your full bug-out bag isn’t complete, pack an immediate evacuation bag for each family member. Include a change of clothes, water, snacks, a small first aid kit, a flashlight like the Fenix PD36R, and a copy of your emergency contact list. This single action dramatically increases your readiness for sudden evacuation orders.
- Digitize and Secure Documents: This week, take one hour to scan your most critical documents: birth certificates, passports, deeds, and insurance policies. Save them to an encrypted, password-protected USB drive and upload a copy to a secure cloud service. This simple step protects your identity and ability to recover after a crisis.
Building a Culture of Preparedness
True readiness extends beyond a well-stocked pantry or a generator. It involves cultivating a proactive mindset and making preparedness a regular part of your family’s life. This is about building muscle memory so that when a real emergency strikes, you and your loved ones can act decisively and effectively, rather than reacting with panic.
Key Insight: Your most valuable preparedness tool is not an item on your checklist, but the well-practiced plan that lives in your mind. Gear is useless without the knowledge and training to use it effectively.
To embed these practices, establish a recurring schedule. Mark your calendar for quarterly reviews. These sessions are non-negotiable appointments with your family’s safety. During each review, commit to the following:
- Rotate and Refresh: Check expiration dates on food, water, and medical supplies. Use what’s nearing its date and replace it with fresh stock. This prevents waste and ensures everything is viable when needed.
- Test Your Gear: Fire up the generator for 15 minutes. Test your battery backups. Check the filters on your Sawyer Squeeze water filtration system. Make sure every piece of equipment is in perfect working order.
- Drill Your Plan: Don’t just talk about your evacuation route; drive it. Practice your family communication plan. Conduct a fire drill. These dry runs will reveal weaknesses in your plan that you can correct before it’s too late.
The Ultimate Goal: Resilience and Peace of Mind
The effort you invest in your disaster preparedness checklist pays dividends far beyond the tangible supplies you accumulate. It builds confidence, reduces anxiety, and empowers you with the knowledge that you can protect your family in the face of uncertainty. You are no longer a passive victim of circumstance but an active participant in your own safety and security.
By transforming this checklist from a simple document into a core component of your lifestyle, you are cultivating something invaluable: genuine peace of mind. You are building a legacy of resilience that ensures, no matter what challenges arise, you and your loved ones are ready to face them, together.

