Before you break out any fancy test kits, the most important tools you have are the ones you were born with: your eyes and your nose. This is your first line of defense, a quick and dirty assessment that costs nothing and can instantly tell you if a water source is a hard “no.”
Your First Look: An Essential Contamination Check

Whether you’re dealing with a natural disaster or you’re miles from civilization, your ability to quickly size up a water source is a non-negotiable skill. Forget the complex gear for a moment. This initial check takes seconds and helps you immediately disqualify obviously dangerous options.
Why waste a good test strip on water that’s clearly got an oily sheen or smells like a sewer? This is triage for water. It saves you time, energy, and your precious testing supplies for sources that actually stand a chance.
Visual Inspection: What to Look For
First impressions matter, especially with water. While crystal-clear water isn’t guaranteed to be safe, water that looks sketchy almost certainly is. To get a good look, collect a sample in a clear container—a Nalgene bottle, a mason jar, anything transparent will do.
Hold it up to the light. Here’s what you’re scanning for:
- Turbidity: That’s the fancy word for cloudiness. If you can’t see straight through the water, it’s loaded with suspended gunk like silt, clay, or organic matter. Those particles are perfect hiding spots for bacteria and viruses.
- Color: Is the water tinted? A brownish or yellow hue often comes from tannins from decaying leaves, which isn’t necessarily harmful, but it could also be a sign of agricultural runoff. Green water is a major red flag for an algae bloom, and some of those can produce nasty toxins.
- Floating Particles: Scan for obvious debris. This could be anything from dirt and sediment to signs of serious pollution like an oily film on the surface. If you spot foam or suds that don’t dissipate quickly, it might be contaminated with detergents or other chemicals.
Pro Tip: In the field, I use a simple trick called the “leaf test” to check turbidity. Drop a distinct leaf or a coin into your clear container of water. If you can’t easily make out what it is from the top, the turbidity is too high. That water will need some serious pre-filtering before you even think about purifying it.
Olfactory Clues: What Your Nose Knows
Your sense of smell is another powerful, built-in contamination detector. Bad water often smells bad, giving you a clear warning sign. Just be smart about it—waft the air above the container toward your nose. Never stick your face in and take a deep whiff; you could inhale some nasty volatile chemicals. For more tips on safely sourcing water, check out our guide on collecting water in survival situations.
Pay attention to these tell-tale odors:
- Rotten Eggs: That classic sulfur smell is a dead giveaway for hydrogen sulfide gas, which is produced by certain bacteria. While it’s not always toxic in small doses, it screams “bacterial activity.”
- Chemical or Solvent Odors: If it smells like gasoline, paint thinner, or any other industrial chemical, it’s an absolute no-go. This indicates a nearby spill or industrial pollution. You can’t boil this stuff out; the water is unsafe, period.
- Chlorine or Bleach: If you’re checking tap water after a disaster, a faint chlorine smell is actually a good thing—it means it was treated. But if the smell is overpowering, the system may have been over-shocked, and the water could be too harsh to drink without letting it air out first.
Master these simple sensory checks, and you’ll be able to make a confident first call on any water source. If it looks wrong or smells wrong, don’t even think about tasting it. Move on. If it passes this initial sniff test, then it’s time to move on to more definitive testing methods.
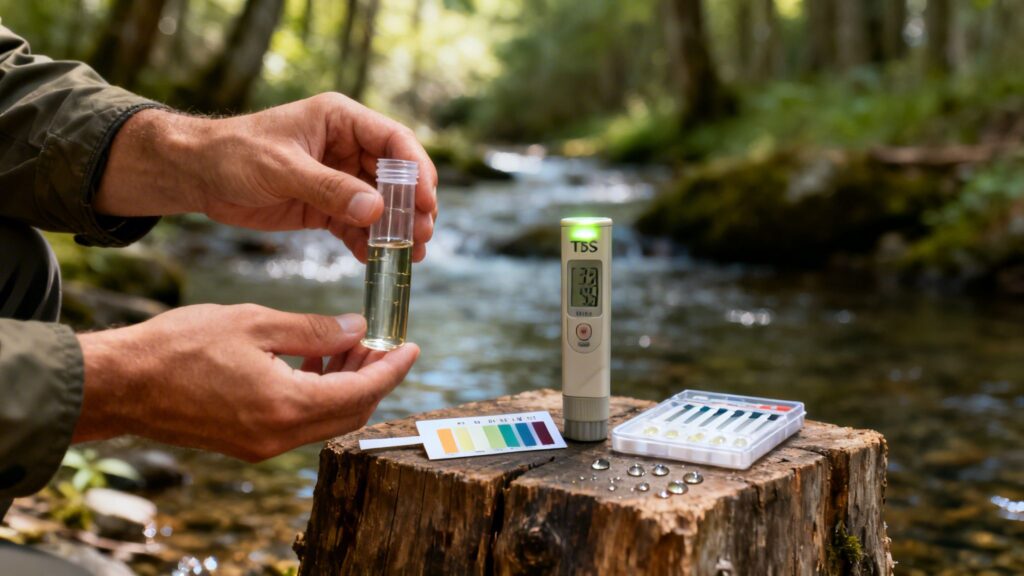
Low-Tech Field Tests for On-The-Go Safety
After you’ve done your initial look-and-sniff test, it’s time to dig a little deeper. While your eyes and nose are great at spotting the obvious red flags, plenty of dangerous contaminants are completely invisible. Luckily, you don’t need a mobile lab to get a much better picture of your water’s quality.
A handful of simple, low-tech field tests can give you the critical data you need to make smarter, safer decisions. These tools are compact, cheap, and absolutely essential for anyone serious about preparedness. They’ll easily fit into any go-bag or vehicle kit.
These tools are compact, cheap, and absolutely essential for anyone serious about preparedness. They’ll easily fit into any go-bag or vehicle kit—just make sure you’re not making common bug out bag mistakes that could leave you without critical testing supplies when you need them most.
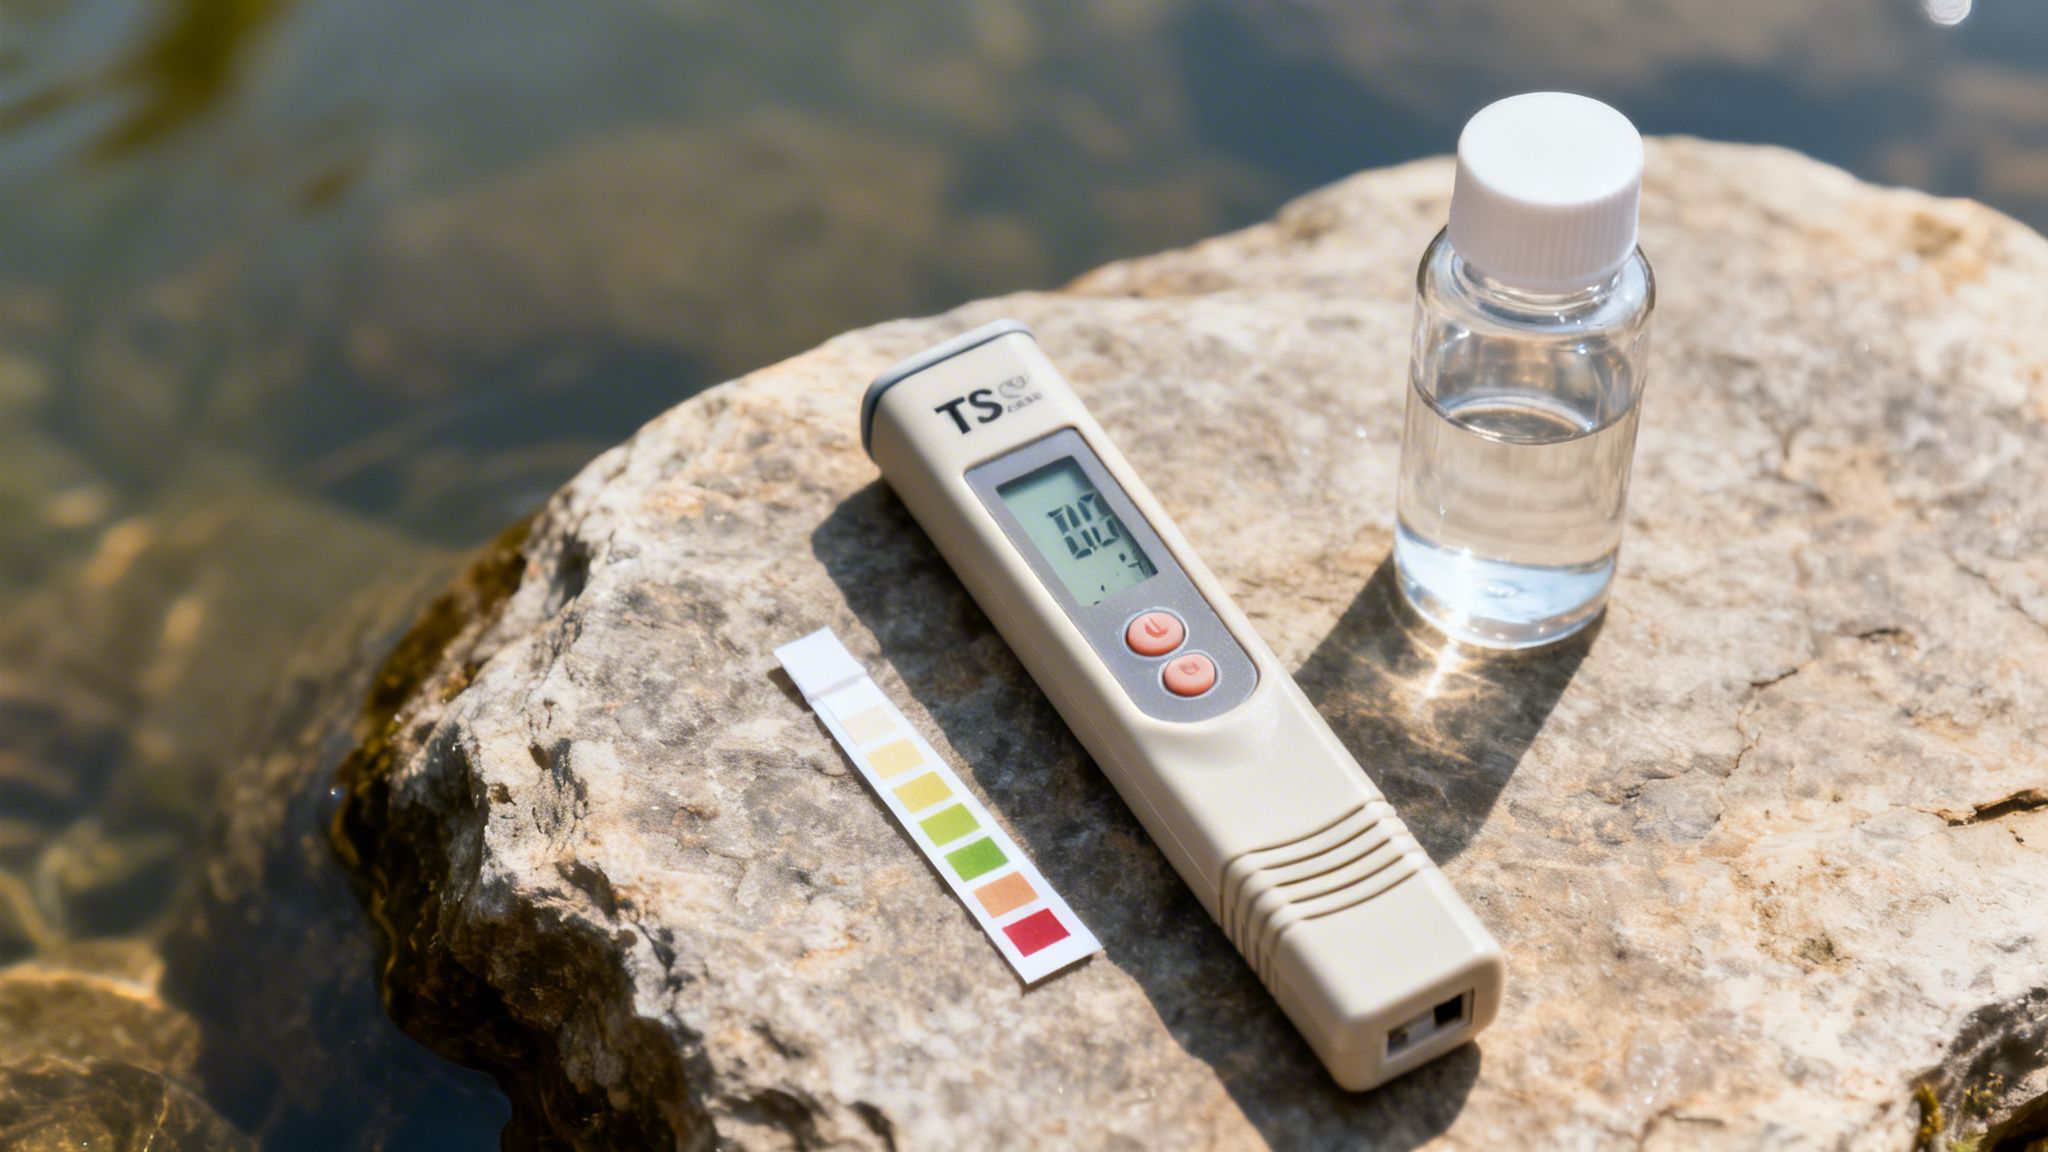
Gauging Water Acidity with pH Strips
One of the fastest and easiest tests you can run is for pH. This measures how acidic or alkaline your water is on a scale from 0 to 14. A reading of 7 is neutral, anything lower is acidic, and anything higher is alkaline. For drinking purposes, you want to see a reading somewhere in the 6.5 to 8.5 range.
So, why does this even matter? Water with a pH that’s way out of whack is a major indicator of chemical pollution. Runoff from old mines, for example, can be intensely acidic. On the flip side, certain industrial waste can make water dangerously alkaline.
Testing couldn’t be simpler:
- Dip a pH test strip into your water sample.
- Wait a few seconds for the color to change.
- Match the strip’s color to the chart that came with your kit.
If you get a reading outside that safe 6.5-8.5 range, that’s your warning sign. It won’t tell you exactly what chemical is in the water, but it screams that something is wrong. Time to find another source.
Measuring Total Dissolved Solids
Another must-do field test is for Total Dissolved Solids, or TDS. This is basically a measurement of all the inorganic salts, minerals, and metals dissolved in the water. Think of it as a general “purity” check.
You can get an instant reading with an inexpensive, pocket-sized TDS meter. Just pop the cap, turn it on, stick the end in your water, and a digital screen will give you a reading in parts per million (ppm).
Pro Tip: In a survival situation, a TDS reading under 500 ppm is generally considered acceptable for drinking after purification. If you see a reading over 1,000 ppm, the water is likely brackish or has a very high mineral content and should be avoided. A super low reading (under 50 ppm) might mean you’ve found rainwater or distilled water—great for purity but lacking essential minerals.
A super low reading (under 50 ppm) might mean you’ve found rainwater or distilled water—great for purity but lacking essential minerals. If you’re collecting rainwater as a primary water source, learning how to filter rainwater for drinking is essential to remove debris and biological contaminants before purification.
Assessing Turbidity on the Fly
Turbidity—a fancy word for cloudiness—is a huge deal. Why? Because all those tiny suspended particles provide the perfect hiding spot for nasty pathogens like bacteria and protozoa. Murky water makes purification methods like UV light or chlorine far less effective.
Your eyes give you a rough idea, but you can get more specific with a turbidity tube. These are just clear tubes with a black-and-white pattern at the bottom. You pour water in until the pattern disappears, then check the measurement on the tube’s side.
No tube? No problem. Improvise by filling a clear water bottle and placing it on a piece of paper with some bold text. Look down through the top of the bottle. If you can’t clearly read the words, your turbidity is high. This water absolutely needs to be pre-filtered through a cloth, bandana, or a proper filter before you even think about purifying it. For a deeper dive, check out our guide to survivalist water purification techniques.
Rapid Field Water Test Comparison
When you’re out in the field, speed and simplicity are everything. This table breaks down the three essential tests you can perform in minutes to get a baseline on water safety.
| Test Type | What It Measures | Simple Tool | Ideal Survival Range |
|---|---|---|---|
| pH Test | Acidity or alkalinity | pH Test Strips | 6.5 – 8.5 |
| TDS Test | Total Dissolved Solids | TDS Meter | Under 500 ppm |
| Turbidity Test | Cloudiness/suspended particles | Clear Bottle & Text | Text is clearly readable |
These tests are your first line of defense, giving you a quick “go” or “no-go” signal before you commit to purifying a water source. They won’t catch everything, but they’ll help you avoid some of the most common and obvious dangers.
Detecting Invisible Biological Threats
While pH strips and TDS meters give you a picture of the water’s chemistry, they’re blind to the most immediate threats to your health. Microscopic pathogens—bacteria, viruses, and protozoa—are the true silent killers in untreated water. These are the bugs that cause debilitating illnesses like giardiasis, cholera, and dysentery, and you can’t see them, smell them, or taste them.
A source that looks crystal clear and tastes perfectly fine can be teeming with these dangerous microorganisms. That’s why learning to test for biological contamination is non-negotiable for anyone serious about preparedness. It’s the critical step that bridges the gap between a promising water source and one you can actually trust your life with.
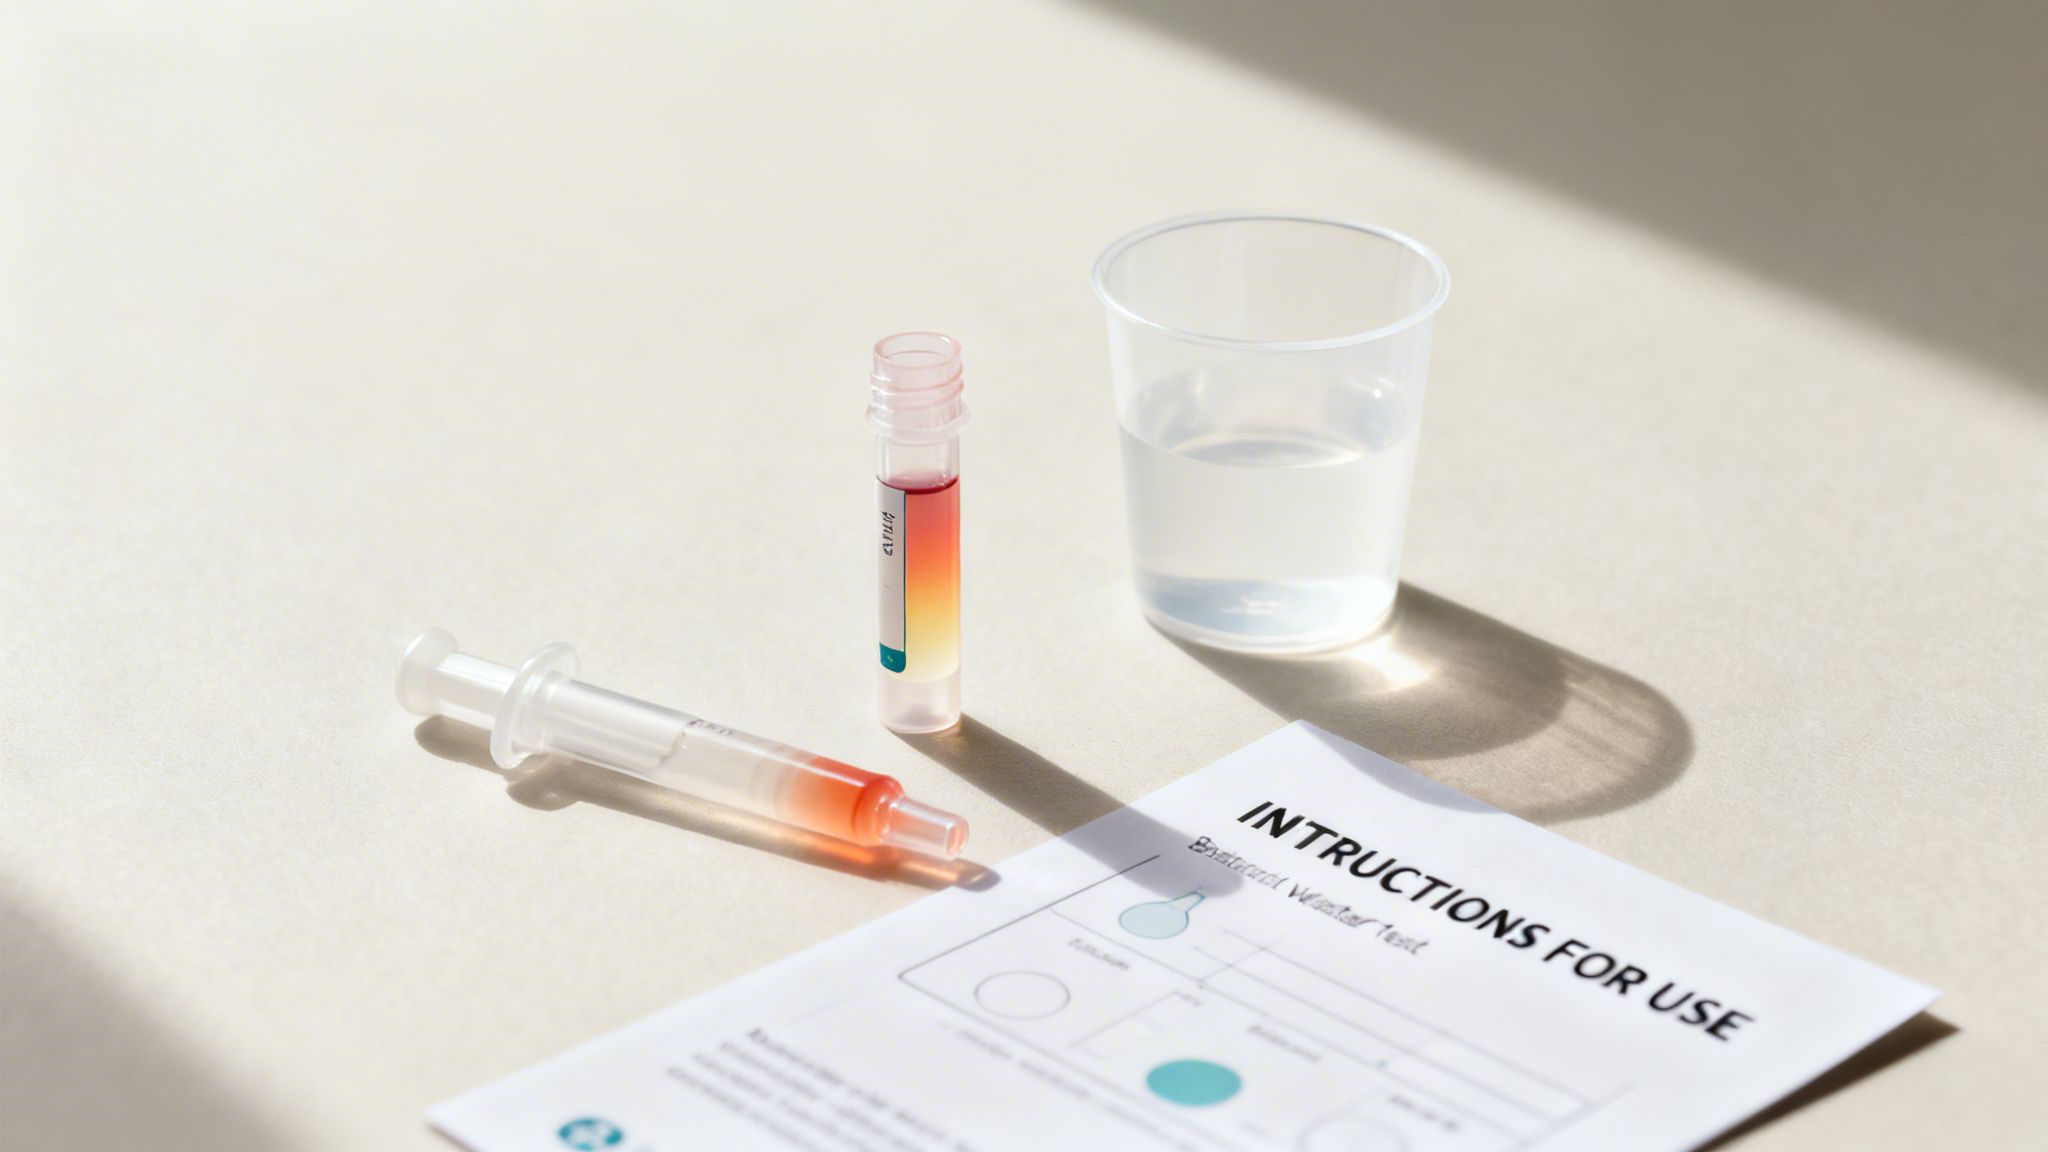
Understanding Coliform and E. coli Tests
In the field, it’s just not practical to test for every single type of pathogen. Instead, we use what are called “indicator” tests. These look for the presence of total coliform bacteria, a huge group of bacteria found everywhere in the environment and in the gut of animals, including us.
Most coliforms won’t harm you, but finding them in water is a major red flag. Their presence means the water has been exposed to environmental runoff, and where they are, more dangerous, disease-causing organisms could be lurking, too.
A much more serious indicator is E. coli (Escherichia coli). This is a specific type of coliform found almost exclusively in the feces of warm-blooded animals. If your water tests positive for E. coli, it’s a sure sign the source is contaminated with sewage or animal waste. That water is absolutely unsafe to drink without aggressive purification.
How Field-Ready Test Kits Work
Fortunately, you don’t need a biology degree to run these crucial tests. Simple, field-ready kits give you a straightforward yes-or-no answer. The kits most preppers and homeowners use work on a very simple principle.
- Sample Collection: You’ll typically add a specific amount of your water sample to a small bottle or vial containing a powdered reagent.
- Incubation: After shaking it up, you just let the vial sit at room temperature for a set period, usually 24 to 48 hours. This gives any bacteria in the sample time to multiply to detectable levels.
- Color Change: If coliforms are present, the water will change color—often to yellow or green. Some of the better kits will also make the sample fluoresce under a UV light if E. coli is present, giving you a definitive result.
These simple tests are incredibly powerful. A negative result brings huge peace of mind, while a positive result is an unmistakable signal to take immediate action. This isn’t about avoiding an upset stomach; it’s about preventing a life-threatening illness when medical help might be miles, or days, away.
Confirming Your Purification Methods
Biological testing isn’t just for checking a raw water source; it’s also the best way to verify your purification gear is actually working. Even the most reliable equipment can fail. Filters can get tiny, invisible cracks, UV purifier bulbs can burn out, and it’s easy to miscalculate chemical treatments. To really be sure, it pays to learn the right way to use methods like bleach for water purification and others.
Think about this scenario: you’ve just run creek water through your trusted Sawyer Squeeze filter. Are you 100% sure it’s safe? The only way to know for certain is to test a sample of the filtered water.
Running a coliform test on your post-treatment water is the ultimate quality control check. If that test comes back negative, you know your system is working perfectly. But if it comes back positive, it’s a critical warning that your filter is compromised or that you need a more robust purification method for that particular source. This habit of testing before and after treatment is what separates the amateurs from the truly prepared.
Screening for Chemicals and Heavy Metals
While running biological tests is smart for spotting pathogens that can make you sick fast, those tests won’t catch a whole other class of silent threats. Boiling water is a fantastic way to kill bacteria and viruses, but it does absolutely nothing to remove dissolved heavy metals, pesticides, or industrial chemicals.
In fact, boiling can actually concentrate these contaminants, making a dangerous situation even worse.
These invisible chemical hazards often have no taste or smell and can cause serious, long-term health problems. This is where screening specifically for chemicals and heavy metals becomes a non-negotiable layer in your preparedness plan. It’s the part of learning how to test water for contamination that addresses the threats your filter might miss entirely.
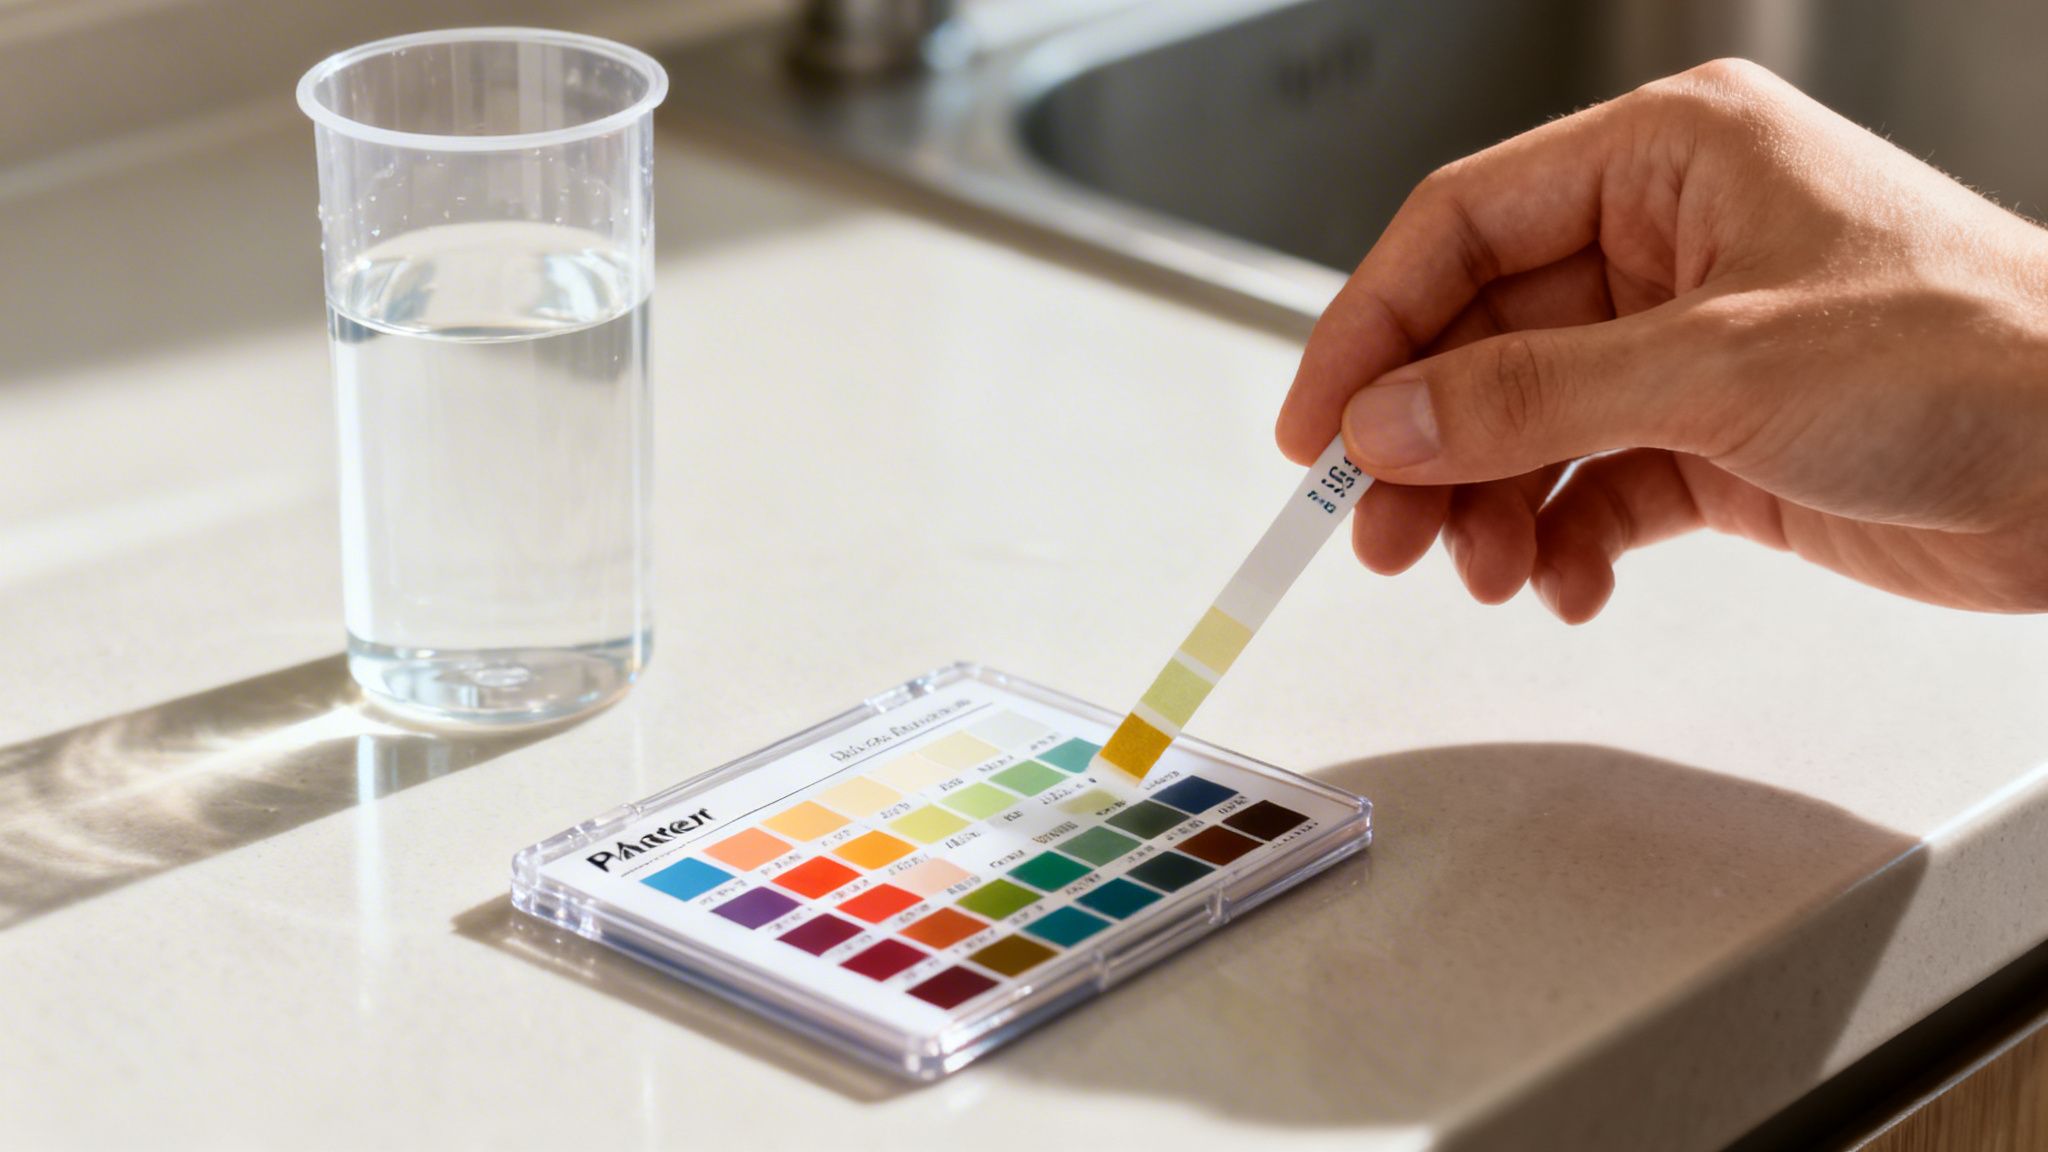
Using Multi-Parameter Test Strips
For a quick and effective field screening, multi-parameter test strips are an invaluable tool for any prepper. These aren’t your simple pool chlorine strips; they’re comprehensive kits designed to screen for a dozen or more contaminants at once on a single strip.
A good kit will typically give you a reading on:
- Heavy Metals: This usually includes lead, copper, and iron, which can leach from old plumbing or occur naturally in groundwater.
- Nitrates/Nitrites: These are common pollutants from agricultural runoff like fertilizers and failing septic systems.
- Chlorine: This helps you confirm if municipal water is still being treated or if the residual disinfectant has disappeared post-disaster.
- Hardness & Alkalinity: While not direct health threats, these parameters affect taste and can impact the performance of your gear.
Using them is dead simple: just dip the strip, wait a moment for the pads to react and change color, then compare those colors to the reference chart that comes with the kit. In less than a minute, you get an instant snapshot of the water’s chemical profile.
Interpreting the Color Chart
That color chart might look a little intimidating at first, but it’s straightforward. Each little colored square corresponds to a specific contaminant and a concentration level, usually measured in parts per million (ppm) or parts per billion (ppb). Your goal is to see if any of your results fall into a range marked as “unsafe” or “high.”
For example, high nitrates are a critical concern, especially for infants and pregnant women. Levels above 10 ppm can lead to a dangerous condition called “blue baby syndrome,” which messes with the blood’s ability to carry oxygen. A simple test strip can give you this vital information in seconds.
The need for this kind of testing, even for treated city water, was tragically highlighted by the 1993 Milwaukee cryptosporidium crisis. This event showed how even advanced municipal systems can fail catastrophically, as the chlorine-resistant parasite sickened over 403,000 people. For preppers, this is a stark reminder of the critical need for at-home testing beyond just trusting the tap.
When Professional Lab Analysis is Necessary
While test strips are excellent for rapid field screening and flagging major red flags, they do have their limits. They provide a general range, not a precise measurement, and they certainly don’t test for everything. For a permanent, long-term water source like a private well or a rainwater catchment system, you need definitive, accurate results.
This is when sending a sample to a state-certified laboratory is the only real answer. Professional lab testing is the gold standard and is essential if:
- You are establishing a new well or off-grid water system.
- Your property is near industrial sites, farms, or old landfills.
- You have persistent health issues that could be water-related.
- Your field tests show consistently high levels of any contaminant.
A lab will give you a detailed report on a much wider array of contaminants—including things like volatile organic compounds (VOCs), pesticides, and specific heavy metals like arsenic and mercury—with a high degree of accuracy. The results will be compared against EPA-established safe drinking water standards, giving you a clear and legally defensible picture of your water’s quality. This comprehensive data is what allows you to select the precise water purification methods needed to make your source safe for the long haul.
Turning Your Test Results Into Safe Water
Getting a positive test result isn’t a dead end—it’s your signal to act. Knowing how to test water is only half the battle; the other half is turning that data into safe, drinkable water. Your findings are a precise roadmap telling you exactly which purification method to use.
Think of it like a diagnosis. A test result lets you move beyond guessing and apply the right treatment for the specific threat you’re facing. This “if-then” approach is the core of smart preparedness, making sure your actions are both effective and efficient.
Responding to Biological Contaminants
If your test kits show the presence of E. coli or total coliforms, you’re dealing with a biological threat. These are living organisms—bacteria, viruses, and protozoa—that have to be neutralized. Luckily, you have several highly effective options for this scenario.
This ‘if-then’ approach is the core of smart preparedness, making sure your actions are both effective and efficient. For a comprehensive overview of all your options, check out our complete guide on water purification for survival.
The most reliable, time-tested method is simply bringing the water to a rolling boil for at least one full minute. Boiling is the gold standard for killing pathogens, but it eats up fuel, which might be a precious resource in a crisis.
For a more portable solution, chemical purification is a solid choice. Potable Aqua tablets, which use iodine, have been a staple in survival kits for decades for this very reason. They’re lightweight, effective, and require no heat. Just make sure to follow the instructions carefully, especially the required wait times.
Another fantastic tool for biological threats is a UV purifier. Devices like the SteriPEN use ultraviolet light to scramble the DNA of microorganisms, rendering them harmless. It’s a fast, chemical-free method that’s perfect for treating clear water on the go.
A crucial first step for any of these methods, especially with cloudy water, is pre-filtering. Run the water through a cloth, a dense layer of coffee filters, or a dedicated sediment filter first. This removes particles that can shield microbes from UV light or chemical disinfectants, making your final purification step far more effective.
Tackling Chemical and Heavy Metal Threats
What if your test strips light up for lead, nitrates, or other chemicals? This is a completely different problem that boiling or standard disinfection won’t solve. These contaminants are dissolved in the water and must be physically removed through advanced filtration.
Most common backpacking filters are designed to stop bacteria and protozoa, but their pores are just too large to catch heavy metals or chemical compounds. For these threats, you need a system with a more specialized filtration medium.
This is where activated carbon comes in. Filters like the Berkey Water Filter system use activated carbon elements alongside microfiltration to adsorb a wide range of chemical contaminants, including pesticides, herbicides, and VOCs. The carbon acts like a magnet, pulling these harmful substances out of the water.
For the most comprehensive protection, especially for a long-term water source with known chemical issues, a reverse osmosis (RO) system is the top-tier solution. RO forces water through a semipermeable membrane that blocks an extremely wide array of contaminants—including heavy metals, salts, and chemicals—producing exceptionally pure water.
Of course, having a reliable method for storing your purified water is just as important. To dive deeper into choosing the right purification system for different scenarios, explore our detailed guide on survival water purification methods.
Of course, having a reliable method for storing your purified water is just as important. Learn more about choosing the right container in our guide to collapsible water tanks.
By matching your response to your test results, you ensure you’re using the right tool for the job every time. This informed, systematic approach transforms a potentially dangerous water source into a life-sustaining resource.
Frequently Asked Questions About Water Testing
When it comes to water testing, a lot of questions pop up, especially when your health is on the line. Let’s clear the air on some of the most common ones I hear from preppers and off-gridders, so you can move forward with confidence.
How Often Should I Test My Stored Water Supply?
There’s no single, one-size-fits-all answer here. The right schedule really depends on your water source and how you’re storing it.
If you’ve treated and sealed water in proper, food-grade containers like a WaterBrick, a quick check every 6 to 12 months is a solid plan. You’re mostly just making sure nothing funky has leached into the water and no bacteria have managed to take hold.
For an active source like a well or a rainwater catchment system, you absolutely need to test at least once a year for bacteria and nitrates. Now, if you’re pulling from something more dynamic like a creek or river, you need to be more vigilant. I’d suggest testing seasonally as a baseline, and always after a major event like a flood, a nearby wildfire, or any suspected chemical spill.
Is a Good Water Filter Enough Without Testing?
Relying on a filter without actually knowing what’s in your water is a huge gamble. I see people make this mistake all the time. A high-end filter is a specialized tool, not a magic wand that solves every problem.
For instance, your typical backpacking filter is a champ at removing bacteria and protozoa, but it’s completely worthless against dissolved chemicals, heavy metals, pesticides, or viruses. Testing is your diagnosis; it tells you exactly which threat you need to fight.
Think of it this way: you wouldn’t take antibiotics for a broken leg. Similarly, you shouldn’t use a microbial filter to fight a chemical threat. Testing first ensures your purification method actually matches the contaminant you’re facing.
What Are the Main Contaminants in a Suburban Emergency?
When a disaster like a hurricane, earthquake, or grid-down event hits a suburban area, the threats to your water supply change dramatically. You’re no longer worried about chronic, long-term exposure. You’re worried about acute, immediate dangers from failing infrastructure.
Here’s what you should be focused on:
- Biological Contaminants: This is threat number one. Broken water mains are a perfect way for raw sewage and contaminated runoff to get into the municipal supply. You have to assume E. coli and other nasty bacteria are present.
- Chlorine Levels: In your tap water, a lack of that faint chlorine smell is a massive red flag. It means the residual disinfectant is gone, and you must treat that water as biologically unsafe until you can purify it yourself.
- Turbidity: If you’re forced to use an alternative local source like a pond or stream, high turbidity (cloudiness) is a major headache. It can clog your filters in a heartbeat and make chemical or UV disinfection far less effective.
Are Expired Water Test Kits Still Accurate?
Absolutely not. Do not trust an expired water test kit, period. It’s a risk that is simply not worth taking. The chemical reagents in test strips and powders break down over time, and that can lead to dangerously wrong results.
The worst-case scenario is a false negative—the expired test tells you your water is safe when it’s actually contaminated. That’s one of the most hazardous mistakes you can make, leading you to drink water loaded with pathogens or chemicals.
Always check the expiration date when you buy a kit. Store them in a cool, dark, and dry place to get the most out of their shelf life, but always, always honor that printed date. I make it a habit to check my preparedness gear annually and rotate out any expired testing supplies. You should too.