
Learning how to preserve food is the cornerstone of self-reliance. It’s the skill that lets you turn a temporary abundance—whether from your garden or a lucky find at the store—into long-term security. You’re essentially taking control of your own food supply by learning how to stop spoilage cold in its tracks.
This isn’t just about making jams and pickles. It’s about knowing you have safe, nutritious food ready to go, no matter what’s happening with the supply chain.
Why Food Preservation Is Your Most Important Skill
Picture this: your local grocery store is shut down for the foreseeable future. A massive storm, a grid-down event, a supply chain collapse—it doesn’t matter why. What’s in your pantry right now?
That uncomfortable question gets to the heart of why this matters. Our modern access to food is far more fragile than most people realize. Food preservation is what turns that vulnerability into a strength. It’s not a quaint hobby; it’s a critical preparedness strategy.
When you know how to preserve food, you have the confidence that you can provide for your family through almost anything. Think about a long-term power outage. That freezer full of meat you worked so hard to fill? It could all be gone in a couple of days. But with the right skills, that same meat can be canned, dehydrated, or cured, making it shelf-stable for years.
The Core Principles of Stopping Spoilage
At its heart, food preservation is just the science of outsmarting the things that make food go bad. Every single technique we’ll cover in this guide is built on a few simple, powerful principles.
- Managing Moisture: Bacteria, yeast, and mold can’t survive without water. That’s the secret behind methods like dehydration and salt-curing—you’re basically creating a desert where microbes can’t grow.
- Controlling Temperature: This is a big one. Extreme cold, like freezing, slows microbial activity to a crawl. On the other end, the intense heat from pressure canning is what destroys the really dangerous stuff, like the bacteria that causes botulism.
- Altering pH Levels: Most bad bacteria hate acid. Pickling and fermenting work by intentionally creating an acidic environment that’s completely inhospitable to the microbes that cause spoilage.
Once you get a handle on these concepts, you shift from being just a consumer to being a producer and a steward of your own food supply. It’s about building a household that can ride out the storm.
Ultimately, learning these skills is a vital piece of a complete preparedness plan. It’s one thing to have a stockpile, but it’s another thing entirely to have the skills to replenish it. Knowing how to preserve food slots perfectly into a broader strategy, which is why we put together a comprehensive emergency preparedness checklist to help you cover all your bases. This is about more than just stocking shelves; it’s about gaining the real-world ability to provide when it counts.
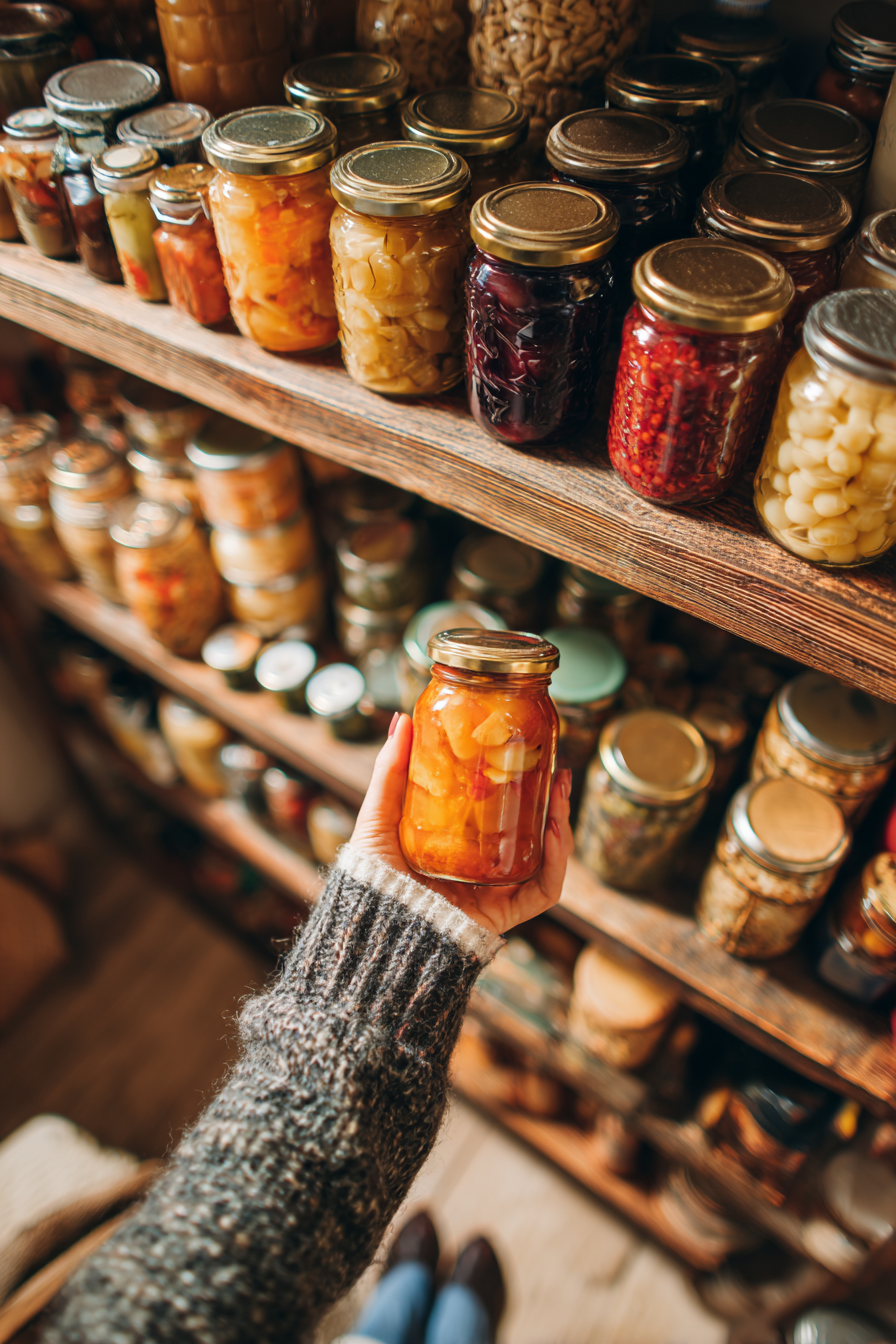
Mastering Canning for Long-Term Food Security
When it comes to building a truly resilient, long-lasting pantry, canning is the gold standard. It’s a time-tested skill that turns fresh produce and meats into shelf-stable assets you can rely on for months, or even years, without a lick of electricity. Learning to can is like building a fortress of food security against supply chain failures and power grid collapse.
When properly canned and stored in ideal conditions, many foods can remain safe and nutritious for decades—some foods can last 25 years or more when you follow the right techniques.
The whole process might seem a bit intimidating at first, but it’s grounded in simple science. You seal food in airtight jars and then heat them to a specific temperature. That heat destroys the microorganisms—bacteria, yeasts, and molds—that make food spoil. As the jar cools, it creates a powerful vacuum seal that locks in flavor and nutrients for the long haul.
This method was born from sheer necessity. It all started back in 1795, when French chef Nicolas Appert won a prize from Napoleon Bonaparte for figuring out how to preserve food for his armies. By sealing food in jars and boiling them, he took shelf life from a few days to a few years. Today, this foundational skill is just as critical, with American households still putting up over 1.5 million jars of food annually. For more on the history of these techniques, you can explore the evolution of food preservation methods.
Water Bath Canning for High-Acid Foods
If you’re just starting out, water bath canning is the perfect entry point. This technique is specifically for high-acid foods. Why does acid matter? Because the acidity itself helps stop the growth of dangerous bacteria like Clostridium botulum, the nasty bug that causes botulism.
Foods that are perfect for a water bath canner include:
- Most fruits: Think peaches, pears, applesauce, and berries. These are the classics for a reason.
- Jams and jellies: The high sugar and acid content makes them prime candidates.
- Pickled vegetables: When you add vinegar (acetic acid), you drop the pH of foods like cucumbers, green beans, and beets, making them safe for this method.
- Tomatoes and salsas: These walk the line, so you must add acid like lemon juice or citric acid to get their pH safely below 4.6.
The process is straightforward: you submerge your sealed jars in boiling water (212°F or 100°C) and hold them there for a specific amount of time. The gear is simple, too. A big stockpot with a rack, some Ball mason jars, lids, and a jar lifter are really all you need to get going.
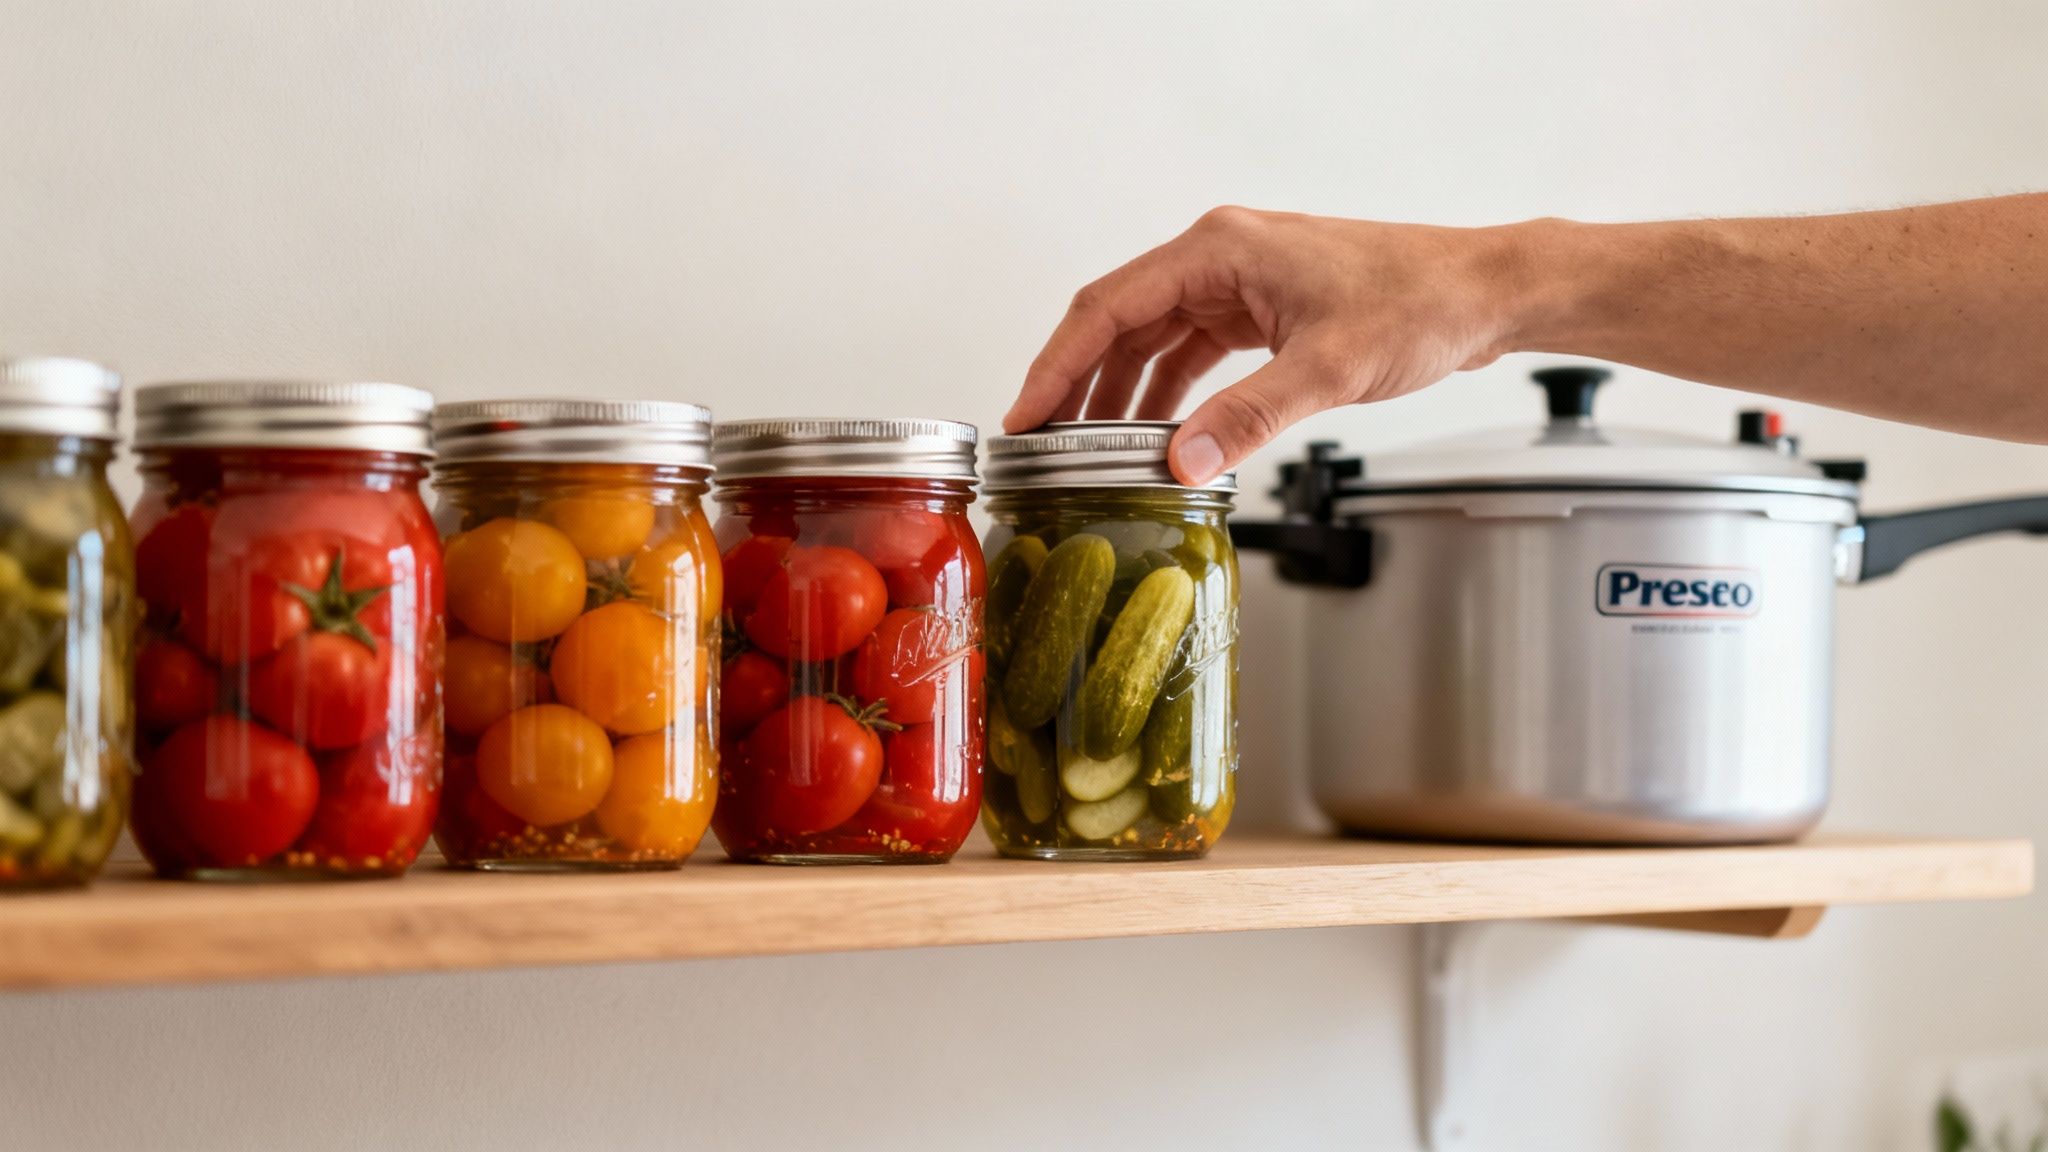
Pressure Canning for Low-Acid Foods
Now, for low-acid foods, you absolutely must use a pressure canner. This is a non-negotiable safety rule. Low-acid foods just don’t have enough natural acidity to prevent botulism spores from thriving, and those spores can easily survive boiling water temperatures.
Key Takeaway: Botulism spores are only killed at temperatures of 240°F (116°C) or higher. A pressure canner is the only piece of home equipment that can safely hit and maintain that heat.
A reliable workhorse like a Presto Pressure Canner or an All American Pressure Canner is one of the best investments any serious prepper can make. It opens up a whole new world of nutrient-dense foods you can safely preserve.
Foods that demand a pressure canner:
- All plain vegetables (carrots, corn, potatoes, green beans)
- All meats, poultry, and fish
- Soups, stews, and chili
- Bone broth
Pressure canning works by trapping steam to build pressure, which in turn raises the temperature inside the canner far above boiling. It’s critical to follow tested recipes from trusted sources like the National Center for Home Food Preservation. These guides give you the exact processing times and pressure settings you need based on the food, jar size, and even your altitude.
Achieving a Perfect and Lasting Seal
The final, crucial step for both methods is making sure you get a proper seal. This is your proof that a vacuum has formed inside the jar. After you pull the jars from the canner and they start to cool, the lid gets sucked downward, often with a satisfying “ping.”
To check the seal, just press the center of the lid once it’s completely cool. If it doesn’t move or make a sound, you’re golden. Any jars that didn’t seal properly are not shelf-stable; just pop them in the fridge and use them up within a few days.
While both canned and freeze-dried foods offer incredible shelf life, mastering canning gives you total control over your ingredients from garden to shelf. You can dig deeper into how they stack up in our guide on canned versus freeze-dried food for your pantry. By understanding the science and sticking to the safety rules, you can turn today’s harvest into tomorrow’s security.
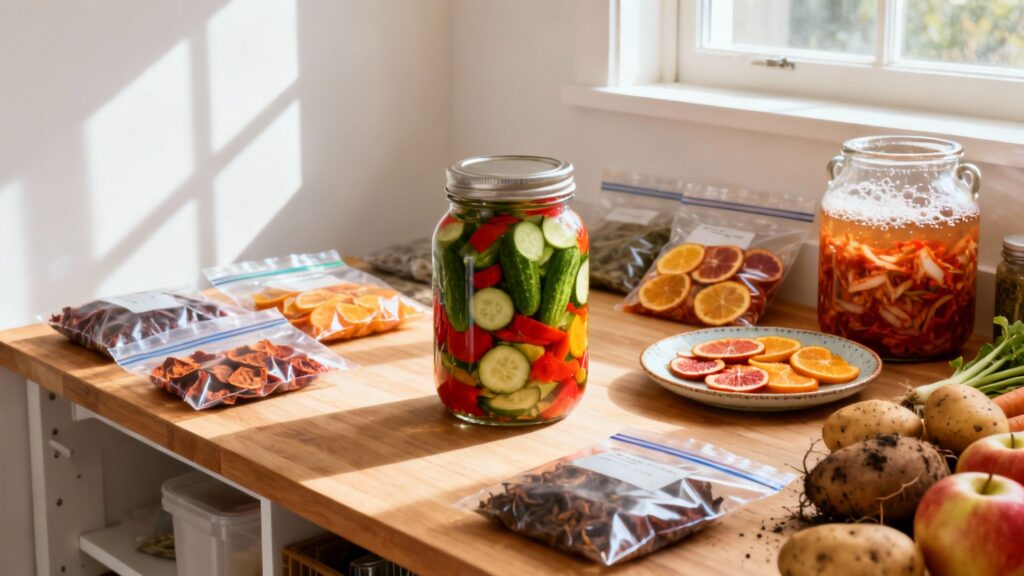
Dehydrating Food for Lightweight Survival Kits
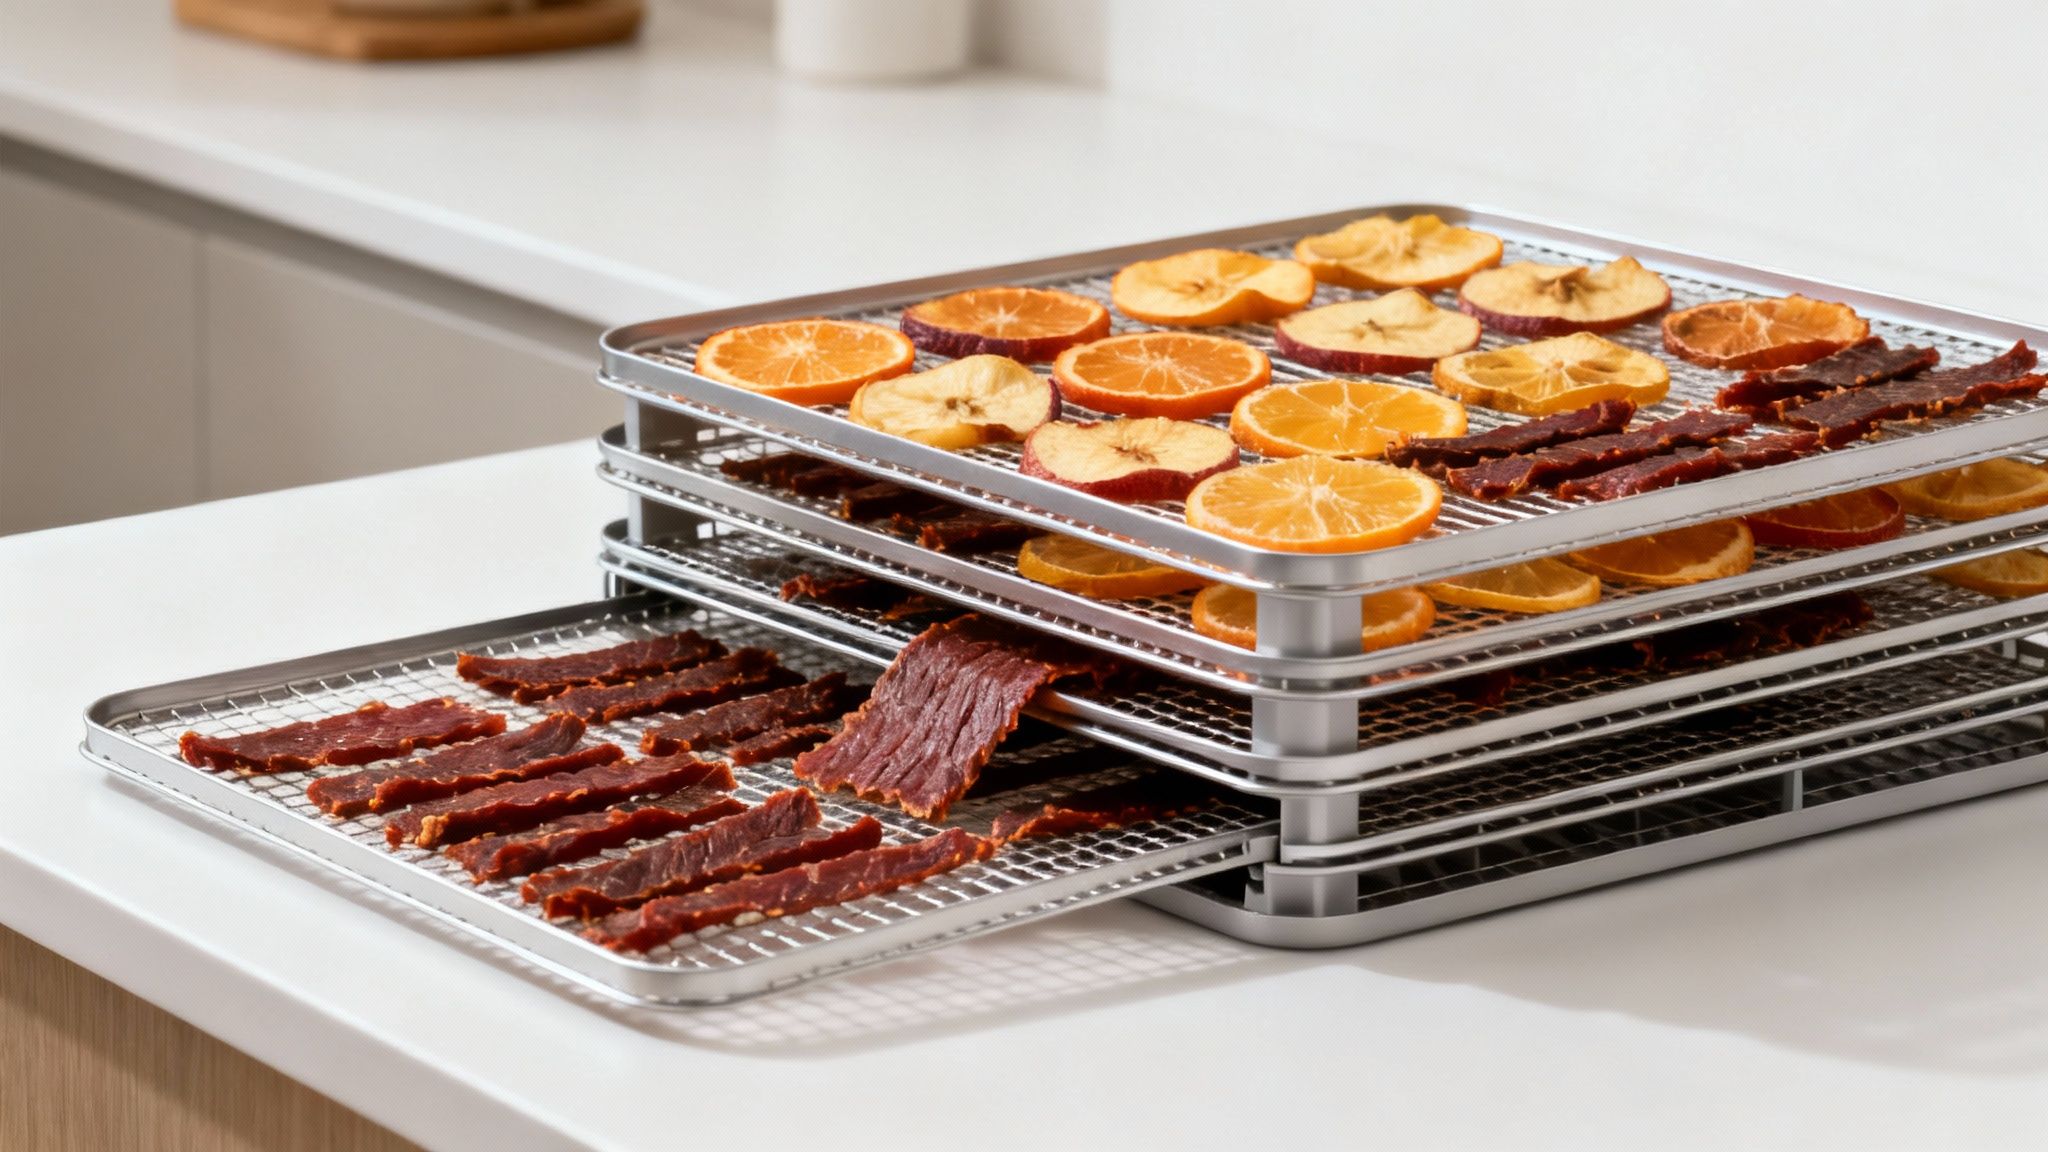
When every ounce in your bug-out bag counts, dehydration is king. By pulling 90-95% of the water out of food, you slash its weight and volume while locking in nutrients. A few pounds of fresh apples shrink into a handful of calorie-dense chips. A hefty cut of beef becomes a few ounces of protein-packed jerky.
This is how you turn bulky, perishable foods into compact, long-lasting fuel perfect for your go-bag or emergency pantry. The science is simple: without moisture, the bacteria and mold that cause spoilage can’t grow. It’s an ancient technique that’s absolutely critical for modern-day preparedness.
People have been drying food for 12,000 years, but the need for stable, portable nutrition has never been greater. The World Food Programme reported that 345 million people faced acute food insecurity in 2023, a stark reminder of how fragile our systems can be. A small bag of jerky can be a lifesaver, packing around 400 calories per 100g. If you’re serious about readiness, this is a skill you need to master. You can read more about the global impact of food security challenges.
Choosing Your Dehydration Method
The right method depends on your gear, climate, and what you’re trying to save. Each approach has its place, especially when you’re thinking about off-grid scenarios.
Electric Dehydrators: This is the most reliable and consistent way to get the job done. A solid unit like the NESCO Gardenmaster Food Dehydrator gives you precise control over heat and airflow, which is non-negotiable for safely drying meat. Other popular models from brands like Excalibur are also excellent for serious home preservation. For a full rundown, check out our guide on choosing the best food dehydrator for your needs.
Oven Drying: No dehydrator? Your oven can work in a pinch. Just set it to the lowest temperature possible (usually 140-170°F or 60-75°C), prop the door open an inch or two so moisture can escape, and arrange your food on the racks. It’s not the most energy-efficient option, but it’s a solid backup.
Sun Drying: This is the ultimate grid-down method, but it demands the right conditions: hot, dry, sunny days with a steady breeze and low humidity. It’s great for high-acid fruits and herbs. I wouldn’t recommend it for meats or most vegetables, though—the risk of bacterial growth is just too high without consistent, intense heat.
Preparing Food for Drying
Good prep is what separates high-quality, long-lasting food from a tough, spoiled mess. Don’t rush this part. Your goal here is consistency, making sure every piece dries at the same rate.
Start by slicing everything into uniform pieces, about 1/4-inch thick. For fruits that brown easily, like apples or pears, give them a quick bath in a solution of lemon juice and water (one part juice to four parts water). This simple step stops oxidation and keeps them looking appetizing.
For most vegetables, you’ll want to blanch them first. This just means boiling them for a minute or two and then plunging them into an ice bath to stop the cooking process. Blanching halts enzymes that would otherwise degrade the flavor, color, and texture over time.
Pro Tip: Making beef jerky? Stick the meat in the freezer for about 30-60 minutes before you start. It firms up just enough to make slicing those thin, even strips a breeze. This one trick makes all the difference in getting that perfect jerky texture.
Achieving the Perfect Texture and Storage
Knowing when your food is done is part science, part feel. You’re looking for a specific texture that tells you enough moisture has been removed for safe storage.
Texture Guide for Dehydrated Foods
| Food Type | Ideal Texture | Signs of Doneness |
|---|---|---|
| Fruits | Leathery and pliable | Should bend without breaking; no visible moisture when torn. |
| Vegetables | Brittle or crispy | Should snap easily; things like corn or peas will be hard. |
| Beef Jerky | Tough but flexible | Should crack but not snap when bent; no soft spots. |
Once your food is fully dried and has cooled to room temperature, it’s time to “condition” it. Put the dried food into an airtight glass jar, filling it about two-thirds of the way. For the next week, give the jar a good shake every day. This helps distribute any tiny bit of remaining moisture evenly. If you see any condensation form inside the jar, it’s a sign your food needs more time in the dehydrator.
When it comes to long-term storage, Mylar bags and oxygen absorbers are your best friends. This combination protects your food from light, moisture, and oxygen—the three things that will ruin it. Stored this way in a cool, dark place, your dehydrated foods will be ready to go for years, providing a lightweight and life-sustaining resource for any emergency.
Using Fermentation for Off-Grid Preservation
While canning and dehydrating are fundamental skills, fermentation is the real game-changer for anyone serious about off-grid food preservation. It’s an ancient method that requires zero electricity, but it does something modern techniques can’t: it actually enhances the nutritional value of your food.
You’re not just stopping spoilage; you’re creating a living pantry teeming with beneficial probiotics. You’re harnessing friendly bacteria to create a powerful, self-preserving ecosystem right in a jar.
The magic behind it is lacto-fermentation. You simply create an oxygen-free environment where naturally occurring Lactobacillus bacteria can thrive. These microbes go to work, consuming the sugars in vegetables and producing lactic acid, a potent natural preservative.
This acid drops the food’s pH below 4.6, making it hostile territory for the harmful bacteria that cause rot. It’s a method so effective that it famously saved Captain Cook’s crew from scurvy in the 1770s, all thanks to the massive Vitamin C content in their barrels of sauerkraut. Today, the global market for food preservatives is projected to hit $3.9 billion by 2028, largely driven by a return to natural methods like this one.
Getting Started with Vegetable Fermentation
The beauty of fermenting vegetables is its simplicity. You don’t need a lab or expensive equipment—just a few basic items to start making gut-healthy staples like sauerkraut, kimchi, and pickles on your countertop.
Essential Gear for Fermentation:
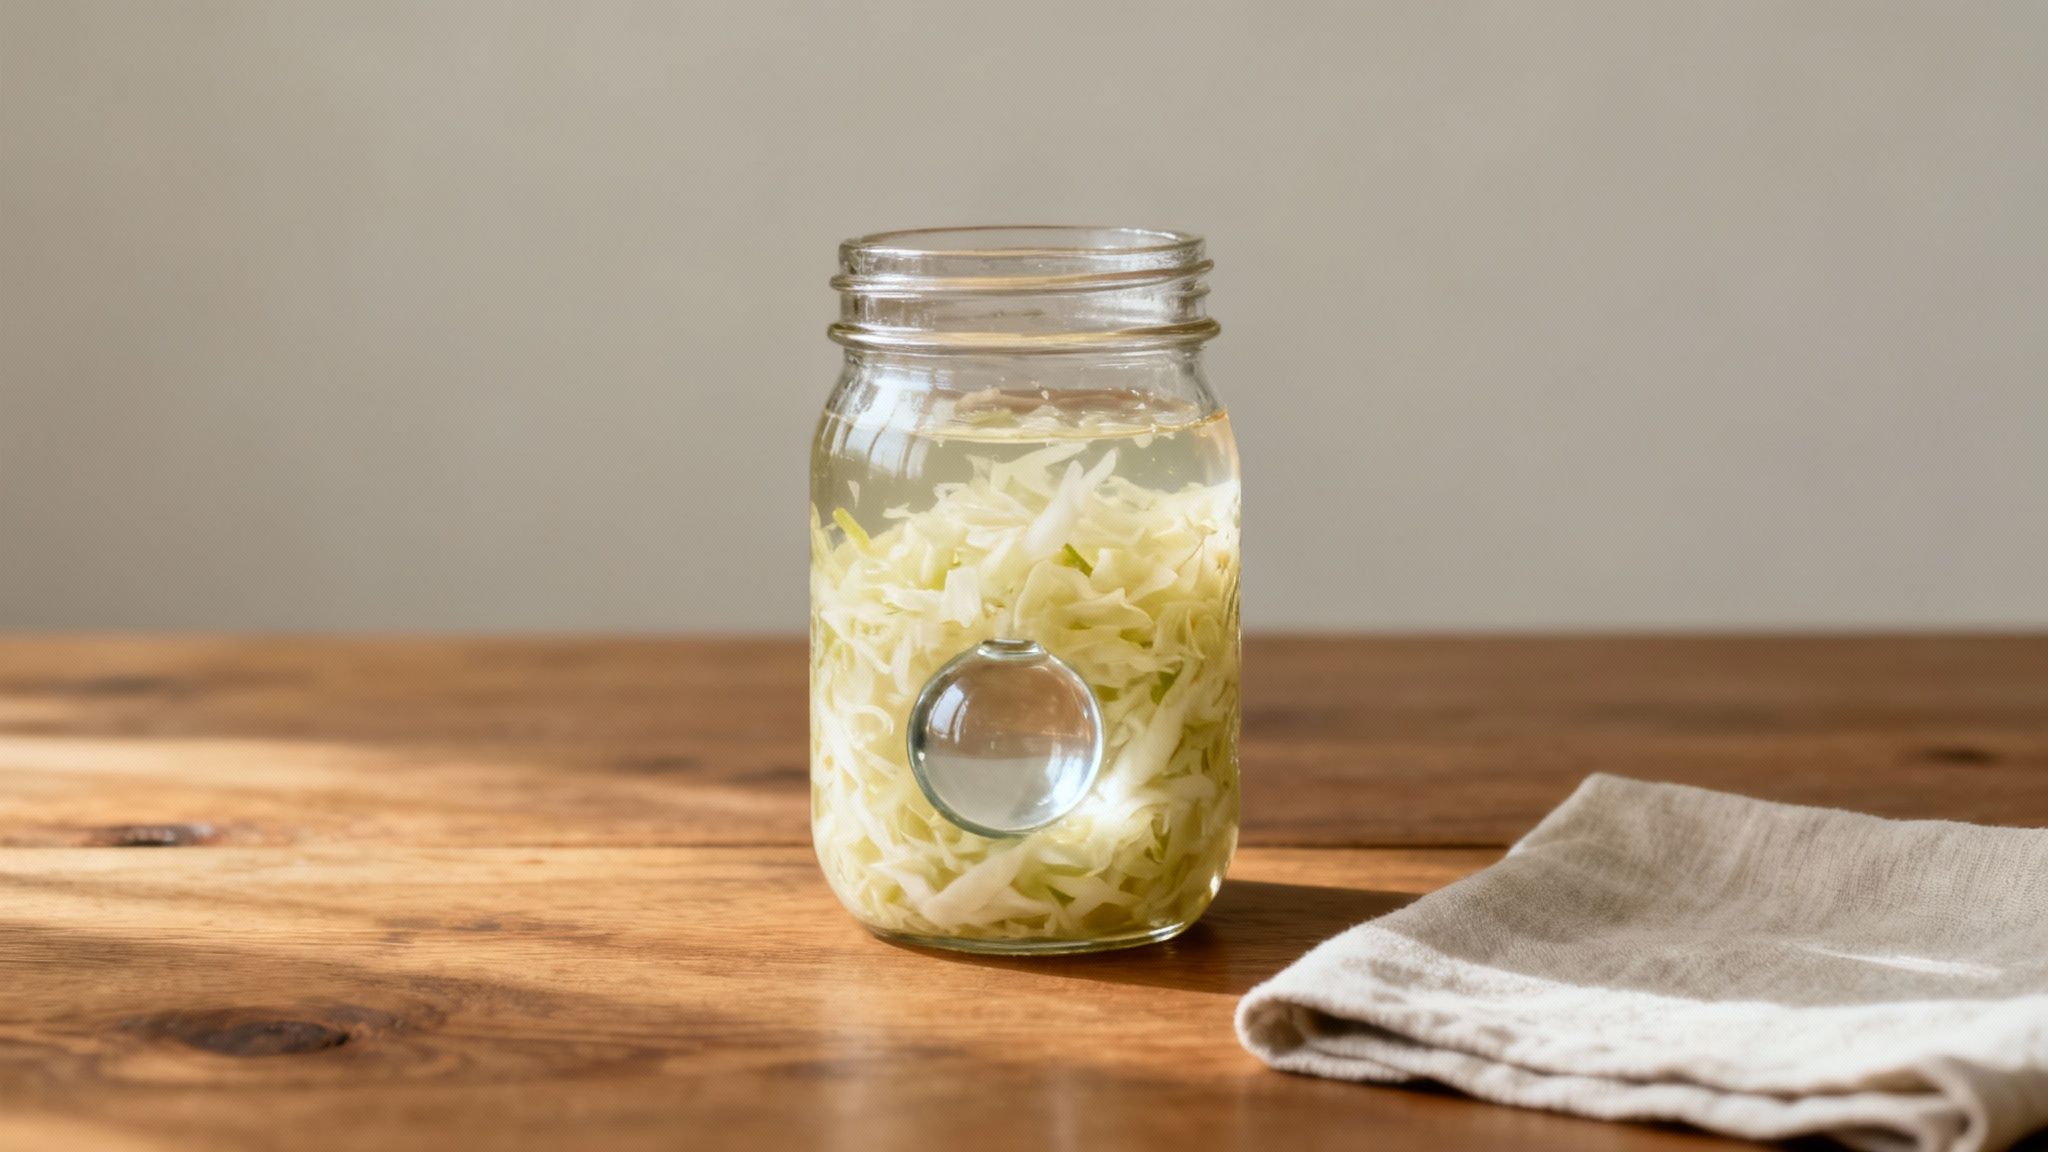
- A Fermentation Vessel: A traditional ceramic crock is great, but a simple wide-mouth mason jar works perfectly fine when you’re starting out.
- An Airlock System: You need to let carbon dioxide escape without letting oxygen in. A specialized lid like a Masontops Pickle Pipe does this automatically, but you can also just “burp” your jars by briefly loosening the lid once a day.
- Fermentation Weights: Glass or ceramic weights are non-negotiable. They keep your vegetables fully submerged under the brine. Anything exposed to air is a potential home for mold.
Once you’ve got your gear, the process is incredibly straightforward. For a classic sauerkraut, you shred cabbage, massage it with non-iodized salt—a good rule of thumb is about 2% salt by weight—and pack it tightly into your jar. The salt draws water out of the cabbage, creating its own brine. Just weigh it down, seal it up, and let nature do the rest.
The Critical Role of Salt and Temperature
Success in fermentation really boils down to two things: getting the salt ratio right and maintaining a stable temperature. Salt isn’t just for flavor. It’s the gatekeeper that slows down bad bacteria, giving the beneficial Lactobacillus a critical head start. Too little salt leads to mushy, spoiled ferments. Too much, and you’ll halt the process entirely.
Temperature, on the other hand, is your throttle.
The sweet spot for most vegetable ferments is between 60°F and 70°F (15°C to 21°C). In this range, the good bacteria work efficiently, developing complex, delicious flavors.
If it gets too warm, things can get soft and overly sour fast. If it’s too cold, the process will be sluggish, and you might not build up enough protective acidity for safe, long-term preservation.
Beyond Vegetables: Salt-Curing Meats
The core principles of fermentation also apply to meat, though the stakes are higher and the process demands meticulous attention to safety. Salt-curing, the foundation of foods like prosciutto and salami, uses a precise combination of salt, curing agents, and controlled drying to make meat shelf-stable.
This method works by drawing out moisture and creating an environment where spoilage bacteria simply cannot survive. For anyone serious about off-grid protein storage, it’s a vital skill to master. We cover the specific techniques and safety protocols you need to know in our detailed guide on how to preserve meat without refrigeration. By mastering both vegetable and meat fermentation, you unlock a powerful, electricity-free way to turn fresh ingredients into long-lasting, nutrient-dense provisions.
Modern Meets Timeless: Freezing, Vacuum Sealing, and Root Cellaring

Once you’ve got the basics of canning and drying down, it’s time to broaden your toolkit. A truly resilient food strategy doesn’t just stick to one method; it blends modern convenience with old-school homesteading smarts. This is where freezing, vacuum sealing, and root cellaring come into play.
These techniques fill the gaps, giving you options whether the grid is up or down. Think of them as the next level in building a pantry that can weather any storm.
Getting the Most Out of Your Freezer
Freezing is probably the easiest way to preserve food, and for good reason—it does an incredible job of locking in that fresh-picked flavor, color, and nutrition. But let’s be honest about its biggest weakness in a preparedness context: it’s completely dependent on power.
If you have a generator or a solid solar backup, a chest freezer can be the heart of your food supply. When packaged right, food quality stays high for months, sometimes even years. The real trick, though, isn’t just tossing things in. It’s the prep work that makes all the difference.
So many people skip blanching, but for most vegetables, it’s non-negotiable. That quick bath in boiling water, followed by a shock in an ice bath, halts the enzymes that would otherwise turn your beautiful green beans into a mushy, flavorless mess in the freezer.
Common Blanching Times for Vegetables
| Vegetable | Blanching Time | Notes |
|---|---|---|
| Green Beans | 3 minutes | Get them into ice water immediately to stop the cooking. |
| Broccoli | 3 minutes | Cut into similar-sized florets so they blanch evenly. |
| Corn (on the cob) | 7-11 minutes | Let it cool completely before you try cutting the kernels off. |
| Carrots | 2-5 minutes | Slice or dice them first. It works much better. |
The Secret Weapon: Vacuum Sealing
Think of a vacuum sealer as a force multiplier for almost every other preservation method. By sucking out nearly all the oxygen, you slam the brakes on oxidation and microbial growth, the two main culprits of food spoilage. It’s an absolute must-have if you’re serious about long-term storage.
When you pair it with freezing, you can pretty much say goodbye to freezer burn. That nasty layer of ice crystals that ruins meat and produce texture? Gone. With a decent machine like a FoodSaver Vacuum Sealer, you can safely extend the freezer life of meats from a few months to 2-3 years.
But don’t stop at the freezer. A vacuum sealer is a game-changer for your dry pantry, too.
- Dehydrated Foods: It keeps your jerky, dried fruit, and veggie chips from going soft or stale.
- Dry Staples: It’s perfect for protecting rice, beans, flour, and pasta from moisture and pests.
- Emergency Kits: You can create waterproof, compact pouches for first-aid supplies, matches, or important papers.
To get the most out of this method and avoid common mistakes, it’s worth understanding the complete process of vacuum seal food storage and how to optimize it for different types of foods. You’re safeguarding your investment of time, money, and hard work. It’s one of the best guarantees that your stored food will be safe and tasty when you finally need it.
The Old Ways: Root Cellaring Principles for Everyone
Root cellaring is the original off-grid preservation. It’s a brilliant, timeless technique that runs on zero electricity—just a little knowledge of how nature works. A proper root cellar creates the ideal environment (cool, dark, and humid) to keep root vegetables, winter squash, and apples fresh for months on end.
Now, you don’t need to excavate your backyard to make this work. Many homes already have a spot that can be turned into a great cool storage area. You’re looking for a place that naturally stays between 32°F and 40°F (0°C to 4°C) and has decent humidity.
Potential Cool Storage Spots in Your Home:
- An unheated corner of the basement, far from the furnace.
- A crawl space that holds a consistent cool temperature.
- An insulated part of a garage or shed (this works best in colder climates).
Before you store anything, though, some crops need to be cured. Curing involves letting produce sit for a short time in a warmer, humid spot to toughen its skin and heal any nicks. This step is critical for potatoes, onions, garlic, and winter squash.
After curing, pack them in crates or bins with good airflow. And remember to keep certain foods separate. Apples, for example, release ethylene gas, which will make your potatoes sprout. By mixing modern tech like vacuum sealers with these ancient methods, you create a layered, robust food system that’s ready for anything.
Building Your Preserved Food Supply Action Plan
Knowing how to preserve food is one thing. Actually doing it is where the real self-reliance begins. It’s time to take all that theory and build a solid, actionable plan to turn your kitchen into a hub of food security.
The biggest mistake people make is trying to do everything at once. Don’t. The goal here is to build skills and confidence, season by season. Pick one method, one type of food, and just see it through from start to finish.
Your Quick-Start Checklist
For your first few projects, you want a quick, tangible win. Start with something that has a low barrier to entry but delivers a big impact on your pantry.
- First Project: Dehydrating Herbs. This is as simple as it gets and requires almost no special gear. Drying a bunch of herbs from your garden—or even the grocery store—is the perfect way to grasp the core principle of moisture removal without getting bogged down in complex safety rules.
- Next Step: Water Bath Canning Jam. There’s nothing like seeing a row of jewel-toned jars of jam on your shelf that you made yourself. A small batch of berry jam is the classic introduction to canning. It teaches you the basics: sanitizing jars, processing, and checking for that satisfying “pop” of a proper seal.
- Graduate to Pickling. Start with a simple batch of refrigerator pickles to get the hang of it, then move on to a canned, shelf-stable version. This reinforces your water bath skills while letting you play with different flavors.
Creating a Seasonal Stocking Plan
A truly resilient pantry isn’t built in a weekend; it’s built over time by working with nature’s rhythm. You have to plan your efforts around the seasons to take advantage of what’s abundant, cheap, and at its peak.
A well-managed pantry isn’t just a collection of jars; it’s a strategic resource. By preserving foods in their peak season, you lock in the best flavor, highest nutritional content, and lowest cost.
Here’s a sample plan to get your wheels turning:
- Spring: This is the time to focus on canning pickled asparagus and dehydrating early greens like kale. Toss the dried kale into soups all winter long. It’s also a great time to experiment with fermenting radishes.
- Summer: Go time. This is peak season for so much. Water bath can your peaches, tomatoes, and berry jams. Break out the pressure canner for green beans and corn. Dehydrate zucchini into chips and make fruit leathers with the kids.
- Fall: Time to preserve the classic autumn harvest. Make and can applesauce, pressure can pumpkin puree, and dehydrate loads of apple slices for snacks. This is also the prime season for root cellaring potatoes, onions, and winter squash.
- Winter: Things slow down outside, but your kitchen can still be busy. Use these colder months to pressure can meats, bone broths, and hearty soups. If you have a cool, controlled space, it’s a good time to try salt-curing meats.
Pantry Management and Rotation
Your job isn’t finished once the jars are lined up on the shelf. If you don’t manage your inventory, all that hard work can go to waste. The golden rule is simple but non-negotiable: First-In, First-Out (FIFO).
Always, always place your newly preserved items at the back of the shelf and pull from the front. A simple label on every single item with the contents and the date it was made is essential. Without it, you’re just guessing.
The best way to rotate your stock is to actually use it. Integrate your preserved foods into your daily cooking. That home-canned tomato sauce for pasta night, those dehydrated veggies tossed into a stew, the fermented pickles with a sandwich. When you treat your pantry as a living, dynamic resource instead of a static museum, rotation happens naturally.
For a deeper dive into organizing your supplies, our guide on long-term food storage offers more advanced strategies. By creating a plan and sticking to it, you transform knowledge into tangible security for your family.