
Insulating your cellar ceiling is a fundamental preparedness project. It’s all about sealing off the joist bays that sit between your home’s main floor and the cellar down below. Taking this one step can dramatically cut down on heat loss, keep your cellar temperatures steady for food storage, and toughen up your home against a brutal cold snap or power outage. Think of it as a cornerstone skill for becoming more self-reliant.
Why Insulating Your Cellar Ceiling Is A Core Preparedness Skill

When you look at it through a prepper’s lens, insulating a cellar ceiling stops being a weekend DIY task and becomes a critical move toward self-sufficiency. An uninsulated cellar is actively working against you. It’s a massive heat sink, constantly pulling warmth down from your living space. During a winter power outage or a fuel shortage, that energy drain is a serious liability.
This project is a game-changer for fortifying your home against blackouts, harsh winters, or supply chain breakdowns—all critical scenarios covered in our guide on how to prepare for natural disasters.
This single project can turn your cellar from a weak point into a strategic asset. By installing a proper thermal barrier, you hit several key preparedness goals all at once.
Fortifying Your Home Against The Cold
The most immediate win is a more resilient home. In a grid-down winter scenario, every single degree of retained heat counts. Good insulation helps your main living area stay warmer for longer, meaning you burn through less of your emergency heat and conserve that precious fuel. It’s like putting a thermal shield on your home’s underbelly. For example, a well-insulated ceiling prevents the pipes running through the floor joists from freezing solid and bursting—a common disaster during a long blackout.
This isn’t just about being comfortable; it’s about making your home defensible against the elements when the conveniences we rely on disappear. A warmer living space means you can take better care of your family and stretch critical resources like firewood or propane.
Creating A Stable Food Pantry
A properly insulated cellar ceiling is also key to maintaining a cool, stable environment below—perfect for storing food long-term. It essentially helps you create a makeshift root cellar, ideal for keeping everything from potatoes and apples to your canned goods. An uninsulated cellar, on the other hand, has wild temperature swings that can speed up spoilage and ruin your food stores right when you need them most.
Combine your temperature-stable cellar with proper vacuum seal food storage techniques to extend the life of your provisions even further and protect against moisture and pests.
Learning how to store food long-term properly in this controlled environment maximizes your pantry’s shelf life and ensures your family’s food security during extended emergencies.
If you’re serious about building a food supply that doesn’t depend on a grocery store, this project is non-negotiable. The whole idea of creating a stable environment is central to the concept of off-grid living, which you can read more about in our detailed guide.
This project is a game-changer for fortifying your home against blackouts, harsh winters, or supply chain breakdowns where heating fuel is suddenly scarce. An uninsulated cellar can easily leak 20-30% of a home’s heat. For families prepping for grid failure, adding R-30 insulation to a cellar ceiling could cut heating costs by 15-25% a year.
If you’re serious about building a food supply that doesn’t depend on a grocery store, stock your insulated cellar with foods that last 25 years to create a truly resilient pantry.
Selecting Insulation That Meets Your Preparedness Goals
Choosing the right insulation for your cellar ceiling is about more than just grabbing the highest R-value off the shelf. For a prepper, the decision involves thinking about DIY-friendliness, moisture resistance, and long-term durability in a grid-down world.
Each material has its place, but one wrong choice could lead to mold, pests, or a failed thermal barrier when you can least afford it.
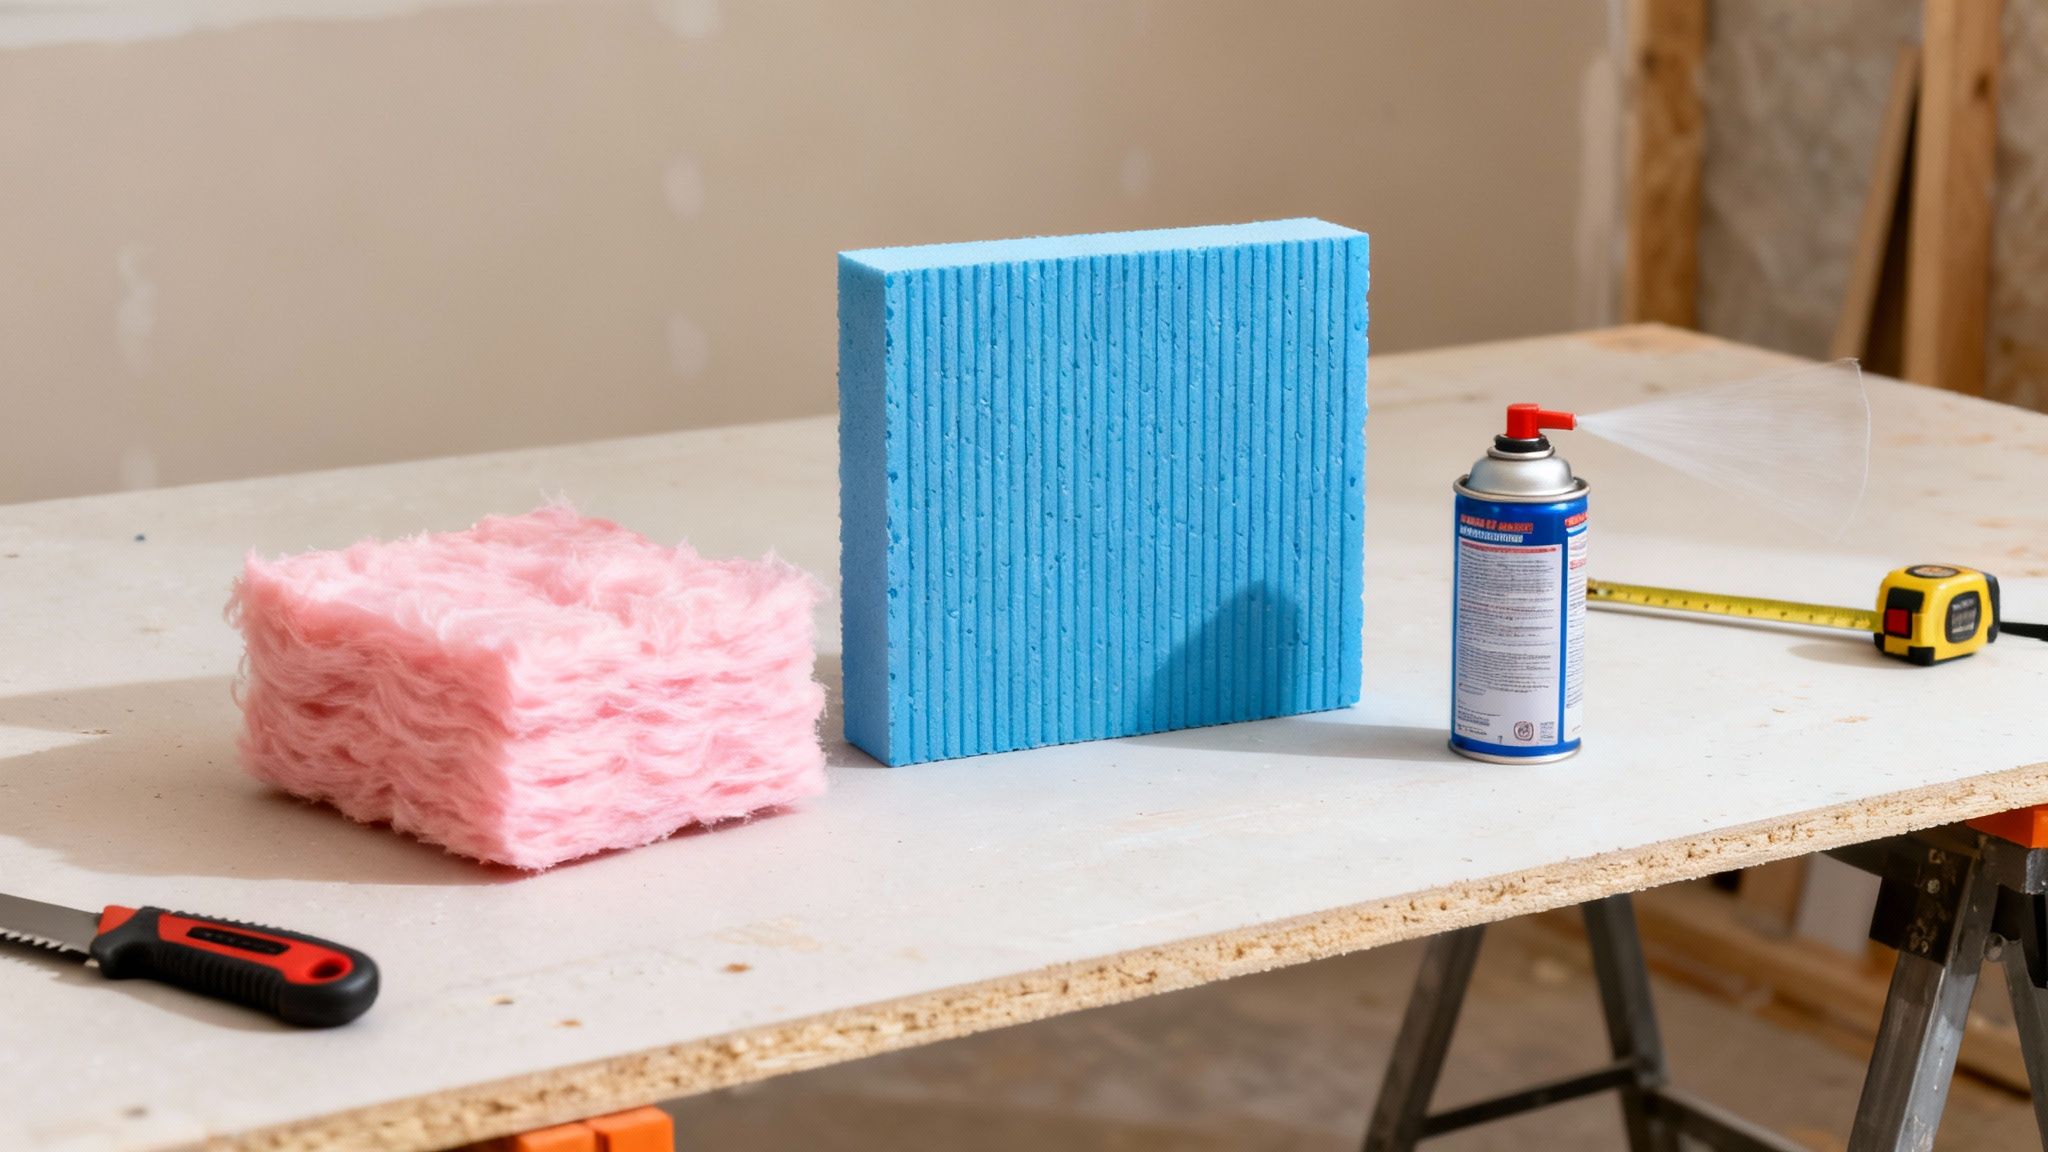
The three main contenders for this project are fiberglass batts, rigid foam board, and spray foam. Each one strikes a different balance between cost, performance, and how hard it is to install. The best pick really depends on your specific cellar conditions and how comfortable you are with a hands-on project.
Rigid Foam Board: The Prepper’s Top Choice
For most cellar projects, rigid foam board is the clear winner. Products like Owens Corning FOAMULAR XPS (extruded polystyrene) give you excellent thermal resistance and—most importantly—are incredibly resistant to moisture. This is a non-negotiable feature for any below-grade space where dampness is a constant enemy.
Unlike other materials, rigid foam doesn’t soak up water, so it won’t turn into a breeding ground for mold or lose its insulating power if the humidity spikes. It’s also a breeze to work with using basic hand tools, making it a perfect DIY project for anyone building out their list of off-grid living essentials.
Fiberglass Batts: The Budget-Friendly Option
Fiberglass batts are what you’ll find in most homes. They’re cheap and easy to find, but they have a major downside for cellar use: they are terrible with moisture. If your cellar has any dampness at all, fiberglass can act like a sponge, leading to mold, rot, and a total loss of its R-value.
That said, in a perfectly dry, well-ventilated cellar, it can still be a decent choice. With an insulated ceiling, your home stays warmer during a blackout while the cellar becomes a natural cool storage space. Fiberglass batts offer an R-value of around R-3.1 per inch and can prevent pipes from freezing, a common problem in uninsulated homes. If you go this route, a vapor barrier is non-negotiable—it can cut moisture penetration by 90% and stop mold before it starts.
Spray Foam: The Professional Seal
Spray foam insulation gives you the highest R-value per inch and creates a perfect, seamless air barrier. It expands to fill every single crack and crevice, making it the absolute best for stopping air leaks.
The big drawback? This is almost always a job for the pros. It requires specialized equipment and training to apply correctly. While the performance is top-tier, relying on outside help and facing a higher cost can be a deal-breaker for preppers who value self-sufficiency. It’s an excellent solution, but not one you can easily do yourself during a crisis.
When deciding on the best material for your cellar, it helps to see a side-by-side comparison.
Insulation Material Comparison for Cellar Ceilings
| Material Type | Average R-Value/Inch | Moisture Resistance | DIY Friendliness | Best For |
|---|---|---|---|---|
| Rigid Foam Board (XPS) | R-5.0 | Excellent | High | DIYers in damp or humid cellars needing a durable, long-term solution. |
| Fiberglass Batts | R-3.1 – R-3.7 | Poor | High | Budget-conscious projects in perfectly dry, well-ventilated cellars. |
| Spray Foam (Closed-Cell) | R-6.0 – R-7.0 | Excellent | Low (Pro Install) | Achieving the highest R-value and a perfect air seal, especially in complex spaces. |
Each option has its strengths, but for the self-reliant individual, the choice becomes clear.
For the prepared individual, the best choice is often the one you can install, repair, and rely on with your own two hands. Rigid foam’s combination of performance, durability, and DIY-friendliness makes it the clear winner for most cellar insulation projects.
Gathering Your Essential Tools And Supplies

Before you even think about cutting the first piece of insulation, you need to get your gear in order. Success in any project, especially one with preparedness in mind, hinges on having the right tools ready to go.
Think of it this way: a trip to the hardware store mid-job kills your momentum and wastes valuable time. You can’t afford that. For any prepper, reliability is everything. While power tools are great for speed, always have a manual backup. Your cordless drill is handy, sure, but a solid screwdriver set won’t ever run out of juice. A razor-sharp utility knife and a decent handsaw are non-negotiable for trimming insulation and getting into those awkward corners.
Personal Protective Equipment (PPE)
Your safety comes first, period. You’ll be working overhead, kicking up dust and dealing with materials you don’t want in your lungs or eyes. Don’t skimp here—your long-term health is worth way more than the few bucks you might save.
- Respirator: A cheap paper mask isn’t going to cut it. Get a quality 3M Respirator with P100 cartridges. This will protect you from fiberglass particles, foam dust, and any mold spores you might disturb along the way.
- Eye Protection: Stuff falling from the ceiling is a real hazard. A good pair of wrap-around safety glasses or goggles that don’t fog up is essential.
- Gloves: A pair of tough work gloves will save your hands from cuts, scrapes, and the itchy irritation that comes from handling most insulation materials.
Having the right protective gear is a fundamental part of being prepared. You can find more details on must-have items in our comprehensive survival gear list.
Core Tools And Materials
With your safety sorted, let’s get to the tools of the trade. This list covers the essentials for installing rigid foam board, which is the go-to method for most DIY cellar jobs.
You’ll need a trusty tape measure, a T-square or another long straight edge for guiding your cuts, and a caulking gun. For materials, you’ll obviously need your insulation boards and a construction adhesive that’s specifically made for foam—check the label to be sure.
Pro Tip: Grab several cans of an expanding foam sealant like Great Stuff Gaps & Cracks. This is your secret weapon. You’ll use it to fill gaps around pipes and wires and to create a perfect, airtight seal around the edge of every single foam board you install.
Finally, don’t forget the specialized foil tape. You’ll use this to seal the seams between each board, turning individual panels into one continuous vapor and air barrier. Getting all this laid out before you start is the key to a smooth, efficient job that you only have to do once.
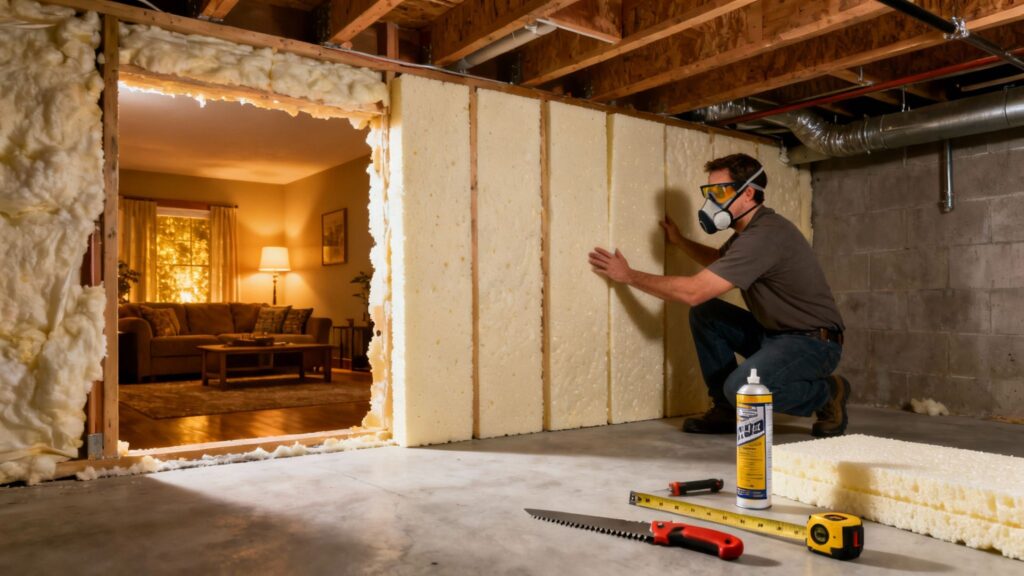
Your Guide To Installing Rigid Foam Insulation
Alright, this is where the theory ends and the real work begins. For most cellar ceilings, installing rigid foam board is the best route for a DIYer. It gives you the highest performance for your effort and is a project that builds practical, hands-on skills.
We’re getting into the actionable steps now. This isn’t just about sticking some foam to the ceiling. It’s about creating a tough, airtight barrier that will pay off for years to come, especially when the grid is down.
Measuring and Cutting Boards for a Perfect Fit
A snug fit is everything. If your boards are loose, you create air gaps that let cold air right past your insulation, making all your hard work pointless. The goal here is precision.
Start by measuring the space between your floor joists. Do it in a few different spots along the length of the bay—old houses settle, and lumber is rarely perfectly straight. Take your narrowest measurement and subtract about 1/4 inch. That little bit of wiggle room is just enough to get the board into place without a fight. You’ll seal that tiny gap later.
When it’s time to cut, forget the utility knife. A long, serrated blade, like an old bread knife you’ve retired to the workshop, works wonders. It gives you a much cleaner edge and kicks up less dust. Use a T-square to guide your cuts and keep them perfectly square.
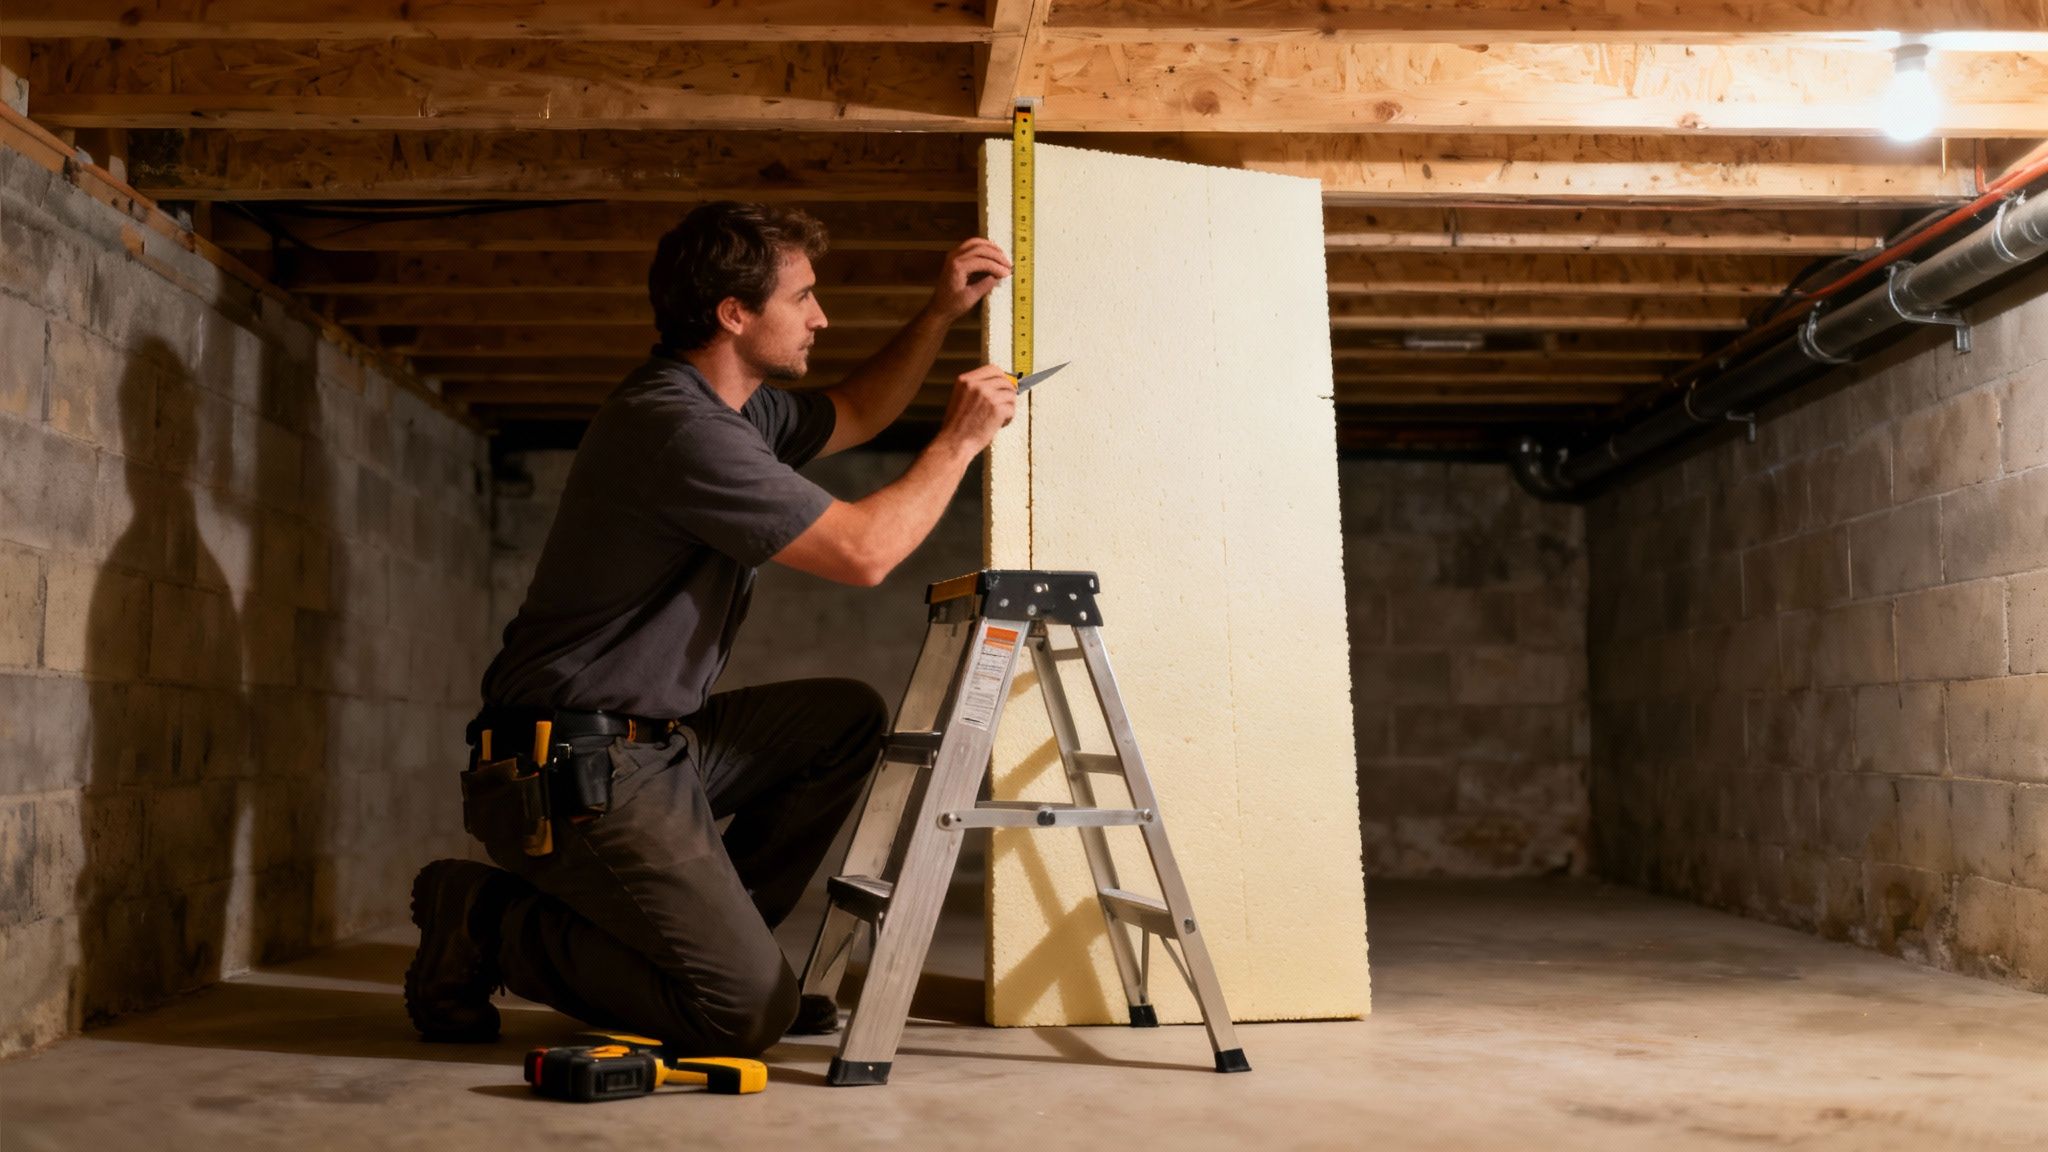
Air Sealing the Critical Rim Joist Area
Before you even think about the main ceiling, you have to tackle the rim joist. This is the piece of wood sitting on top of your foundation wall where all the floor joists end. It is one of the single biggest culprits for heat loss in any home.
Here’s how to seal it right:
- Cut to Fit: Measure the rim joist area in each joist bay and cut a piece of rigid foam that fits snugly inside.
- Adhesive and Sealant: Run a bead of foam-safe construction adhesive on the back of your foam piece. Press it firmly against the rim joist.
- Seal the Edges: Grab a can of expanding foam sealant like Great Stuff Gaps & Cracks. Spray a solid, continuous bead around all four edges where the foam meets the wood. This creates a permanent, airtight seal that stops drafts dead.
This step is non-negotiable. Sealing the rim joist is just as important as insulating the rest of the ceiling. Skipping it is like leaving a window wide open in winter.
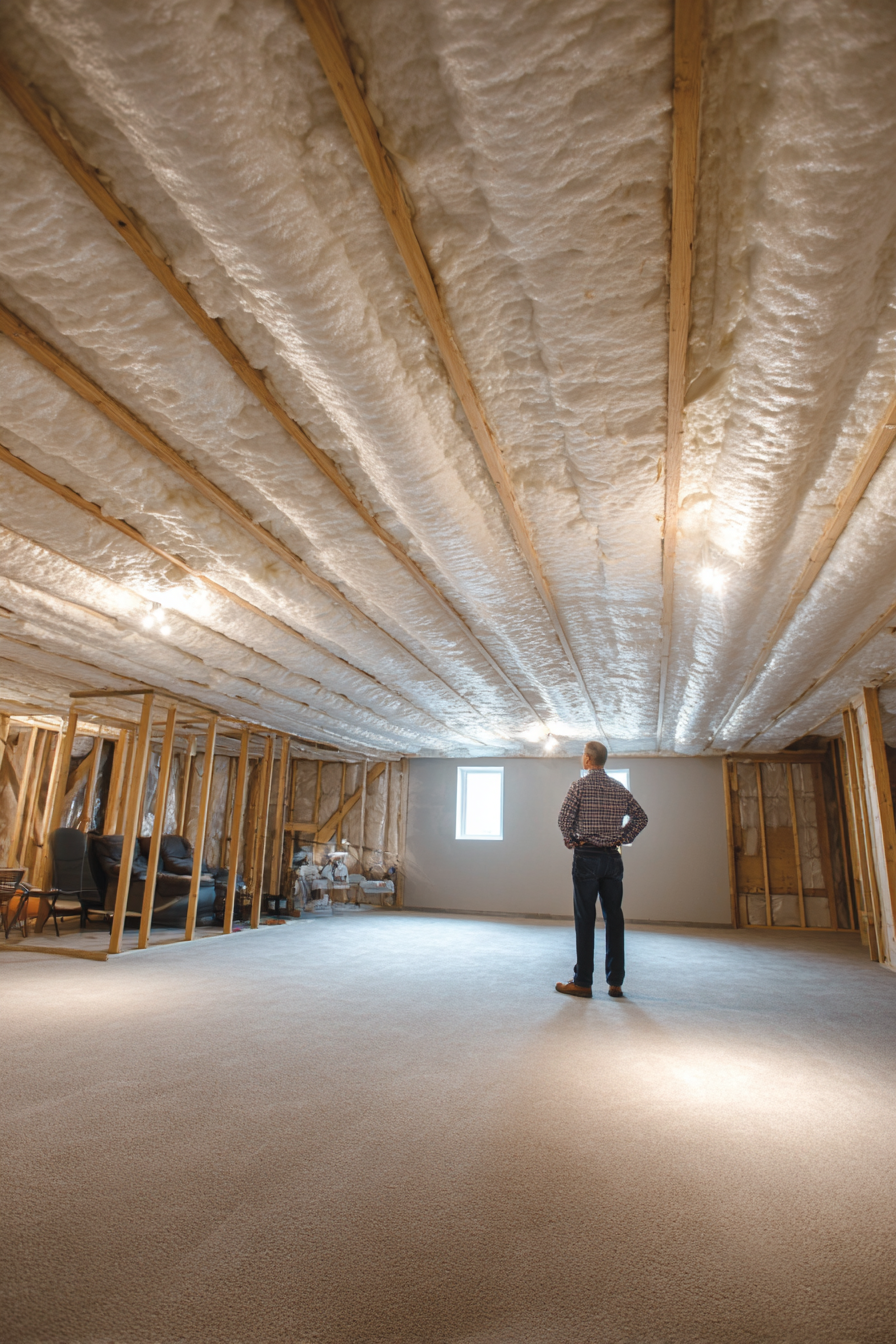
Securing the Insulation and Finishing the Job
With the rim joists sealed up tight, you can move on to the main event: installing the panels between the joists. The process is simple, but your attention to detail matters. Apply a generous S-shaped bead of foam-safe construction adhesive to the back of each board you’ve cut.
Gently press the board up into the joist bay, making sure it sits flush against the subfloor above. The adhesive does the heavy lifting, holding it in place. If you run into pipes or wiring, use the “cut and cobble” method. Just cut the foam board into smaller chunks to fit tightly around any obstacles, then hit every single seam and gap with expanding foam.
A proper installation makes your cellar the perfect environment for keeping provisions long-term. If you want to learn more, check out our guide on the principles of underground food storage.
Once every board is in place, the final move is to tape all the seams. Get a roll of high-quality foil tape made for foam board insulation. Run it along every joint where two boards meet, pressing it down firmly. This last step turns all your individual pieces into one continuous, monolithic barrier, fully sealed against both air leaks and moisture.
Controlling Moisture And Airflow In Your Cellar
Even the most meticulous insulation job is doomed to fail if you don’t get a handle on moisture and airflow. Trapping dampness behind brand-new insulation is a surefire recipe for disaster. You’re essentially creating a five-star resort for mold and rot, which can ruin your supplies and even eat away at your home’s structural integrity.
Getting these two elements right is what separates a successful project from a costly, gut-wrenching mistake. It’s a fundamental principle for anyone serious about creating a stable, long-term asset—just as critical as the detailed planning you’d undertake when learning how to build a fallout shelter.
The Role Of Vapor Barriers
A vapor barrier, sometimes called a vapor retarder, is a material specifically designed to stop moisture from migrating through your insulation. For a lot of applications, especially when you’re using classic fiberglass batts, this means installing a separate layer of plastic sheeting.
But this is where rigid foam insulation really pulls ahead of the pack. Closed-cell extruded polystyrene (XPS) foam is built to resist moisture penetration. This means the foam board is the vapor barrier, knocking out an extra step and removing another potential point of failure. It streamlines the whole installation and gives you a much more robust, integrated system.
When you choose a material like rigid foam, you’re not just insulating; you’re also installing your moisture defense at the same time. This two-in-one function is a significant advantage in any below-grade space.
Hunting Down and Sealing Air Leaks
Before you even think about cutting your first piece of insulation, you need to put on your detective hat. Your mission is to track down and seal every single air leak in that cellar. Even tiny, seemingly insignificant cracks can let in a surprising amount of cold, damp air, completely undermining all your hard work.
Start your hunt by zeroing in on these usual suspects:
- Foundation Sill Plate: This is where the wood frame of your house sits on top of the concrete foundation. It’s a notorious hotspot for air leaks.
- Pipe and Wire Penetrations: Take a close look wherever plumbing, electrical wires, or dryer vents punch through the foundation walls. Gaps here are practically a guarantee.
- Windows and Vents: Check the frames of any cellar windows and the seals around ventilation ducts. Old seals are often cracked and leaky.
To plug these gaps, grab a can of quality expanding foam sealant. For bigger openings, you might need to combine the foam with custom-cut pieces of rigid board. If you’ve got fine cracks in the concrete itself, a specialized masonry caulk is the right tool for the job.
Sealing these leaks before you insulate isn’t just a suggestion—it’s non-negotiable. This is how you achieve a truly airtight and efficient thermal envelope, ensuring your cellar remains a dry, secure, and valuable part of your preparedness strategy.
Your Questions Answered: Cellar Insulation FAQ
When you’re taking on a project like insulating your cellar ceiling, questions are bound to pop up. Getting straight, practical answers is the key to making sure your hard work actually pays off, especially when you’re focused on building a more resilient, self-sufficient home.
Do I Need to Insulate the Cellar Walls Too?
Short answer: eventually, yes. Your top priority should always be the ceiling, since that’s where most of the heat from your main living area escapes. Think of it as putting a warm hat on your house.
Once that’s done, insulating the walls is a smart next step, especially if you plan to use the cellar for long-term food storage or as a fallback shelter. You can tackle the walls later with rigid foam—it’s a great DIY project. Just remember that the rim joist, that little band of wood between the top of the foundation and the floor joists, should absolutely be insulated at the same time as the ceiling. No excuses on that one.
What’s the Best R-Value for a Cellar Ceiling?
You’ll want to aim for an R-value between R-19 and R-30, depending on your climate zone. For most folks in the U.S., that’s the sweet spot.
But as someone focused on preparedness, I’d strongly suggest pushing for the higher end of that range, closer to R-30. That extra insulation gives you a much better defense against brutal cold snaps and goes a long way toward energy independence. You can hit that R-30 target with about five to six inches of rigid foam board. Having a good multi-tool, like a Leatherman, on hand is a lifesaver for making those small, precise cuts you’ll need around pipes and wiring for a perfect fit.
Here’s a critical piece of advice: a complete air seal is just as important as the R-value. A drafty installation will make even the thickest insulation worthless. Sealing every single gap and seam with canned foam and quality tape isn’t optional—it’s essential.
Can I Use Leftover Batt Insulation From an Attic Project?
I know it’s tempting to be resourceful and use what you have on hand—that’s the prepper mindset, after all. But using standard fiberglass batts in a cellar is playing with fire.
Those fluffy batts act like a sponge for moisture, and a damp cellar is their worst enemy. Before you know it, you’ll have a serious mold problem, rot setting into your floor joists, and insulation that’s doing absolutely nothing.
If your cellar is bone-dry (and you’re absolutely sure of it), you could use them, but make sure the paper or foil facing is installed pointing up toward the heated living space above. Honestly, though, for almost any below-grade project, your best bet is to invest in moisture-resistant rigid foam board. It’s a safer, more durable, and far more resilient long-term strategy for your home.